Adding SureCart to your eCommerce website is a wise choice!
SureCart is user-friendly, fully customizable, and loaded with powerful features. It’s the most innovative eCommerce solution you’ll ever need.
Whether you’re setting up SureCart for the first time or optimizing your existing store, we’re here to help.
This tutorial will give you all the information you need to ensure you get the very best out of SureCart.
Before we proceed, you may ask: Does SureCart work best with any specific theme?
Let’s answer that first.
Which WordPress theme works best with SureCart?
Honestly speaking, any theme works well with SureCart!
Because SureCart is such a flexible eCommerce plugin, you can use it with any theme or any page builder that you like.
That’s why it’s such a great choice if you’re looking for a flexible eCommerce plugin.

For this tutorial, we have selected Astra as our theme of choice, for:
- Giving us complete control over every aspect of our website
- Being built to prioritize performance, customization and user friendliness
- Being a multipurpose theme that comes with over 240 predesigned Starter Templates, including plenty of choices for eCommerce
To bring your creativity to life, you can also use the free Spectra page builder to make your website even more unique.
Using these tools, you will be able to use SureCart to its full potential and customize your eCommerce store the way you want.
We recommend installing the Astra theme before continuing with this guide.
Once you’re done, let’s install SureCart.
Choose a SureCart plan, even the free one works!
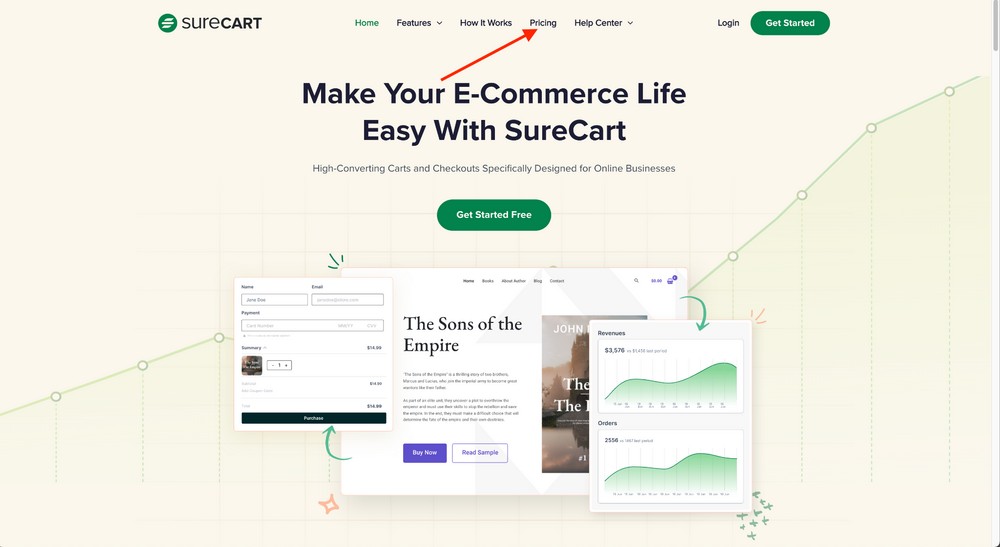
From the SureCart homepage, click on the Pricing page to see available plans.
Choose the plan that suits your needs. If you aren’t sure, the free plan will get you started.
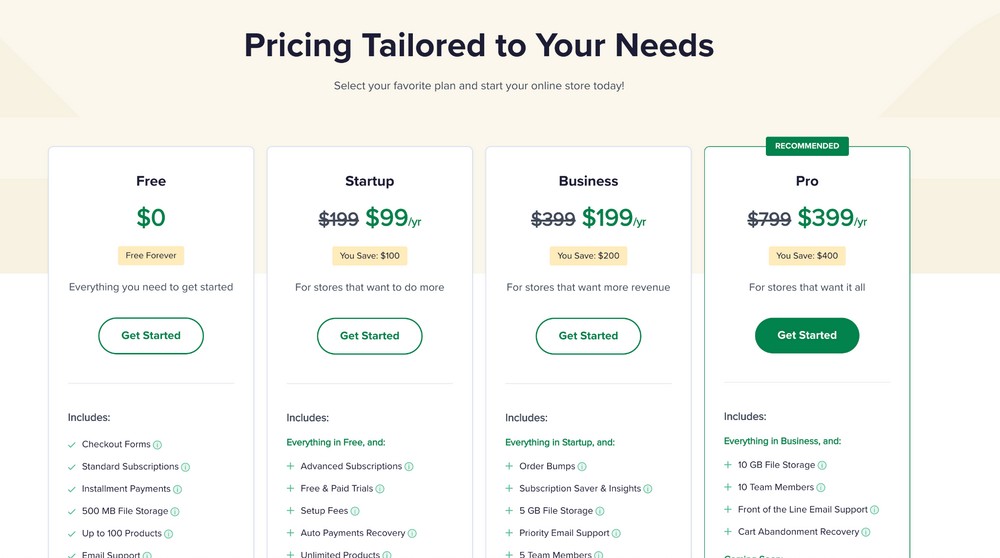
Two ways to install SureCart
You can install SureCart in two ways: from the WordPress repository and from the Astra dashboard.
Install SureCart from the WordPress repository
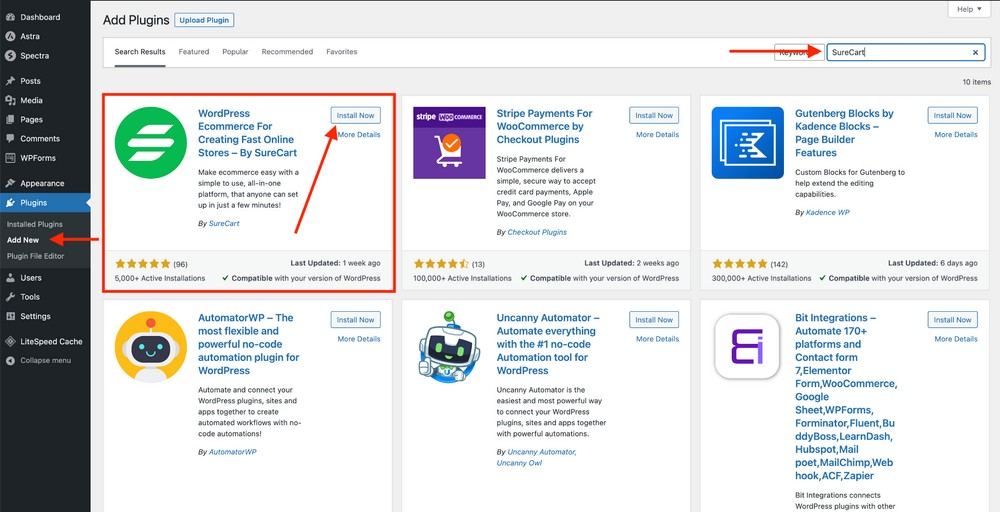
To install it from the WordPress repository, go to Plugins > Add New and search for SureCart.
Install and Activate the plugin.
Install SureCart from the Astra dashboard
This approach is pretty straight forward if you already have Astra installed on your website.
Go to Astra > Dashboard, find SureCart under the Useful Plugins section and click on the Install link.
The plugin will be installed and activated in one go.
Understand how SureCart works
The SureCart plugin interface and SureCart server are two sides of the same coin.
This cloud-based solution creates your store on its server. You’ll perform all your eCommerce activities on your website as you usually would, it’s just securely hosted elsewhere.
The SureCart server uses a secure API to connect to your site to make everything work.
Your data is kept secure at all times through this connection.
When you create a product, SureCart saves it to its cloud server. It shows the product on your store as usual, but the cloud server does all the heavy lifting so your web host doesn’t have to.
It’s a useful strategy and keeps your website lean and fast.
Whether you add products, manage customers, or create checkout forms, everything is stored on SureCart’s servers.
The performance benefits of this approach are immense, which we will discuss later in the article.
For now, let’s familiarize ourselves with how the SureCart plugin interface and server page should appear.
Once the plugin has been configured, the SureCart interface will show menu items for everything you need to run your store.
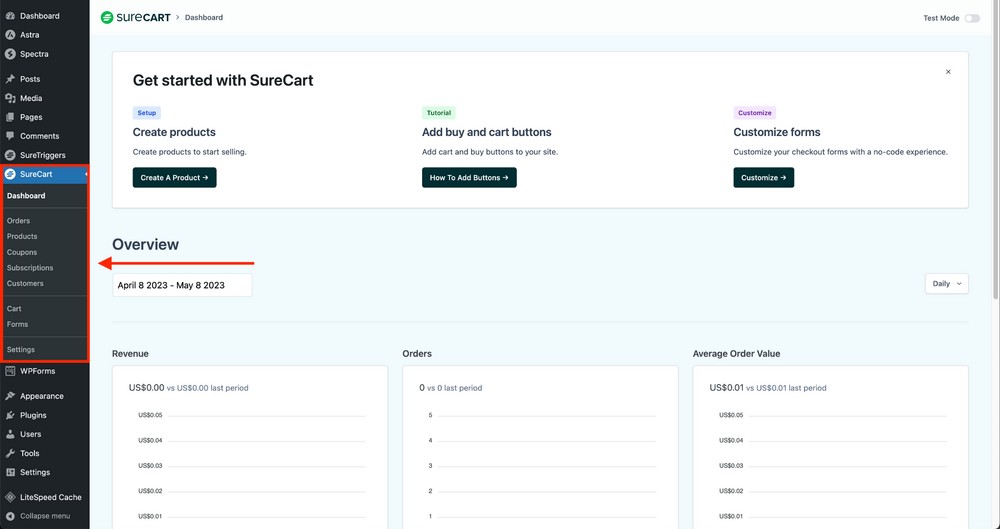
SureCart’s server page is very user friendly which you may need to access for more admin related tasks.
You can access it from within the plugin interface or using the URL https://app.surecart.com.
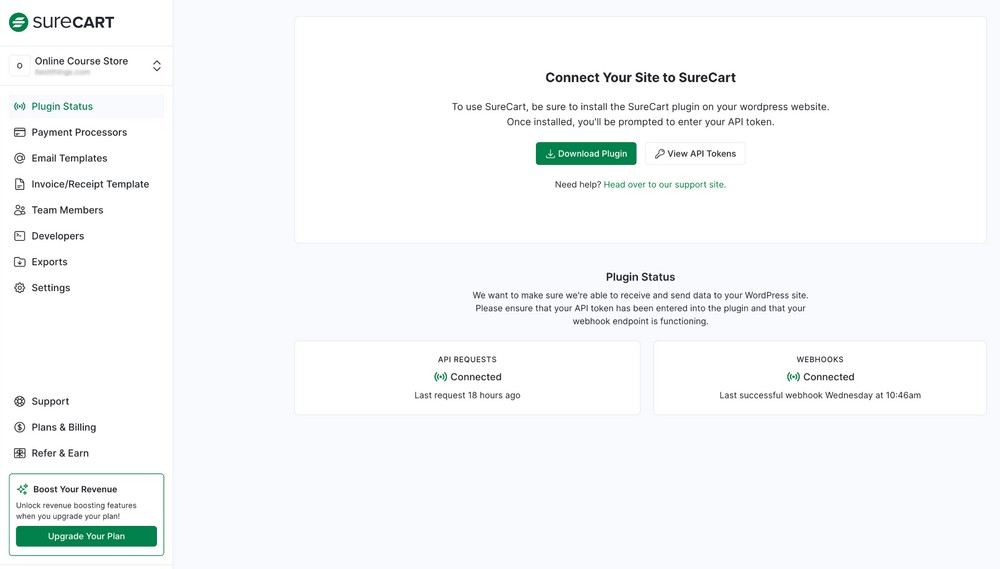
SureCart can be configured from both sides so you have full control over everything.
1. Configure SureCart with the WordPress wizard
You can easily configure SureCart without technical knowledge. The setup wizard guides you through the entire process in four simple steps:
- Sign up with SureCart
- Set up your online store
- Connect with payment processors
- Connect the SureCart server to your WordPress website
When you install SureCart from the WordPress repository, it creates two menu items in the WordPress admin sidebar, Get Started and Settings.
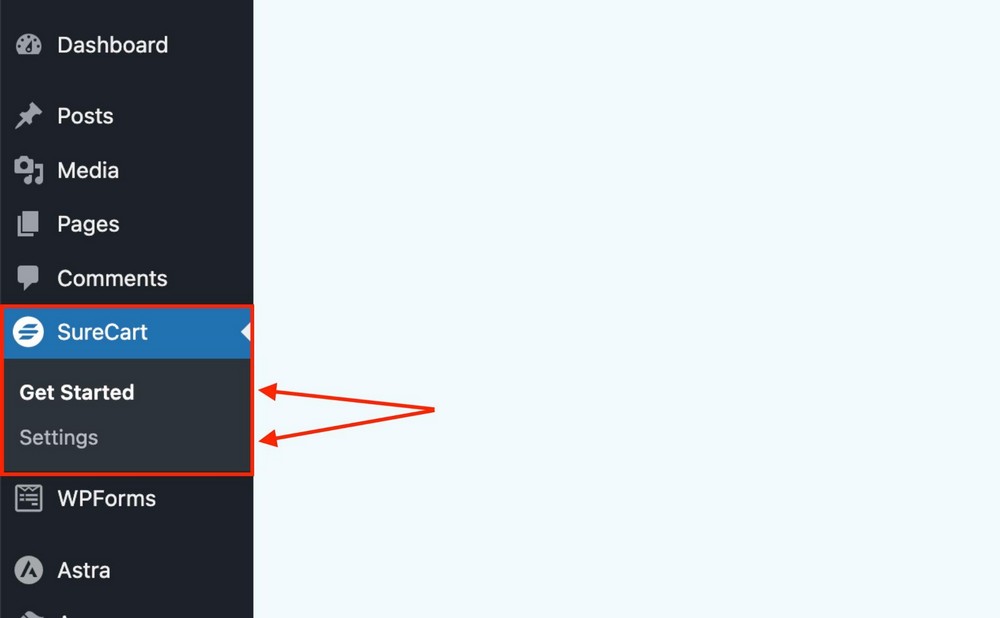
Click Get Started to launch the setup wizard.
Alternatively, when you install SureCart via the Astra dashboard, the setup wizard will launch automatically after the plugin has been installed and activated.
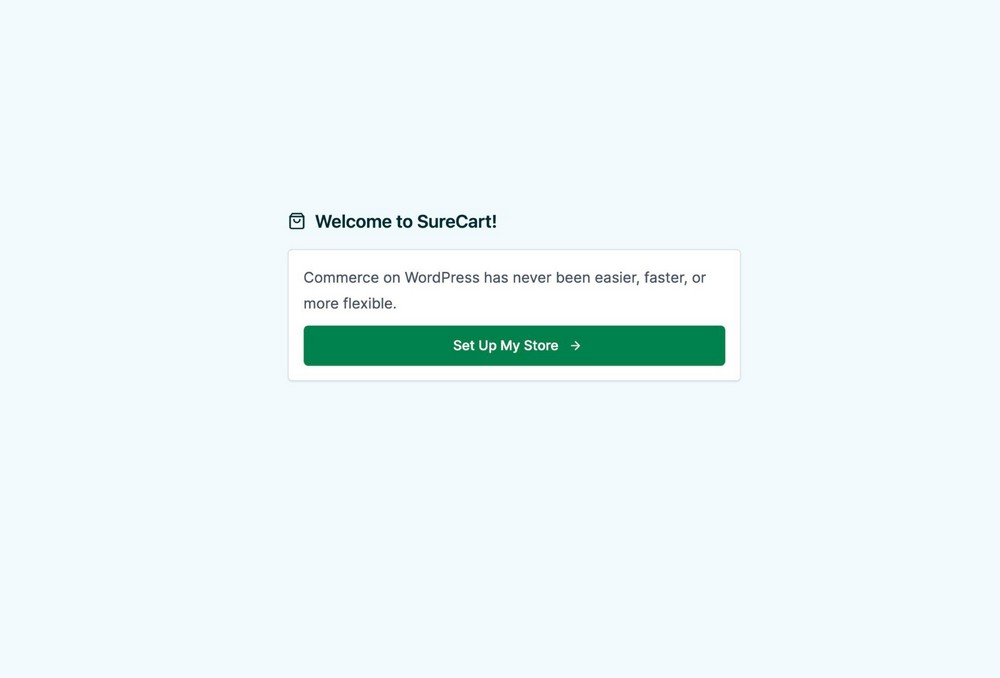
Whichever method you choose, the wizard starts with a welcome message, “Welcome to SureCart”.
Sign up with SureCart
In this step, SureCart creates an account on its server which is essential to make sure everything works.
As mentioned earlier, the wizard starts with a welcome screen that also shows the Set Up My Store button. Press it to continue.
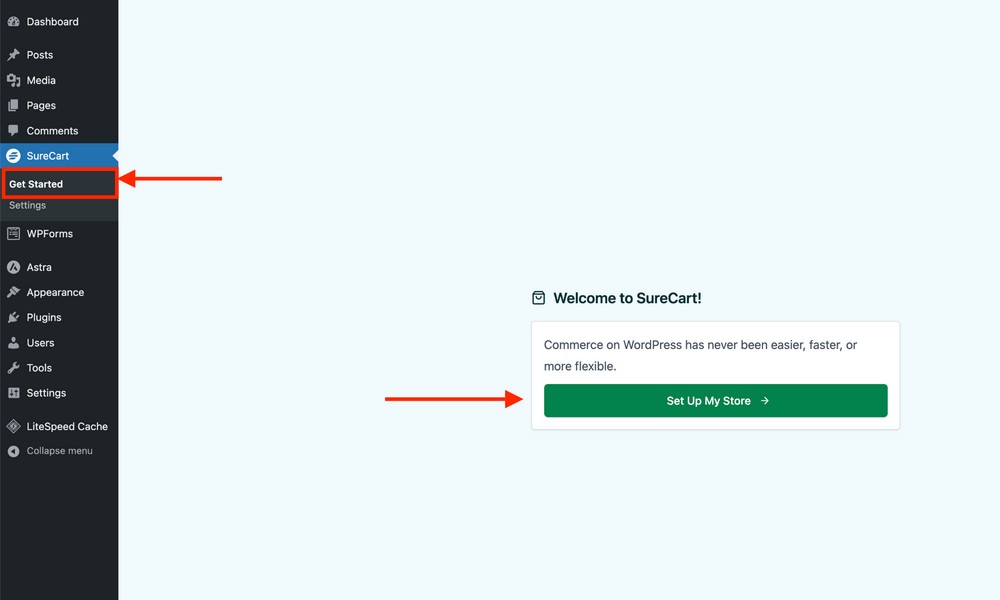
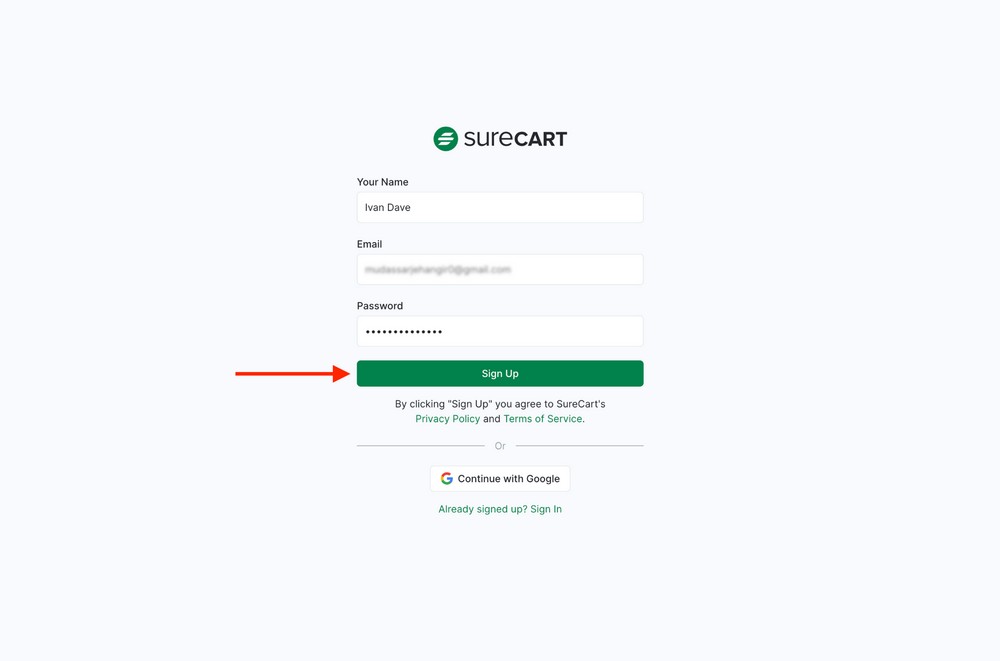
The next screen shows a sign-up form. Enter your information and press the Sign Up button.
If you haven’t purchased a SureCart subscription yet, the next screen will show you a variety of plans. Choose the one that suits your needs if you haven’t already.
As mentioned before, if you are unsure which plan is best for you at the moment, you can choose the free plan.
This is done by clicking the Select Plan button under the Free column.
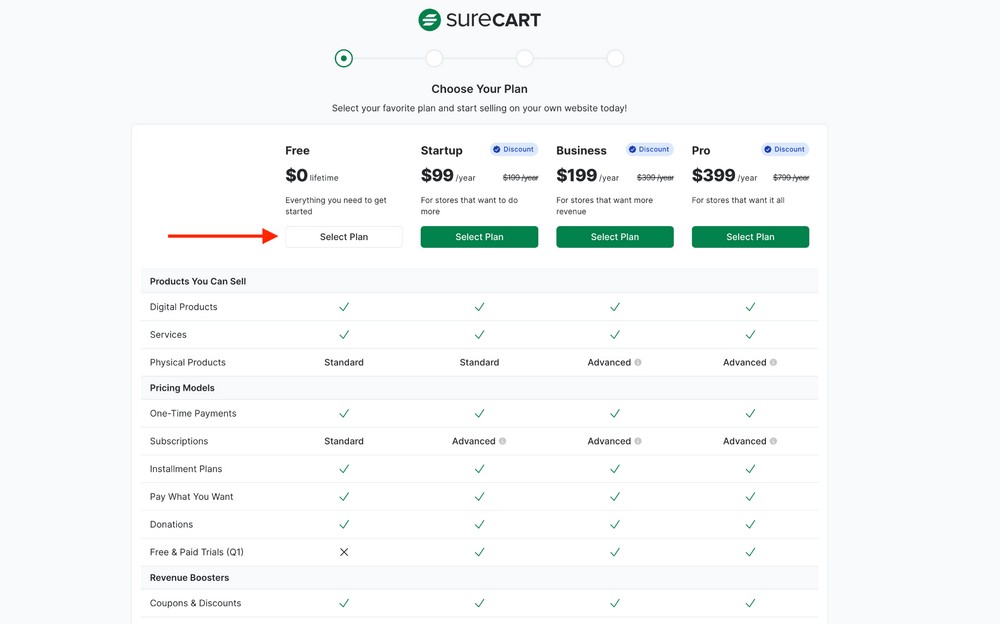
Don’t worry, the free plan is free forever!
It gives you a chance to use SureCart to sell products and do many other things.
You can set up a fully working store with the free account. It’s a great way to get started if you haven’t used it before.
Set up your store
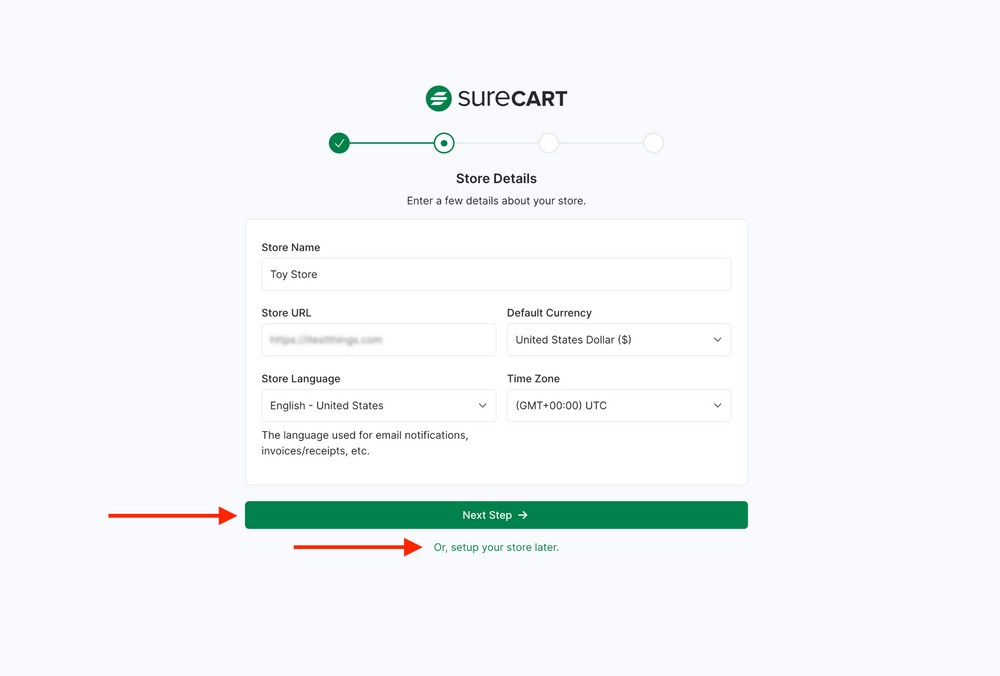
Once you select the plan, the setup wizard will resume and open a form to create your store.
Here you have two options: enter the store details and press the Next Step button, or press the “Or, set up your store later” link.
NOTE:
Adding a store later can be managed from https://app.surecart.com/dashboard.
For now, let’s continue with the wizard and press the Next Step button to create our store.
Connect to payment processors
You receive payments from eCommerce customers through payment processors. The choice of payment processor can drastically improve the user experience.
On the next screen, SureCart allows you to connect to three different payment processors.
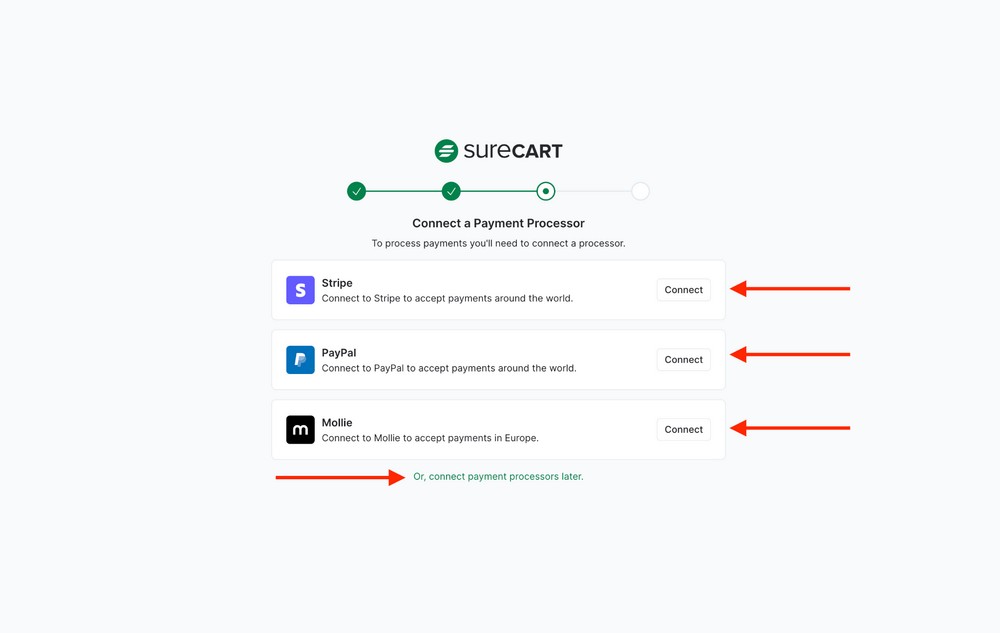
Once again, you have two options: select a payment processor or configure them later by clicking on “Or, connect payment processor later”.
Let’s connect with a payment processor now.
SureCart currently supports Stripe, PayPal, and Mollie. More payment processors are on the way such as Razorpay and Paystack.
PRO TIP:
We recommend connecting with Stripe to begin with. It is the most popular payment processor, offering multiple payment methods for a variety of audiences.
You can even use it to offer express payment options such as Apple Pay and Google Pay.
Back to our setup wizard!
Let’s connect with Stripe. The process is similar for all payment processors.
Press the Connect button and follow the Stripe signup process. If you already have an account, you will only need to sign in.
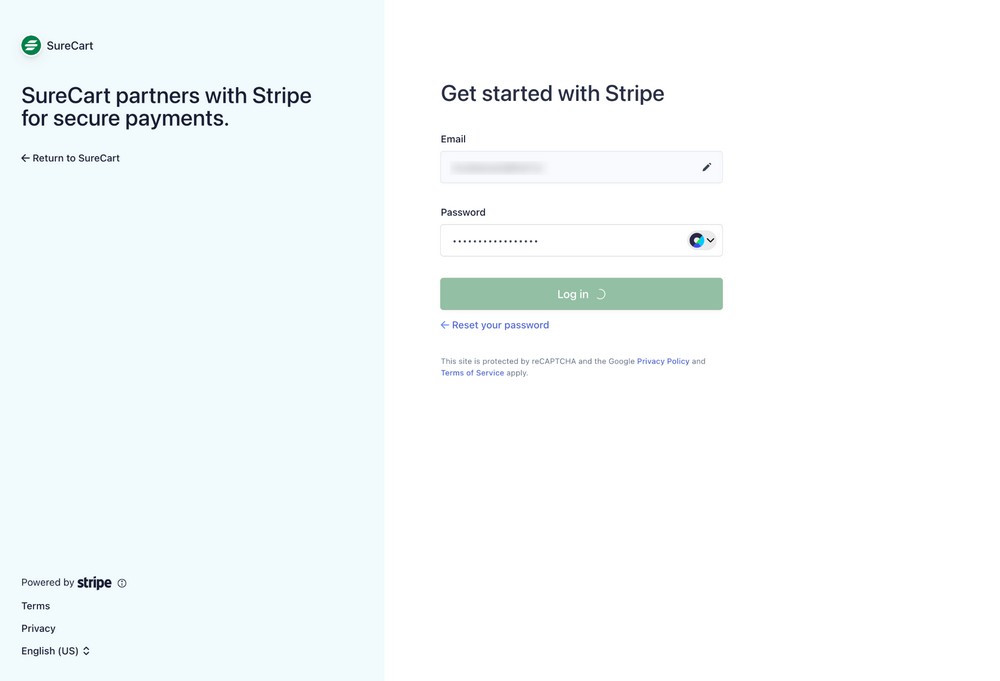
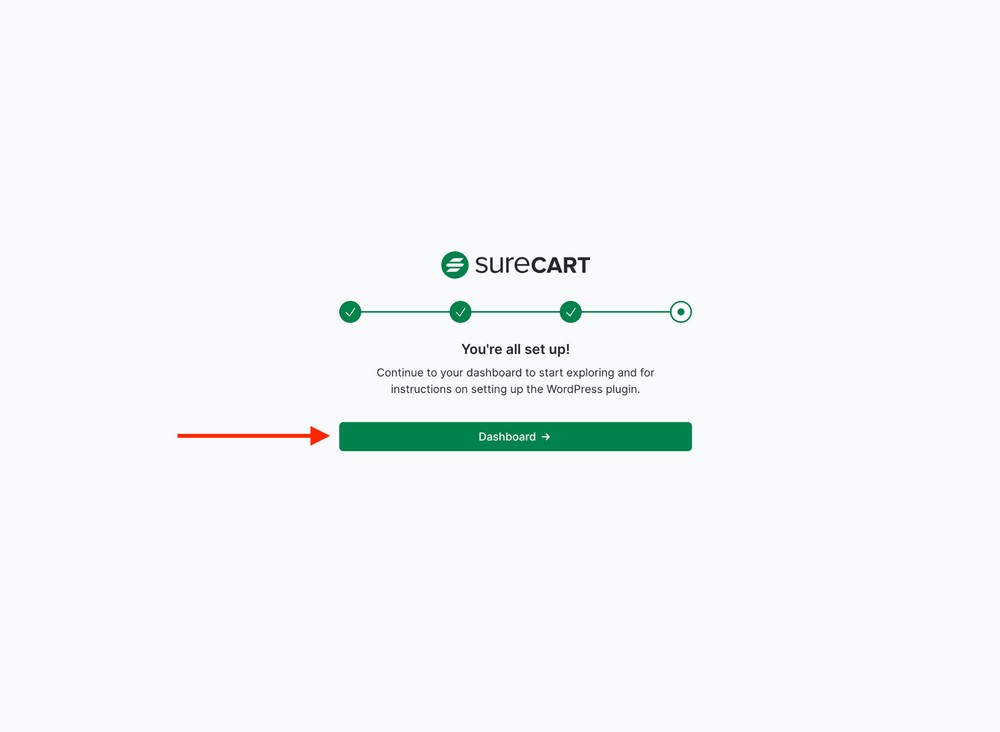
The next screen will confirm everything is ready. Press the Dashboard button to return to the dashboard.
Once connected to Stripe, the Connect button will show Enabled.
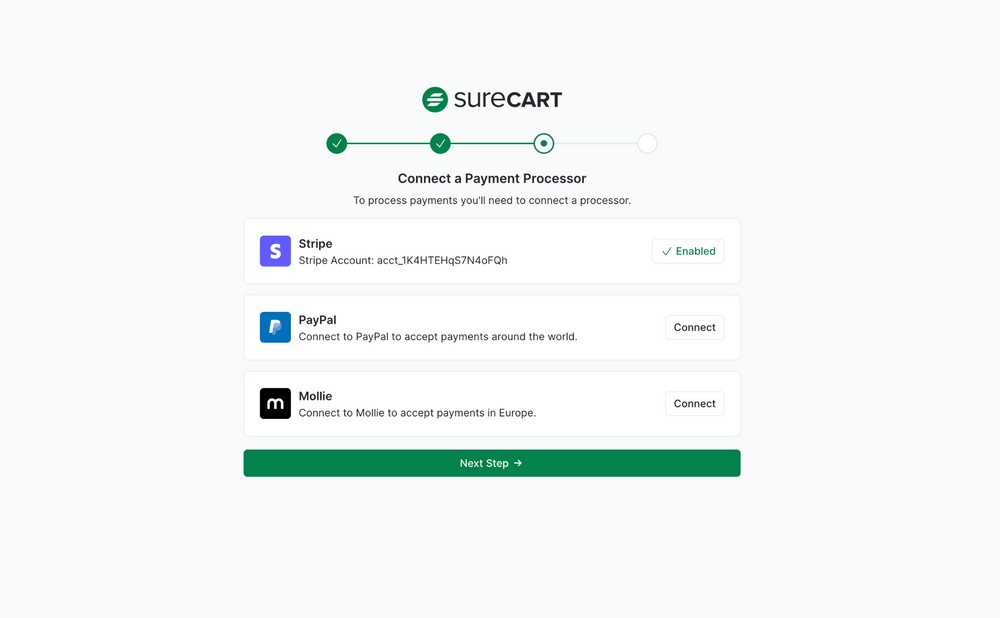
Press the Next Step button to continue or set up other payment processors.
Connect the SureCart server to your WordPress website
The next thing you need to do is to link the SureCart cloud server to your WordPress site using an API key.
The API key ensures your website can securely communicate with the SureCart server. It’s essential for everything to work so it’s an important step.
Press the Next Step button to let SureCart generate the API key.
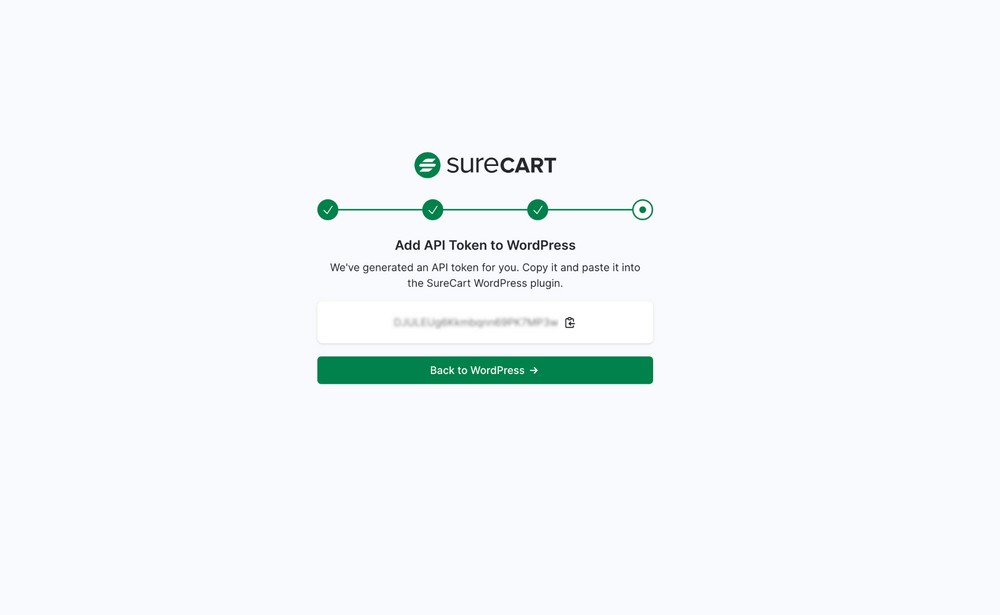
Copy the key and press the Back to WordPress button.
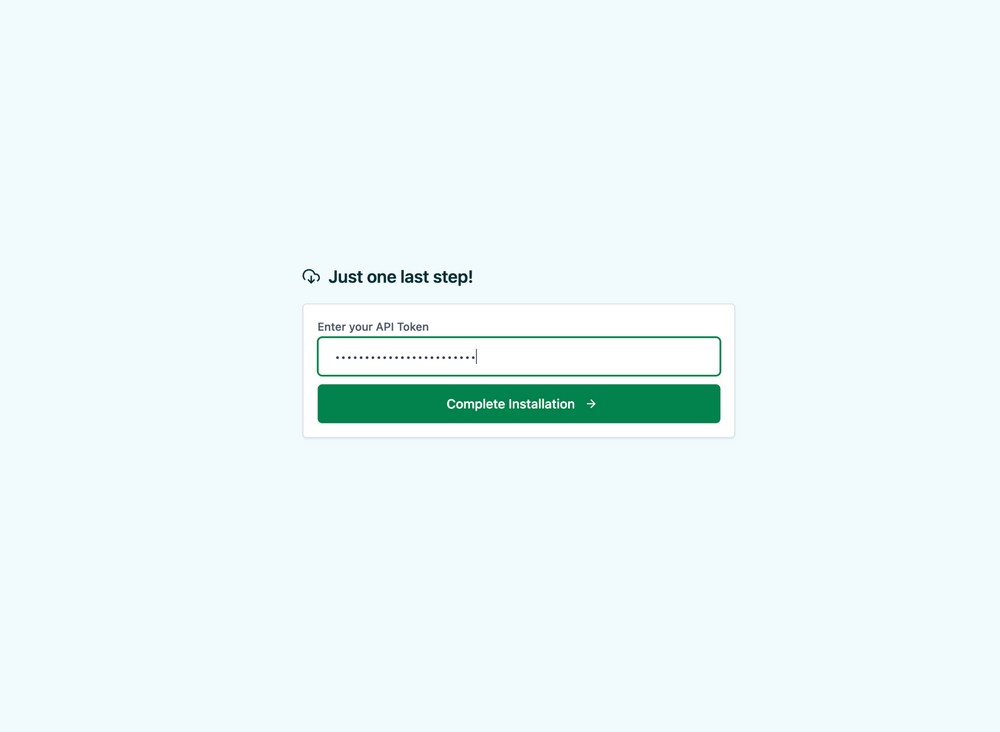
Paste the key on the next screen and press the Complete Installation button.
After completing the wizard, you might see a blank area in the right panel. That’s nothing to worry about.
The synchronization process may take a few seconds to show you everything

After synchronization is completed, you should find an overview of the activity on the Dashboard page.
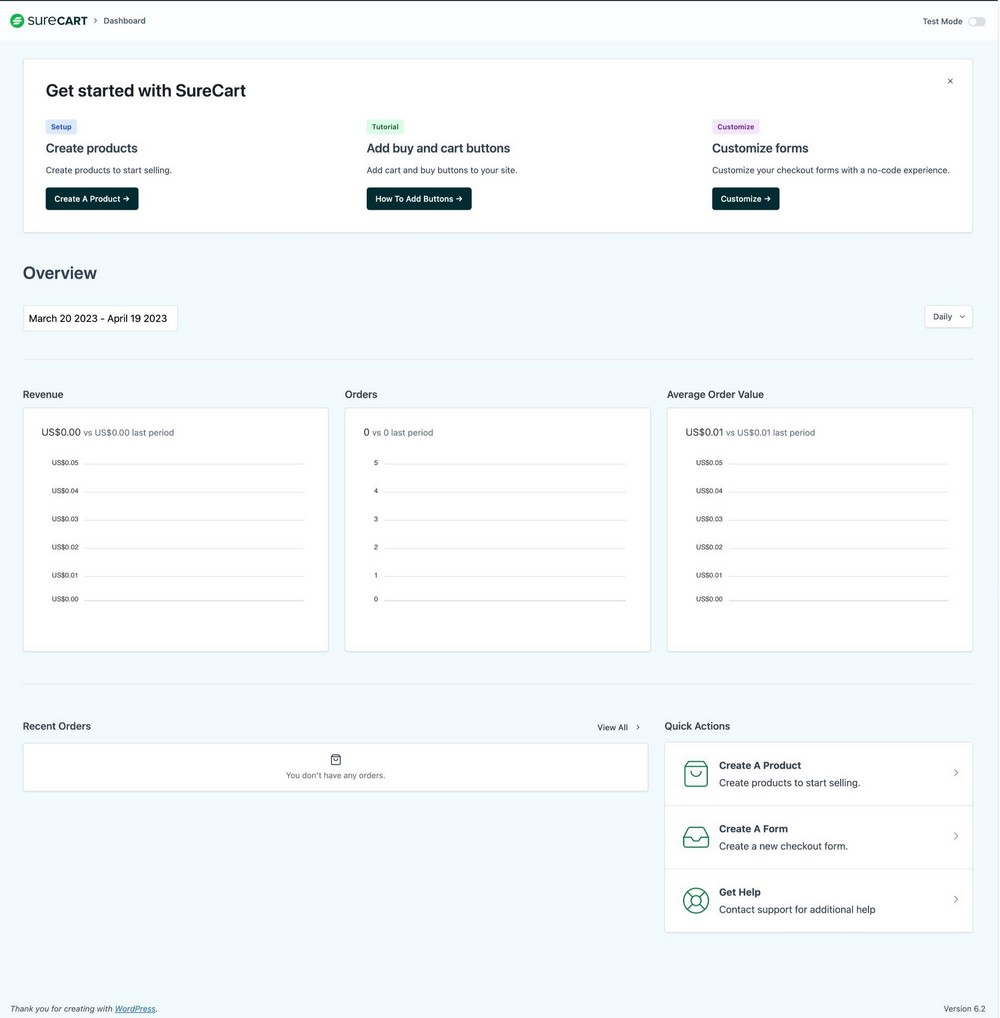
Once you start selling products, these graphs will show your overall store performance.
You should also see a few shortcuts to essential functions such as creating products, forms, a summary of revenue, orders and average order value.
2. Configure SureCart with the server side wizard
If you choose to configure SureCart through the server side wizard, here’s what will happen:
- Sign up with SureCart
- Choose your plan
- Create a store
- Connect with payment processors
- Verify your email
- Connect WordPress with SureCart server
Let’s complete each step together.
Sign up with SureCart
The configuration process starts with signing up with SureCart. If you’ve purchased a SureCart plan, you will have login credentials to sign in.
Whether you purchased or not, type this URL https://app.surecart.com to access the SureCart server dashboard.
Depending on the situation, you may need to sign in / sign up in order to access the dashboard area.
There is also an option to sign up with Google.
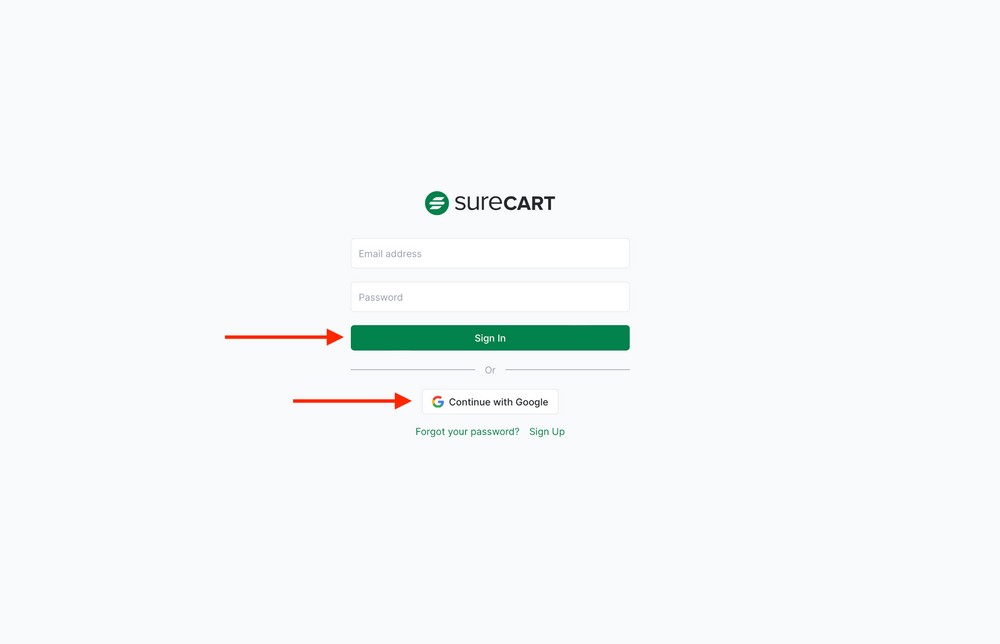
The other advantage of signing up through Google is that you won’t need to verify your email address. One less step. 🙂
Choose your plan
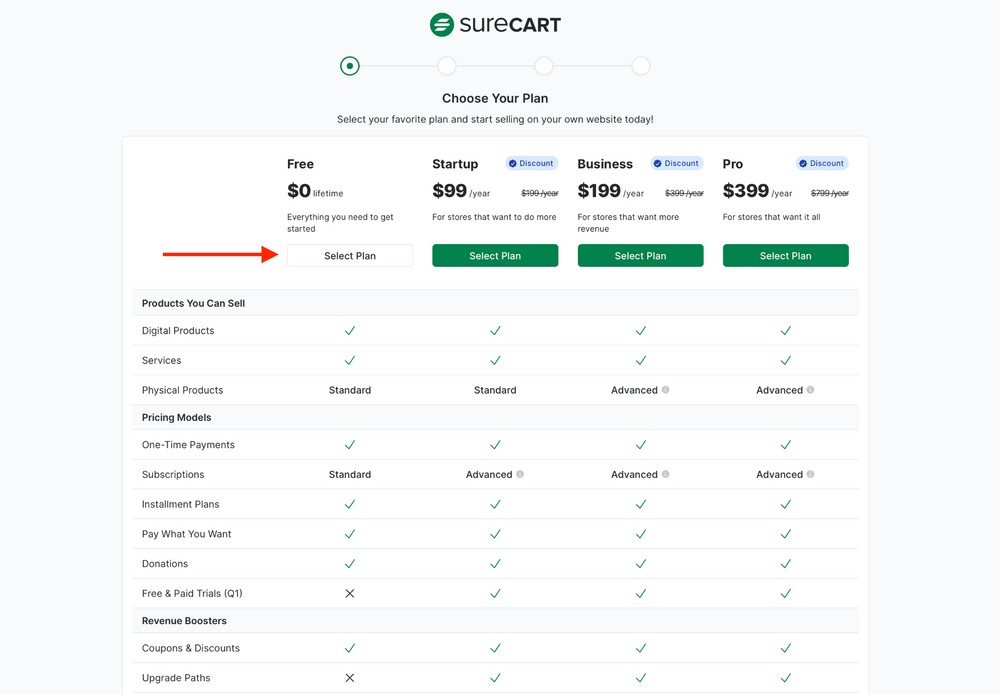
If you haven’t purchased a plan, now is the time. The sign up screen redirects you to the SureCart pricing page.
As we did earlier, we will select the free plan. You can choose whichever suits your needs.
Create a store
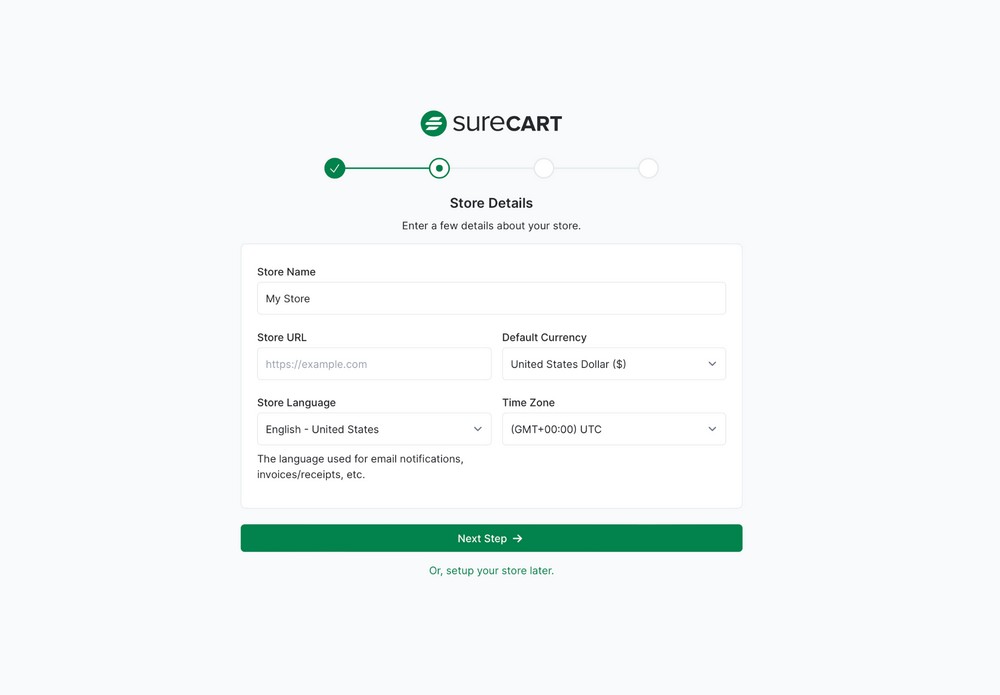
The next screen requires you to enter your store details.
The setup wizard only allows you to create one online store. If you need to establish more online stores, you can do that from the dashboard area.
We will explain it a little more shortly.
Once you are done entering information, press the Next Step button.
Connect with payment processors
Choose one or more payment processors according to your needs. This signup process is similar to what we showed earlier.
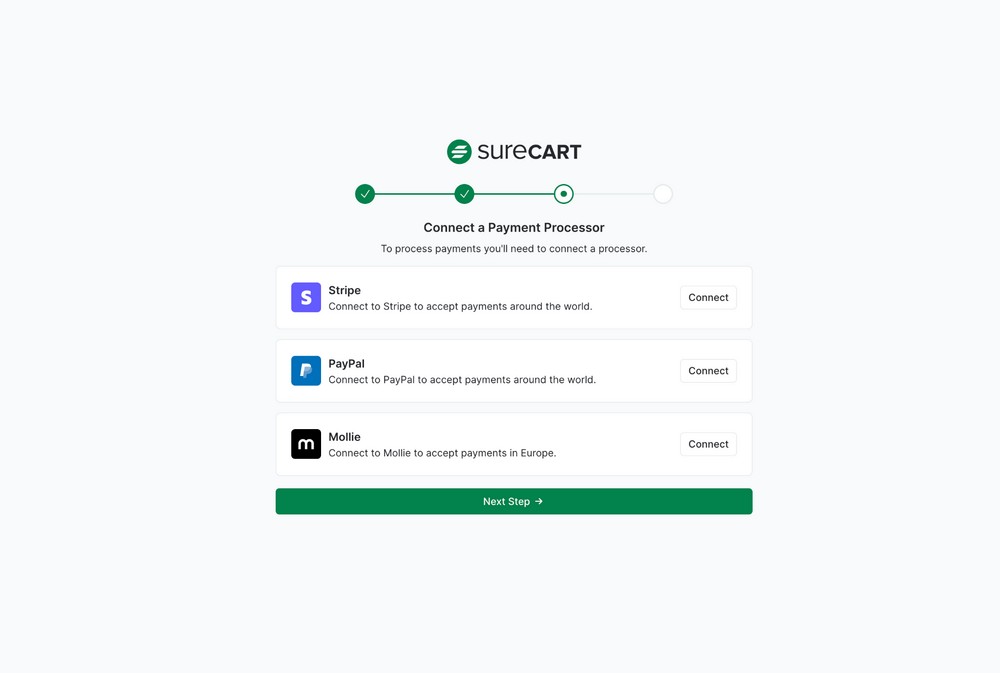
If you want to connect with Stripe, press the Connect button. This will open the Stripe signup page.
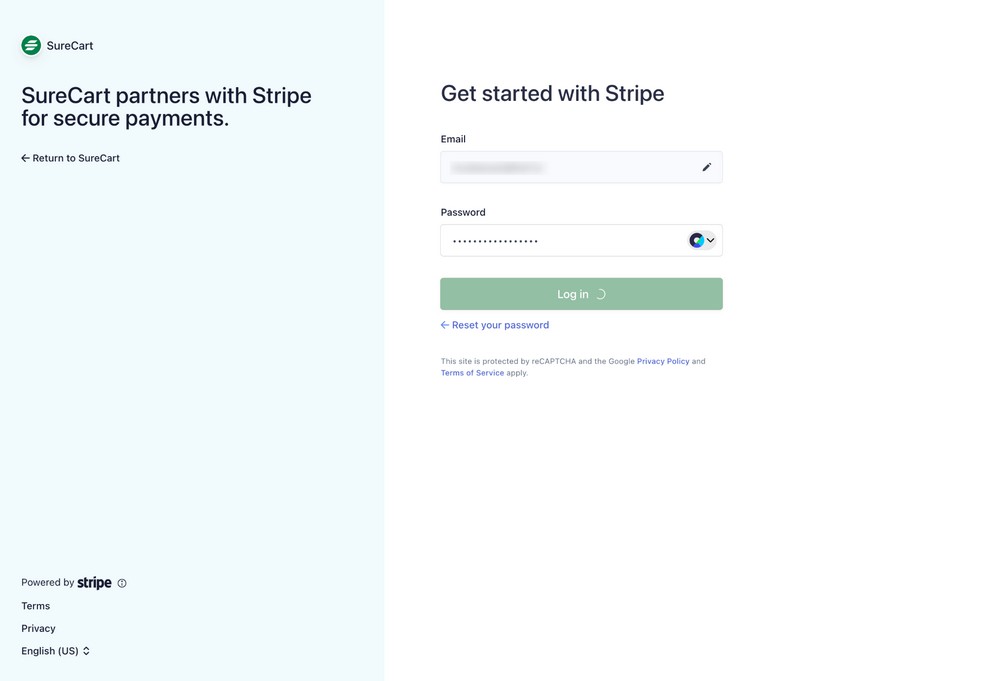
Enter your information and complete the process. Once done, setup will bring you back to the payment processor page.
Repeat the process for other payment processors if you want to.
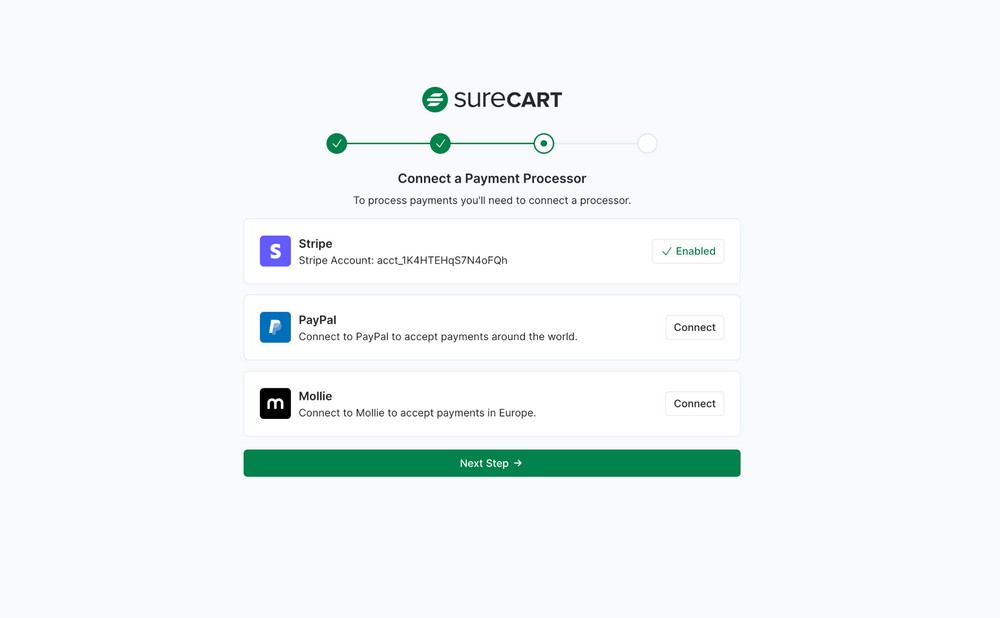
Once you are connected, press the Next Step button to find out the configuration status.
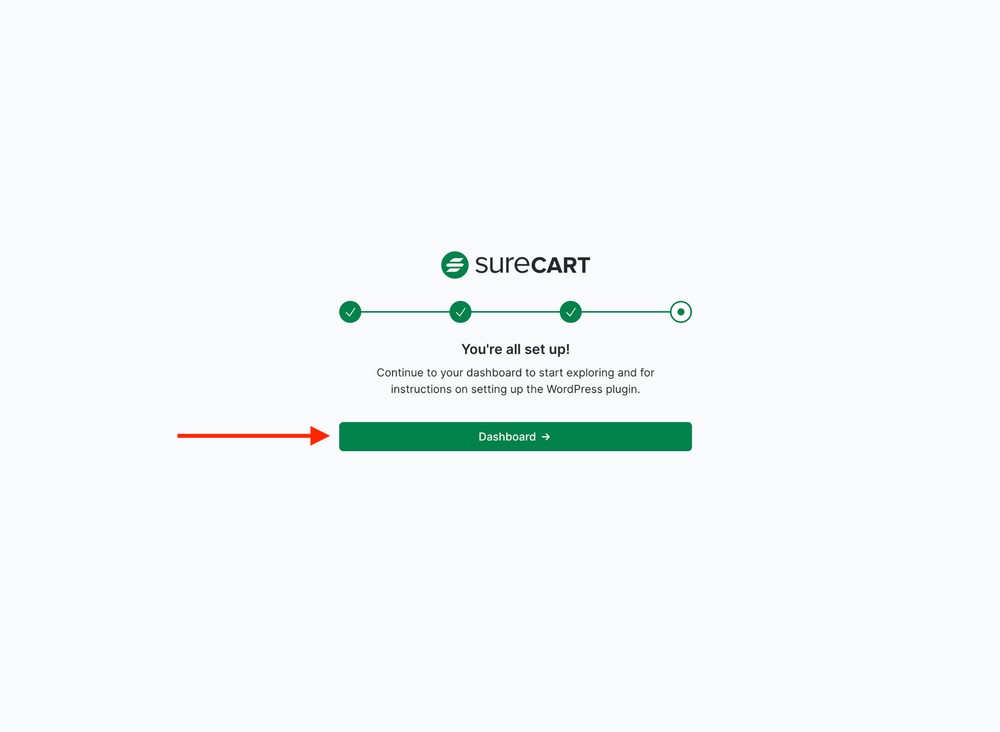
The next screen should show the message You’re all set up.
This means you’ve completed three out of four steps: signup, store setup, and connecting with the payment processor.
Press the green Dashboard button to move on to the next step.
Verify your email address
Have you checked your mailbox lately?
SureCart sends a verification email to complete the signup process and you’ll need to verify for everything to work.
If you’ve been busy with configuring the plugin here, you should be seeing a reminder on the next screen to verify your email.
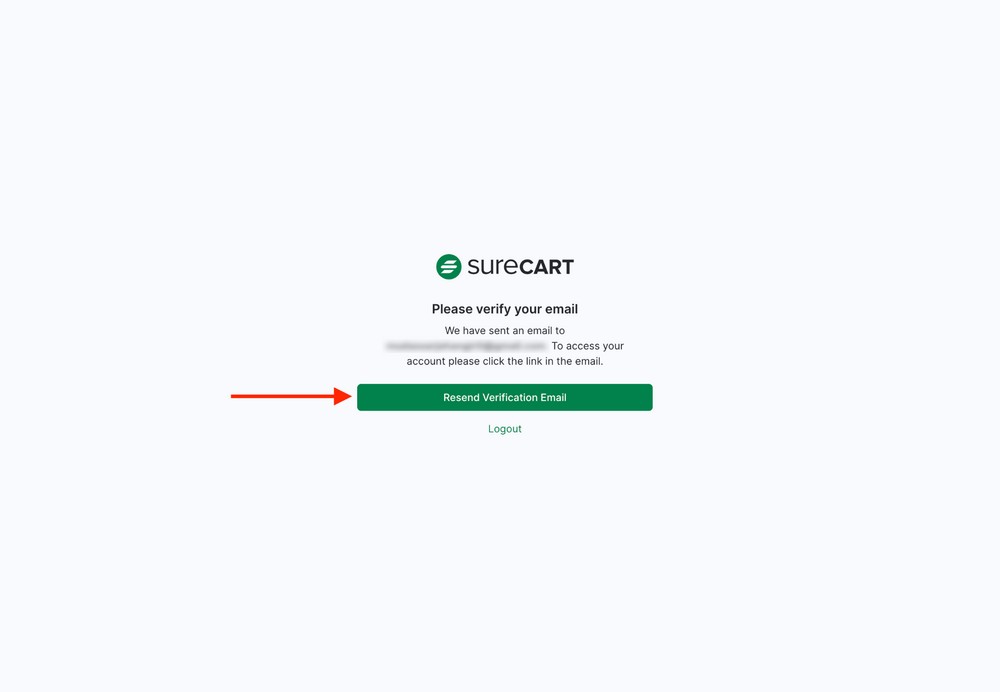
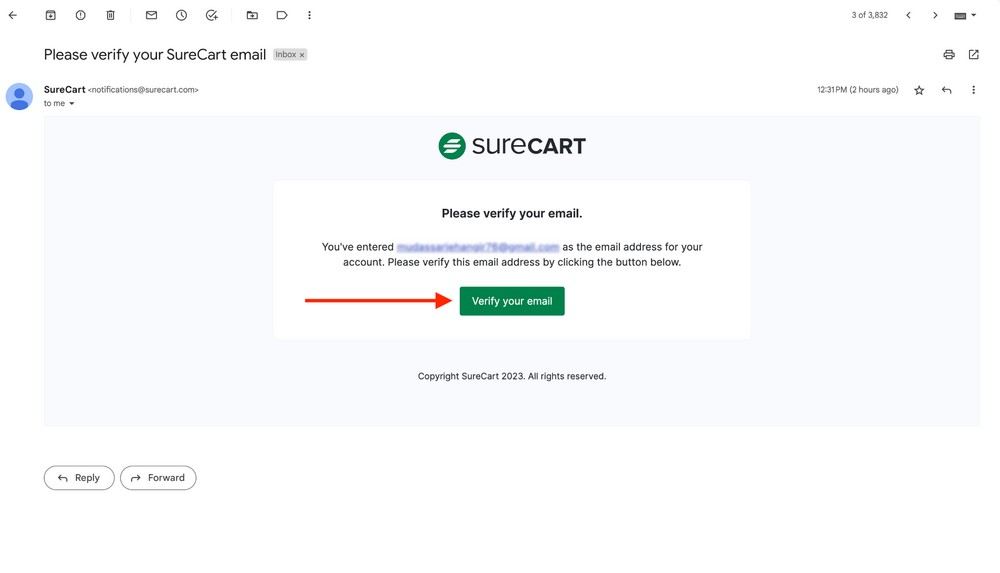
Open your mailbox to find an email from SureCart with the subject: Please verify your SureCart email.
If you haven’t received one, press the Resend Verification Email button.
Once located, open the email and press the Verify your email button to complete the signup process. This will enable you to enter the SureCart server dashboard.
Connect WordPress to SureCart
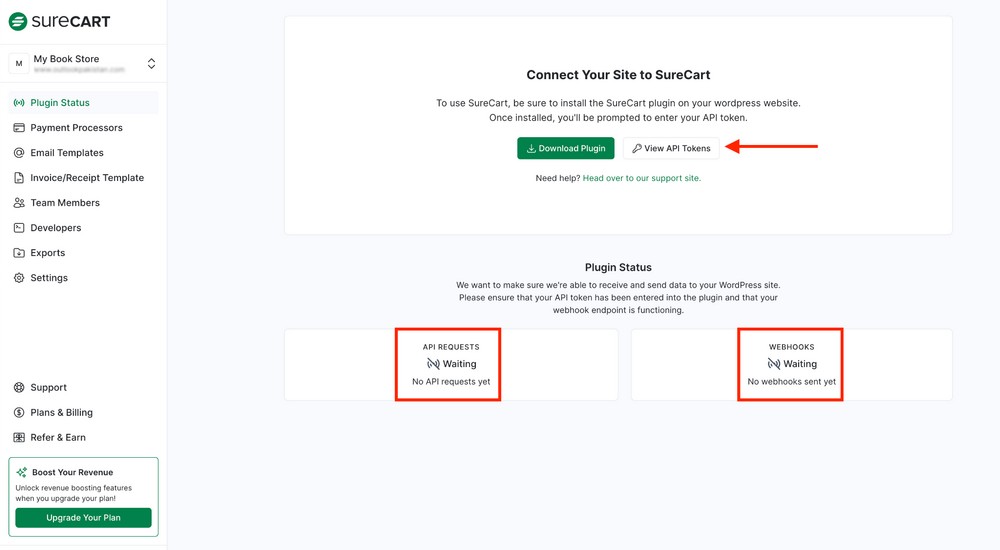
You should now see the SureCart server dashboard with the plugin status showing no API connectivity.
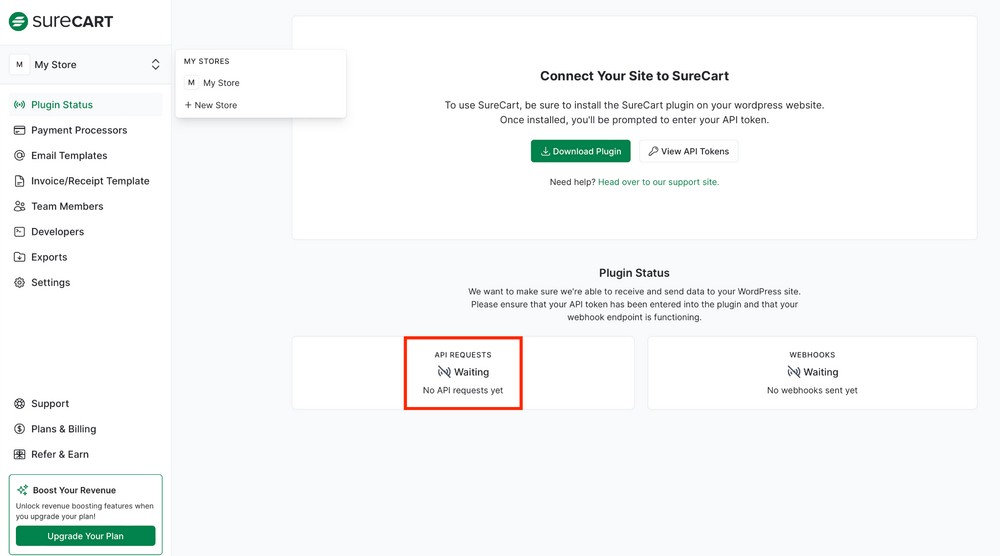
This is the final step to connect your online store on the SureCart server with your WordPress website.
As we mentioned earlier, the SureCart server connects to WordPress using an API key.
Every time you create a SureCart store, it generates a token key. In order to create a connection, you need to copy and paste it into the plugin settings.
To proceed, press the View API Tokens button.
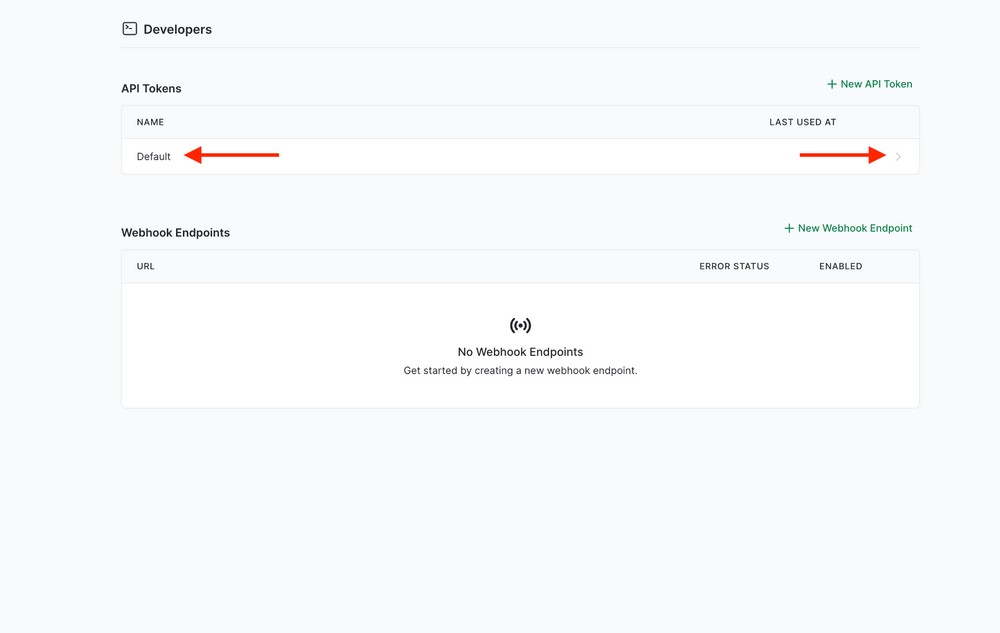
Next, you need to press the default entry to reveal the desired API key.
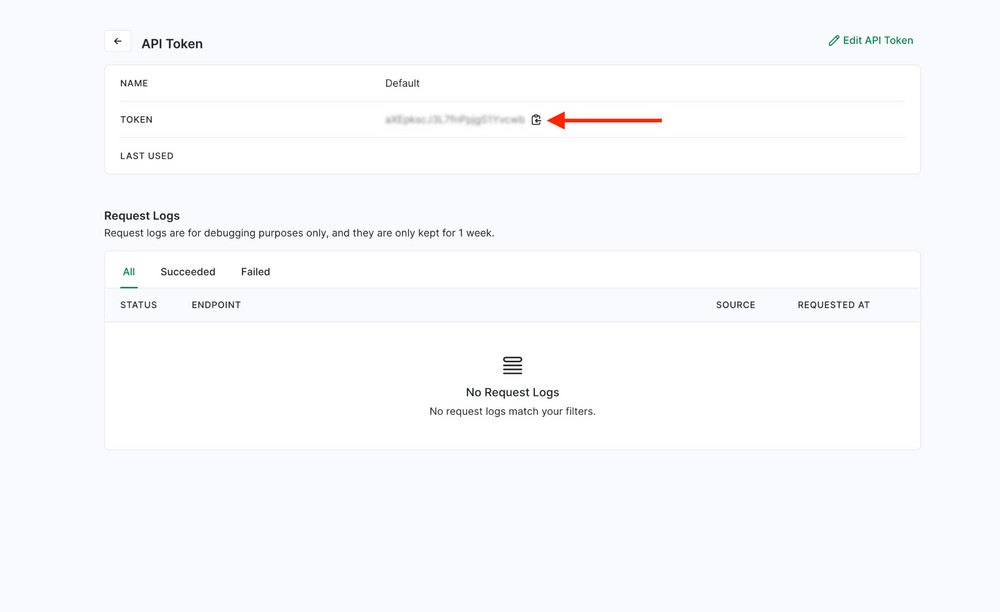
Copy the key and return to WordPress admin.
Install SureCart if you have not already done so. Follow the instructions we provided earlier to set everything up.
Once installed, go to SureCart > Settings and paste the API key into the API Token field.
Press the Save button to complete the process.
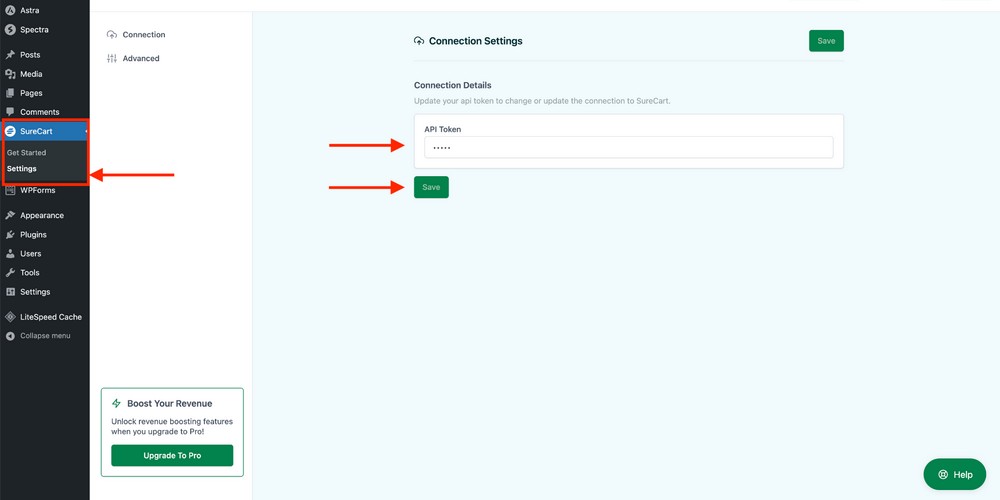
Synchronization may take a few seconds to show the SureCart menu items
How to edit store information
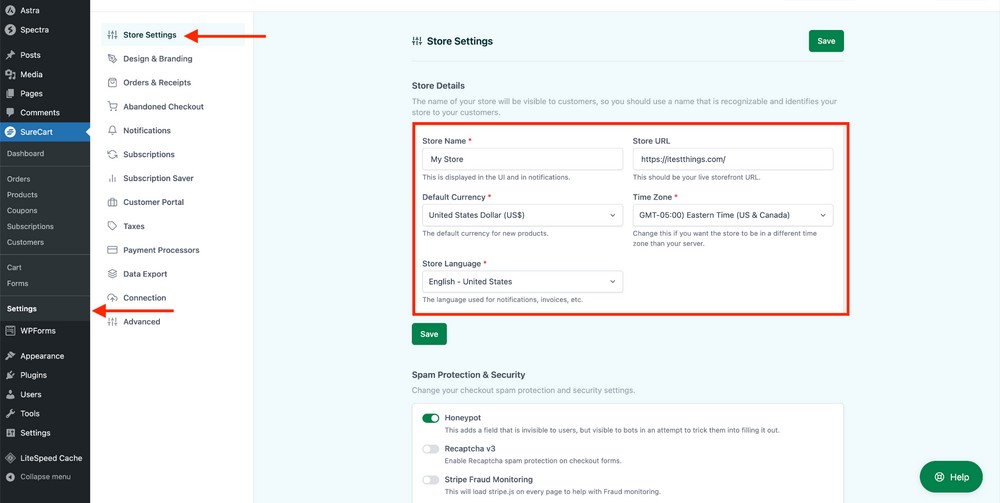
If you need to update an existing store you can do it easily from the admin area.
Go to SureCart > Settings > Store Settings and edit the store information.
Press the Save button when finished.
How to create another store
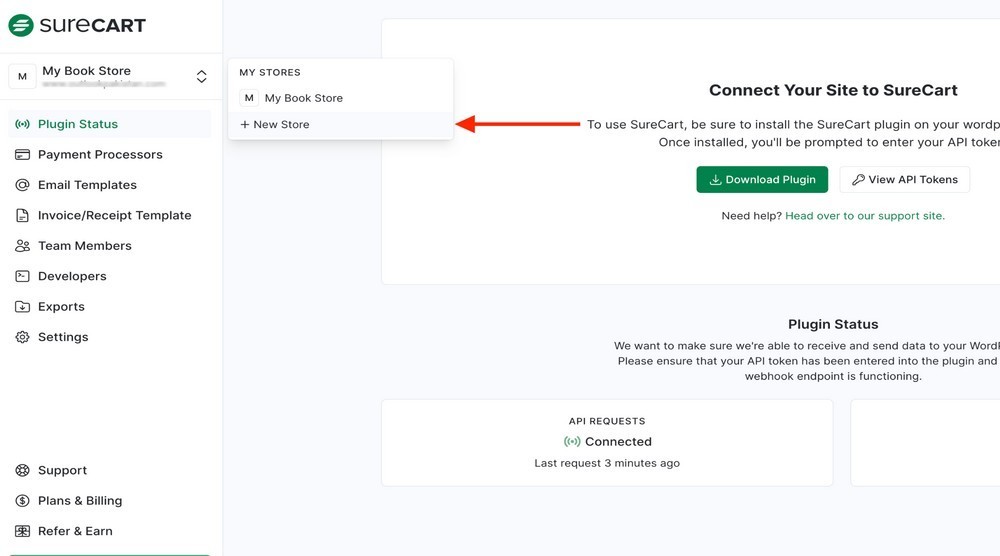
You can create multiple stores from the SureCart server dashboard.
Go to the dashboard area and click the New Store button from the My Stores menu.
Fill in the form and press the Save button.
Connect with payment processors
One way to connect to payment processors is using the SureCart setup wizard. You can also do this from the WordPress admin area.
To find a list of available payment processors, go to SureCart > Settings > Payment Processors.
You’ll also see an option to add manual payment methods such as cash on delivery.
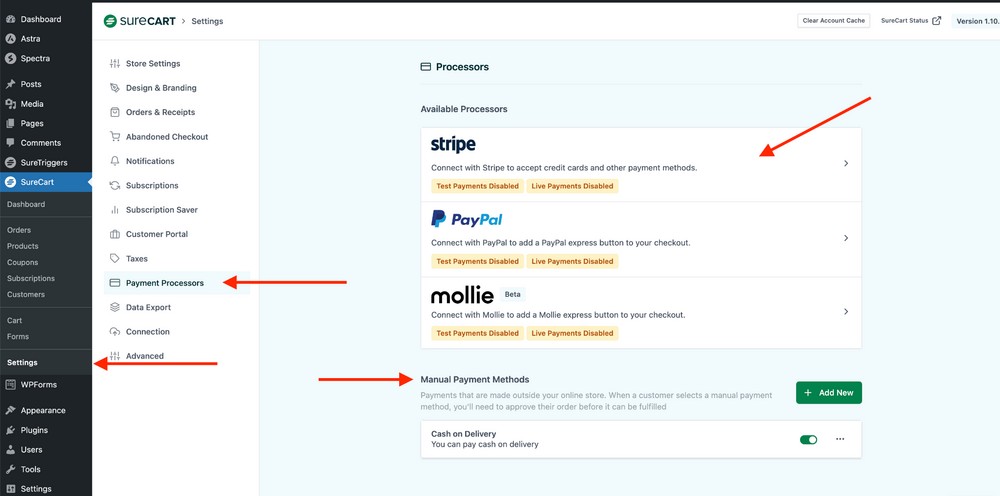
You’ll notice two options inside each payment processor widget: Test Payments and Live Payments.
Both serve different purposes.
Live payments are needed to receive payments from real customers.
Test payment modes are essential to test checkout pages before offering them to real audiences.
To enable a payment processor in any mode, click anywhere on the widget to launch the connectivity page.
As the name suggests, if you are just testing your checkout pages, select Test Mode from the top right.
You’ll wantLive Mode when you launch your store.
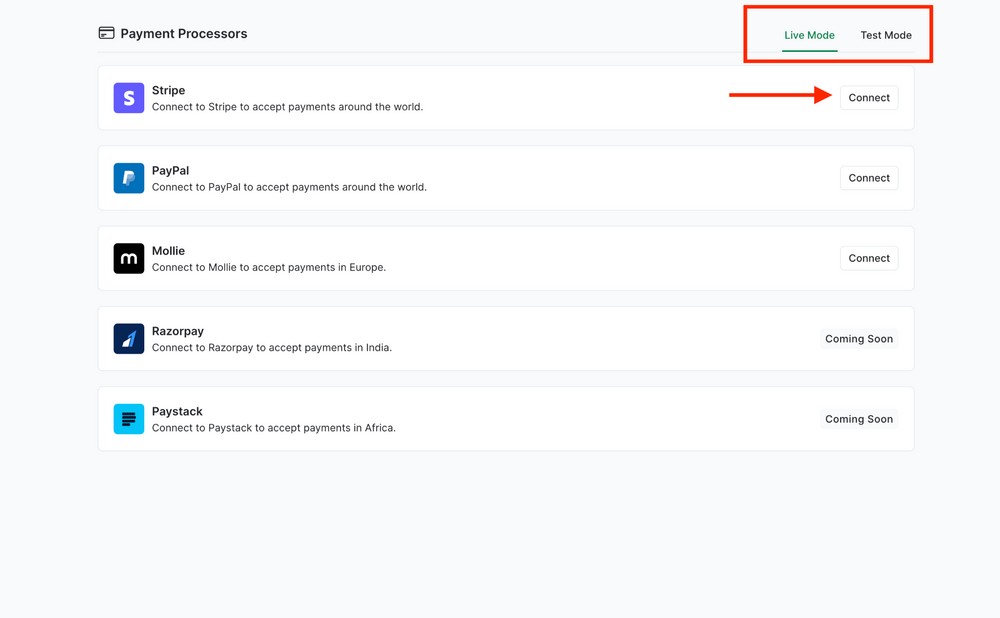
Next, press the Connect button for your favorite payment processor to start the process.
Sign in or sign up on the following page to connect with the payment processor.
Notice the “Enabled” status for each processor you activate.
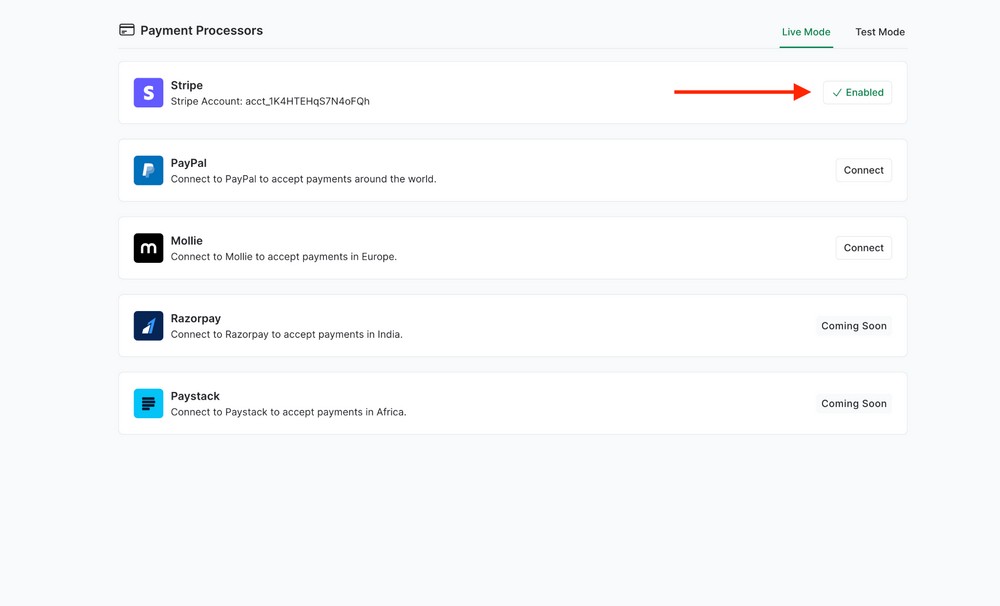
Once connected, go back to SureCart > Settings > Payment Processors and refresh the page to see the results.
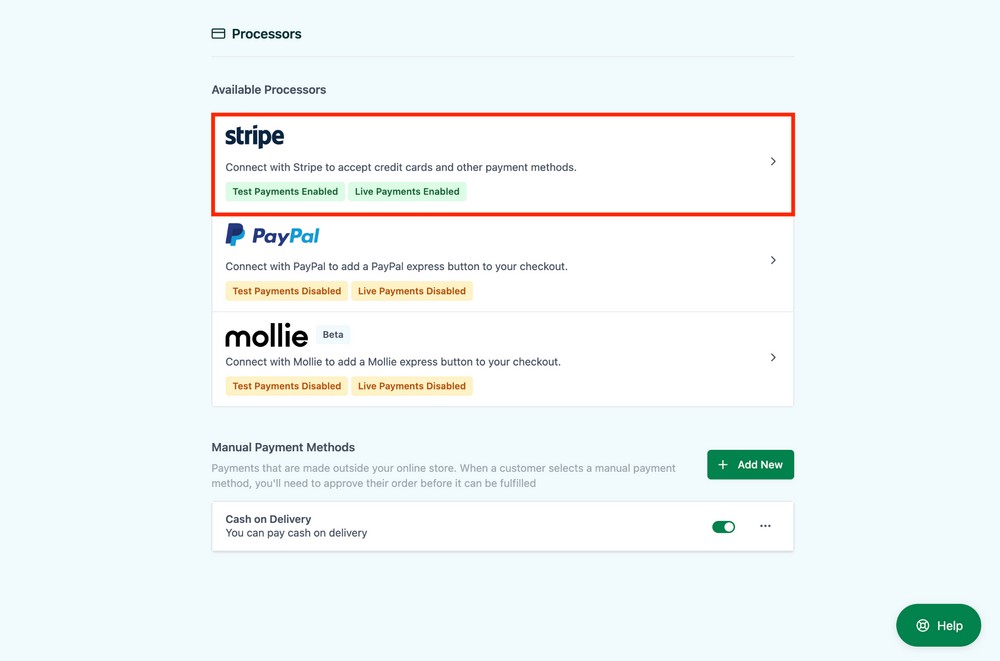
Repeat the process for each payment processor you want to use.
Now we have configured SureCart, it’s time to explore how to add products.
Add products
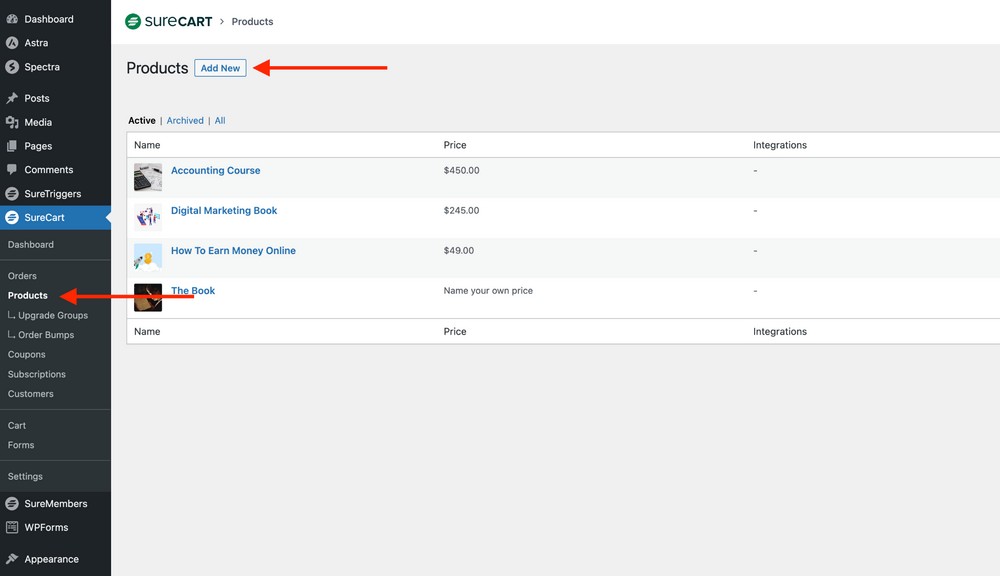
To add products, go to SureCart > Products and press the Add New button.
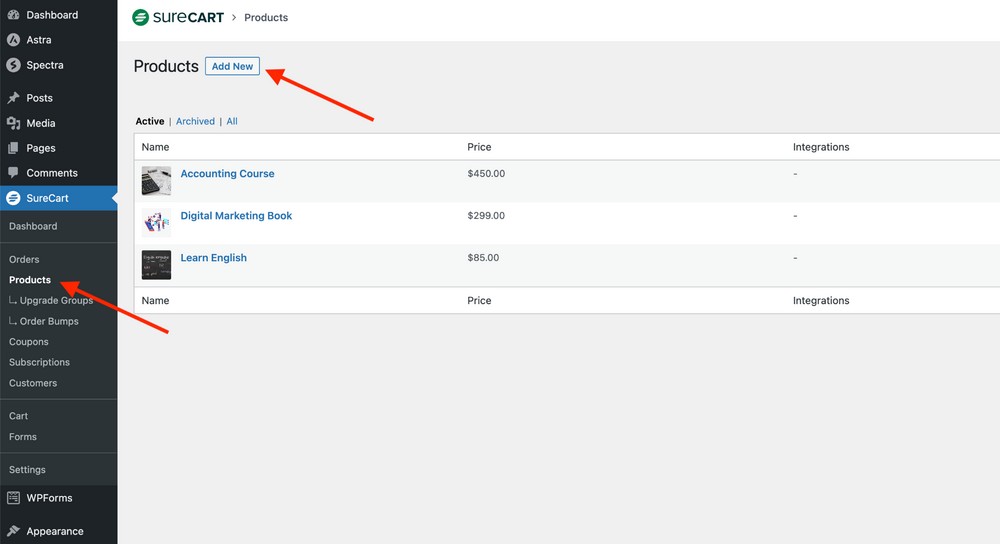
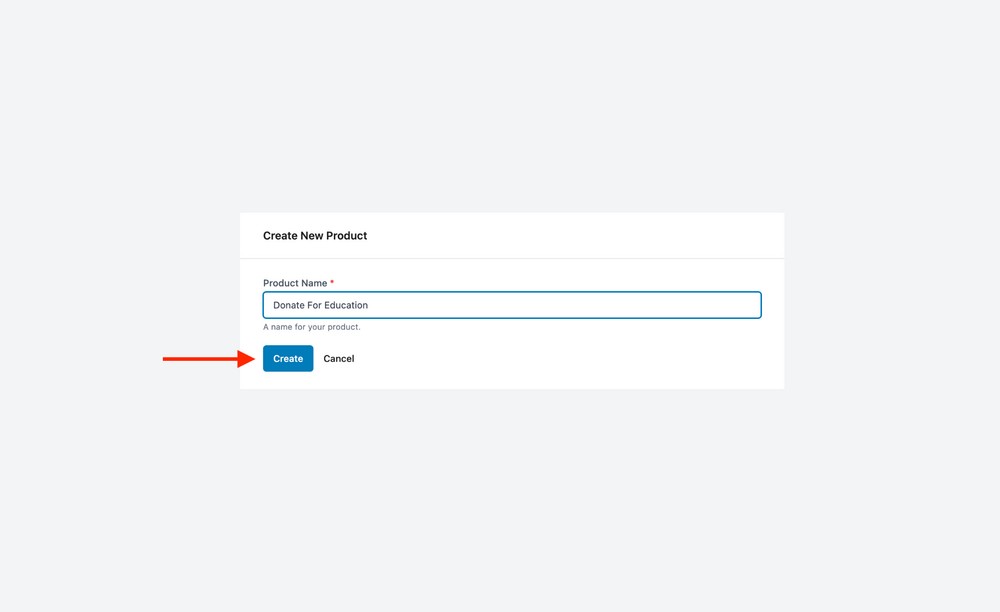
Choose a name for your product and press the Create button.
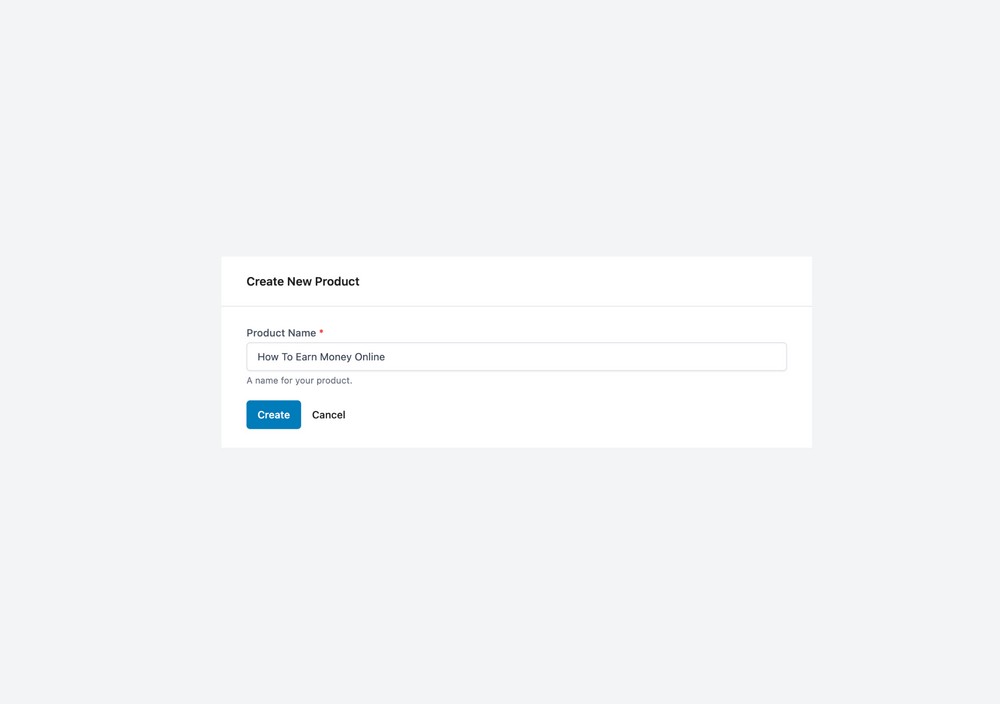
The next screen will show you a product detail page where you can add the desired information.
You can add these things to a product:
- Description: Anything that explains the product
- Pricing: Product price
- Integrations: Useful if you sell courses through other plugins such as LearnDash
- Downloads: If your product is downloadable such as a video, PDF, image or software, add it here
- Product image: Upload a relevant product image
- Tax and shipping: Change these values if your product is taxable and shippable
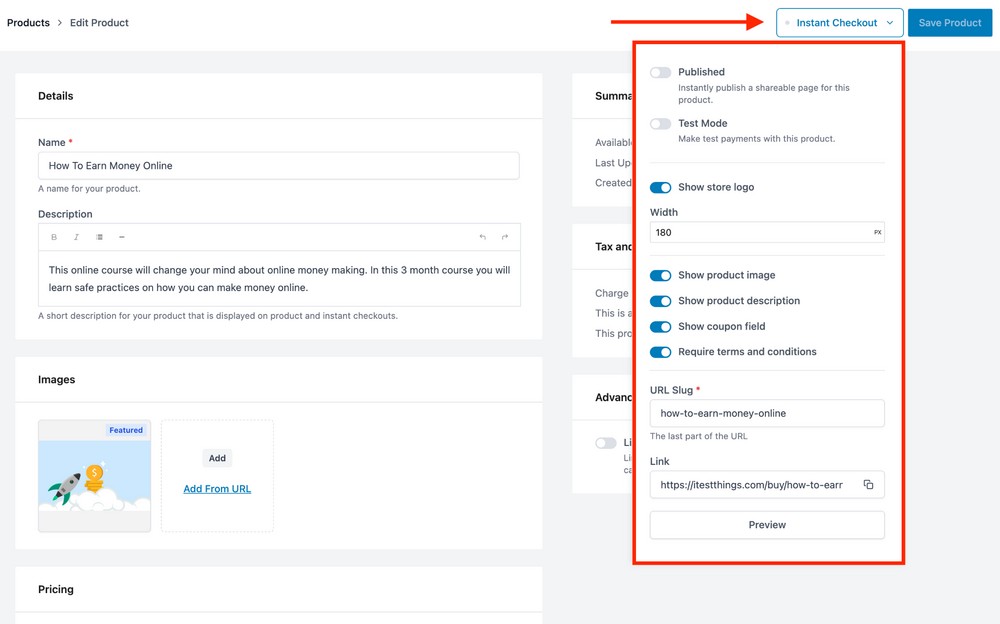
If you want more control over how products look on a checkout page, you can play with the options under the Instant Checkout drop down.
One of SureCart’s best features is its flexible pricing module. It is suitable for any type of requirement you may have.
Let’s explore it.
➡️ One-time payment
Assuming you’ve added the rest of the details, press the Add A Price button to open the price box.
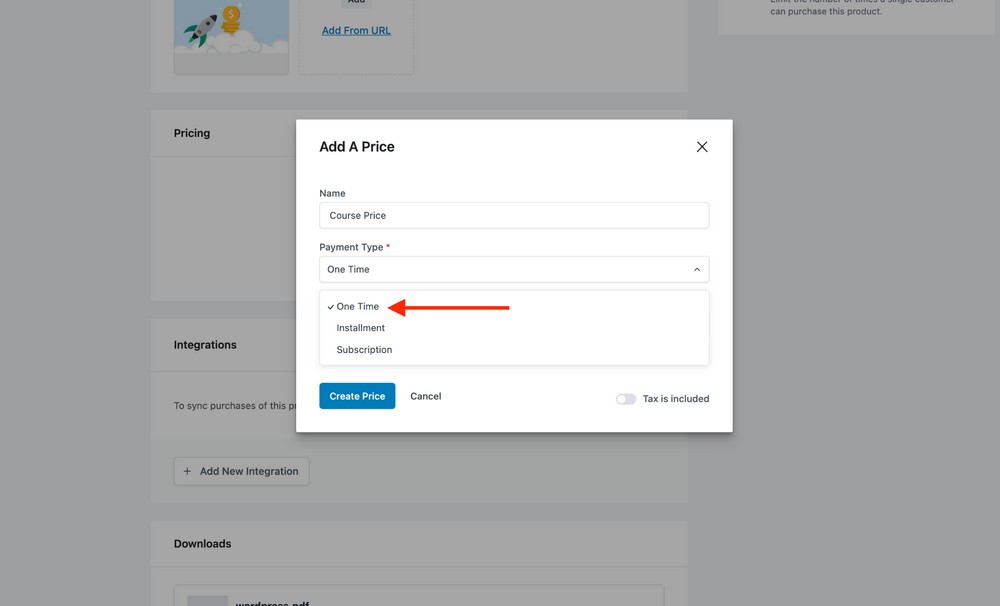
Name the price and select the payment type.
We will select the One Time option from the Payment Type dropdown list.
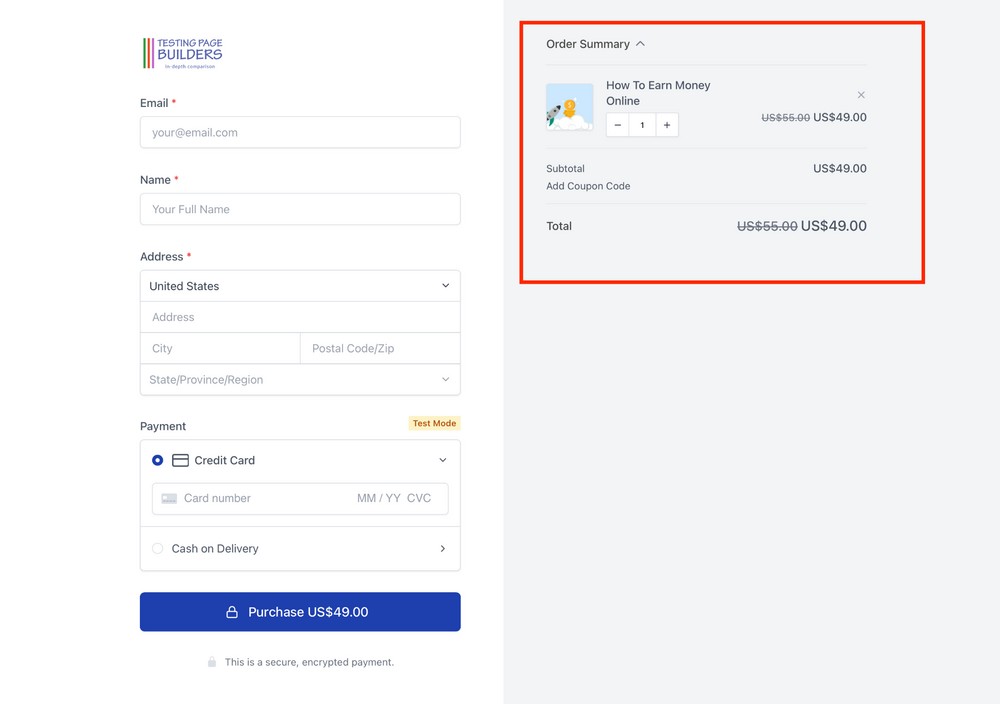
Next, set the Price and Compare at price to $49 and $55 respectively.
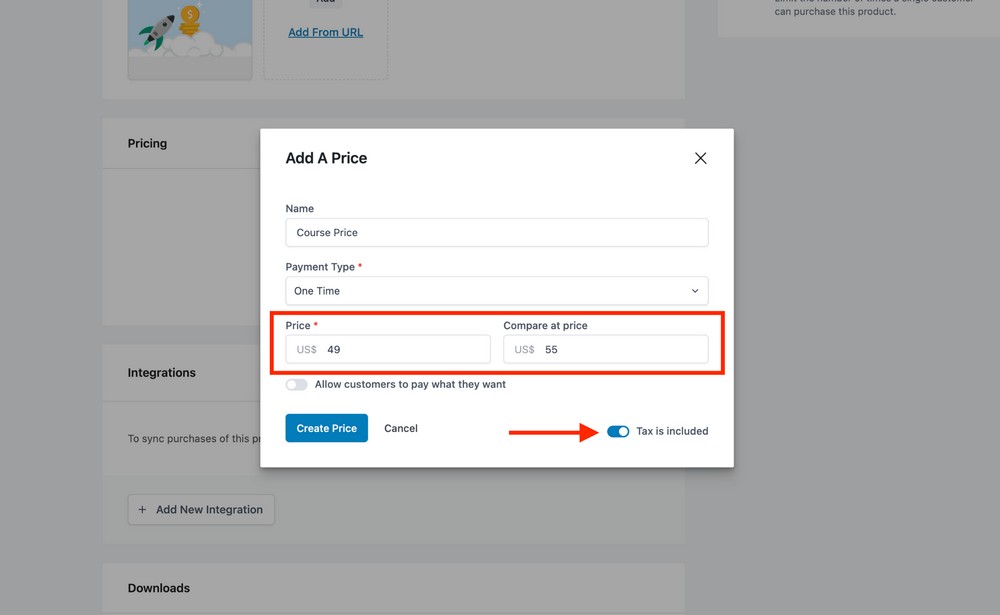
This is helpful when offering discounts. The value Compare at Price is the original product price whereas Price is the discounted price.
If tax is included in the price, you can enable the option at the bottom of the box.
After adding the price, press the Create Price button.
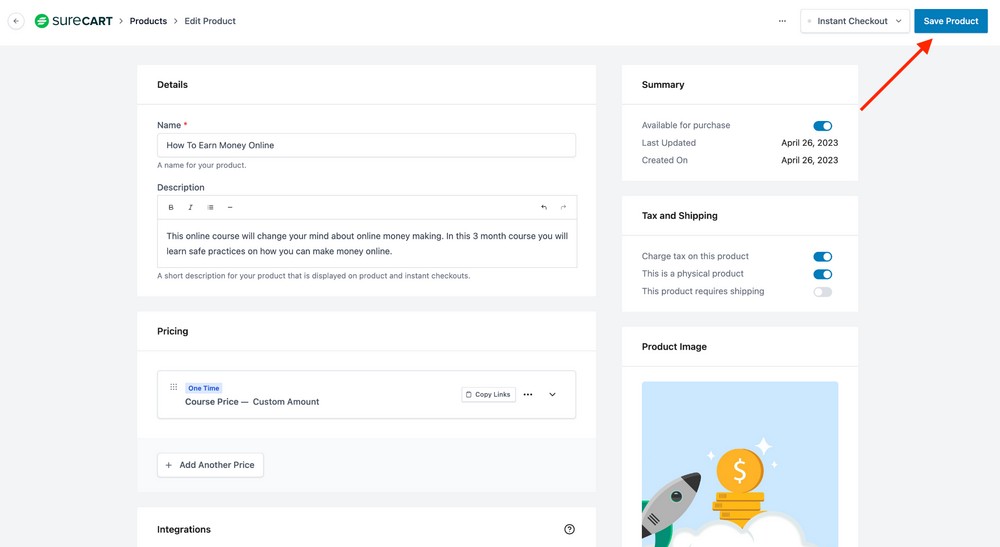
When you are finished, press the Save Product button.
Here is how the checkout form will look.
Curious to know more about the checkout form and how to customize it to fit your needs?
We will discuss it more shortly. 🤔
➡️ Product with installments
If your product requires an installment plan, we can do it easily with SureCart.
Let’s delete the price we set earlier before setting another one.
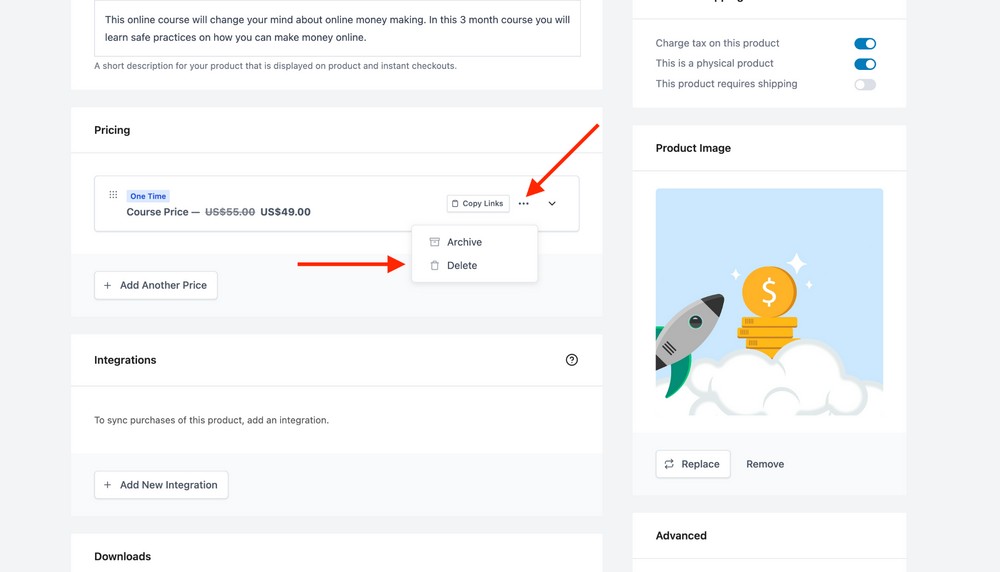
Open the product page and press three dots inside the pricing box to show a tiny menu bar.
Press the Delete option to remove the price.
Once done, press the Add A Price button, name the price and select Installment from the Product Type drop down list.
Add a price to the Price field.
The next thing you need to do is decide when the installment due date should fall after a certain period.
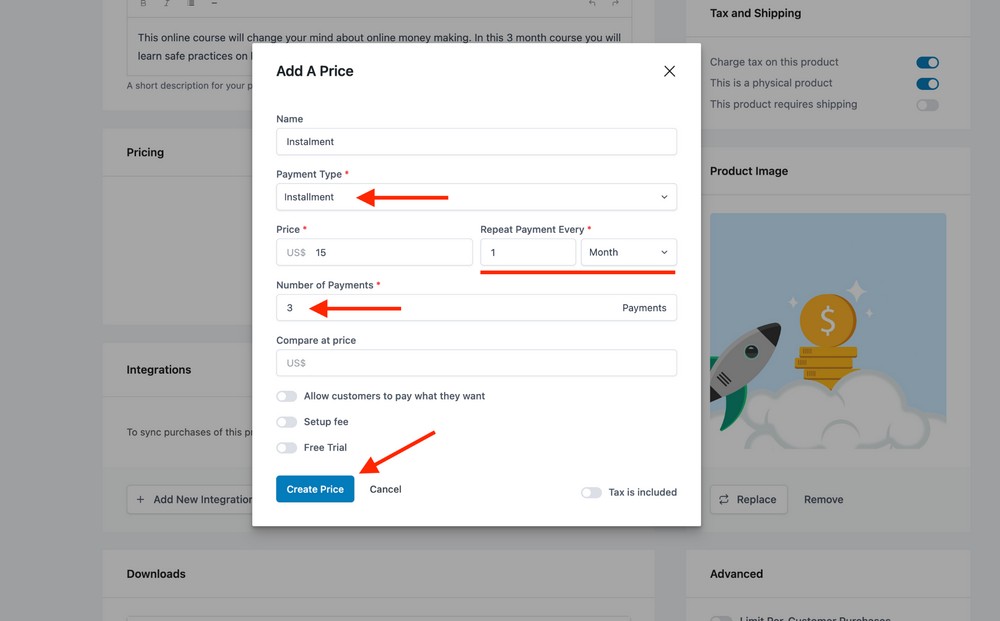
Enter a number and the period in the Repeat Payment Every field.
Enter a value in the Number of Payments field as the total number of installments for your product.
Next, press the Create Price button.
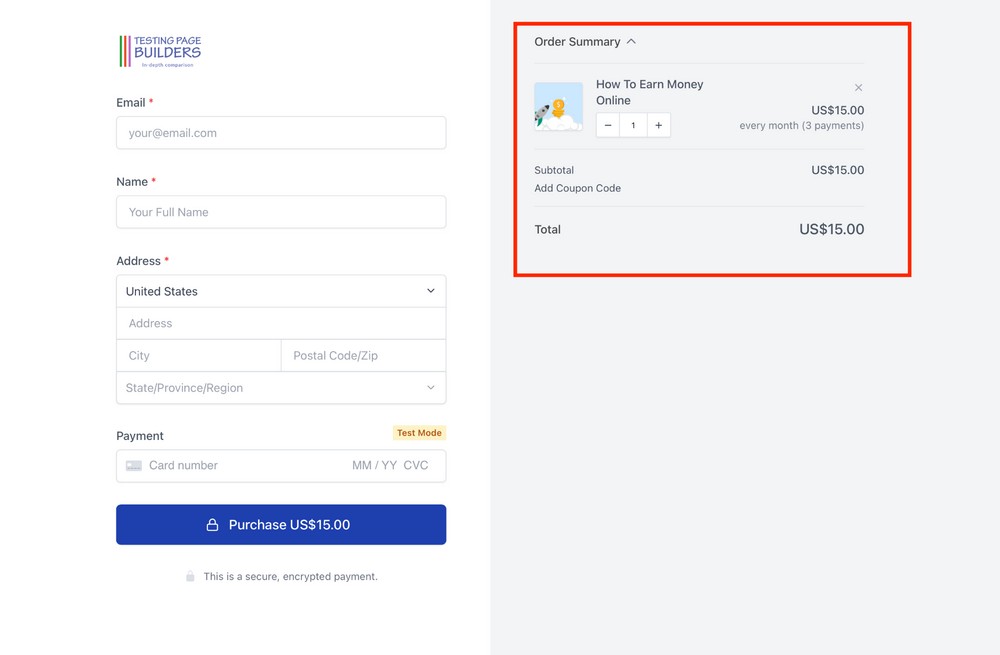
Now, let’s see how the product looks on the live site.
√ Setup fee and free trial
Depending on your product, you can charge a setup fee in addition to the product price.
Setup fees are common in a number of industries including web hosting, finance, and education, where the service provider has to set things up at the client’s end.
If your product or service requires setup fees, SureCart has you covered.
Enable the option Setup fee and add a price to the Setup fee amount field.
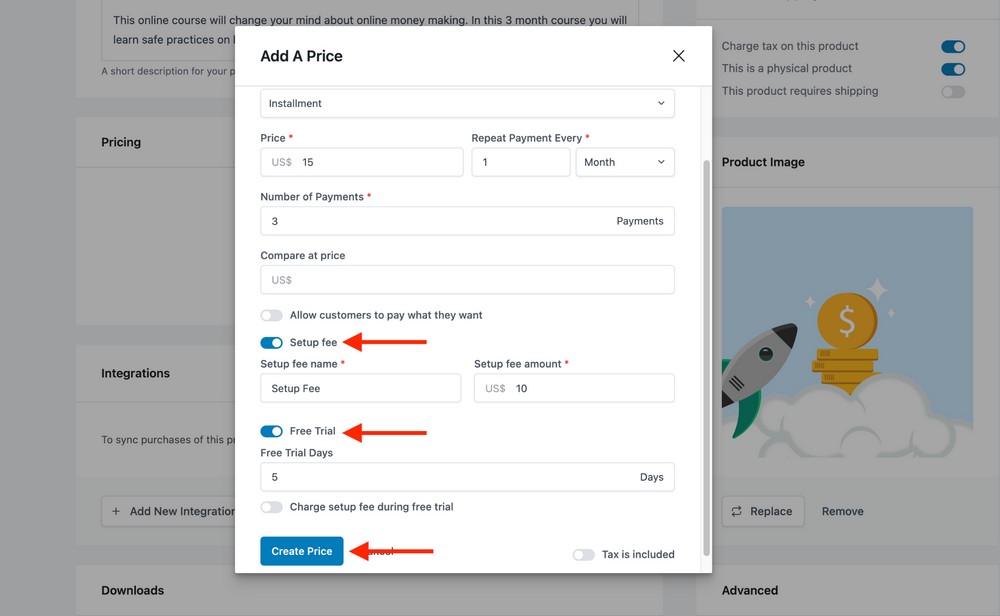
You can also enable the Free Trial option to allow customers to test the product for a certain period before paying for it.
Press the Create Price button to save changes.
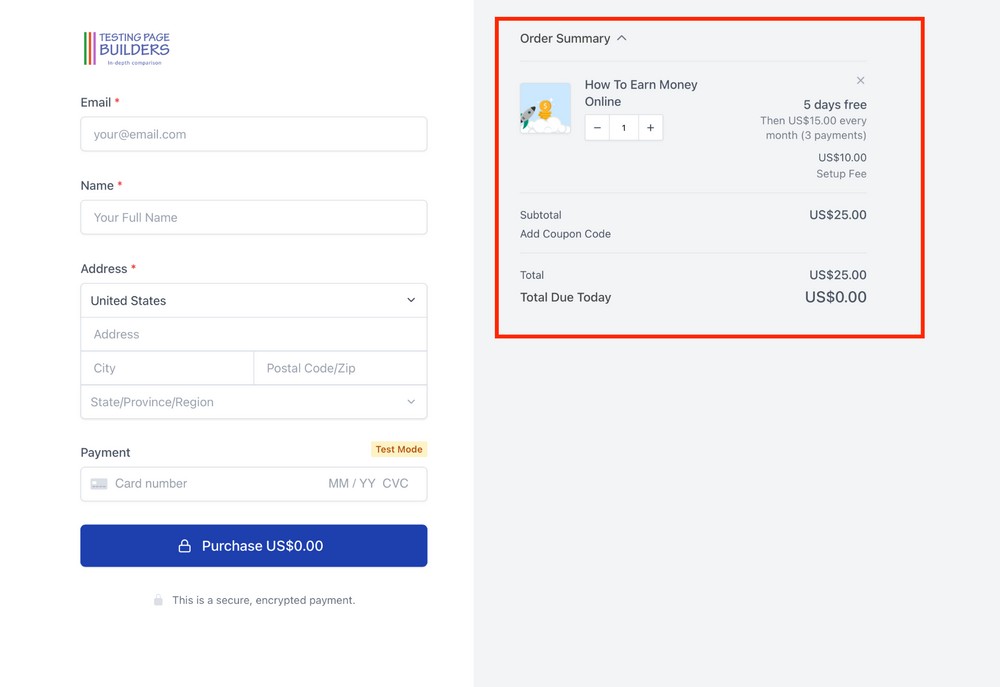
Here’s how it looks now.
➡️ Subscriptions
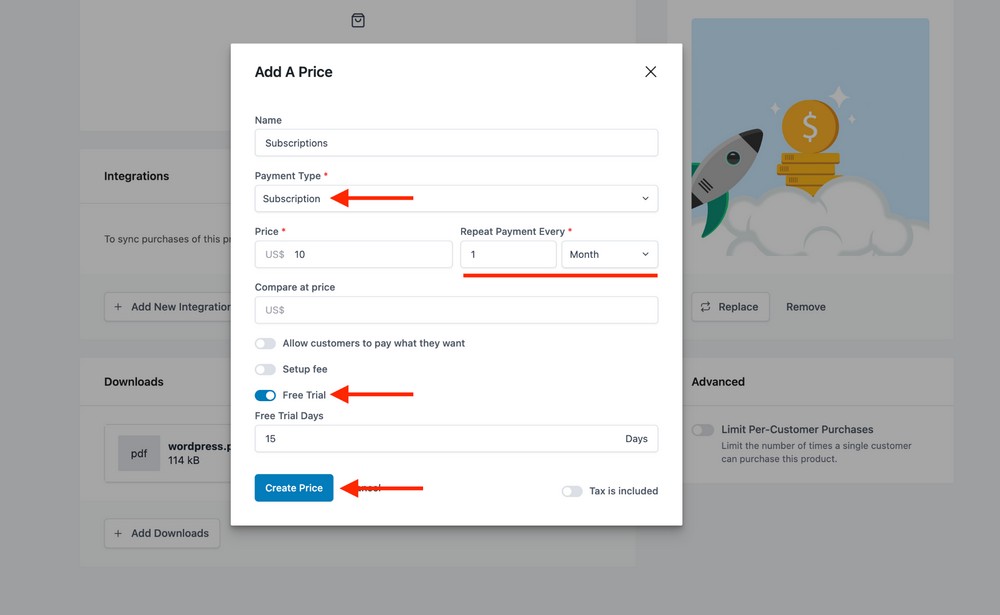
Setting up a subscription is very similar to setting up an installment plan.
It could be a bookstore subscription, software subscription or something else that requires such a payment model.
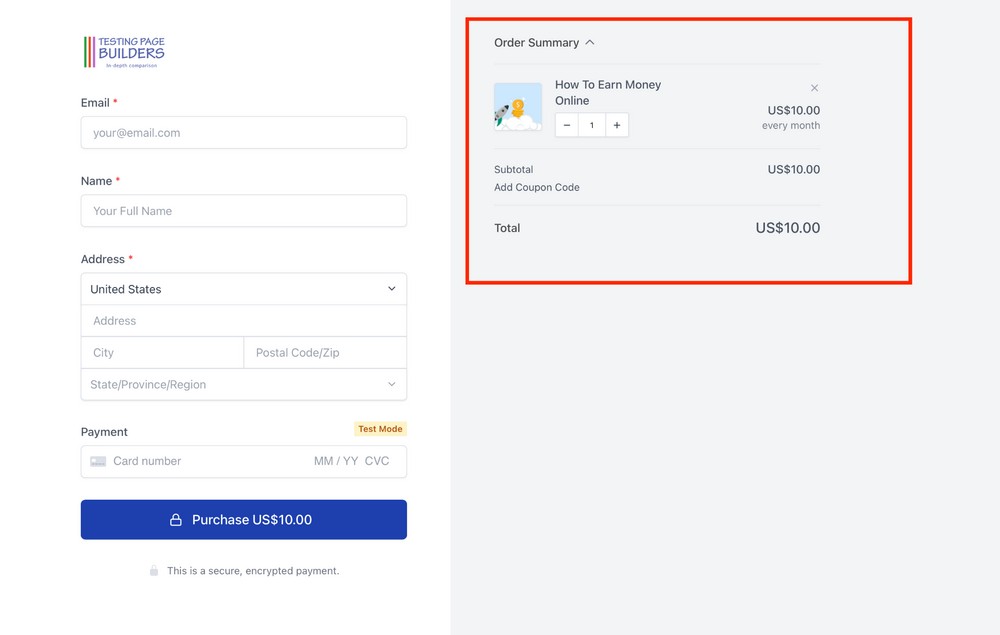
With a subscription model, your payment summary can look like this.
Create a simple checkout form
When you install SureCart, it adds a global checkout form with a default layout.
You can customize this form however you want, but if your website sells multiple products, you may want to create more forms.
➡️ Create a checkout form
To create a checkout form, go to SureCart > Forms and press the Add New button.
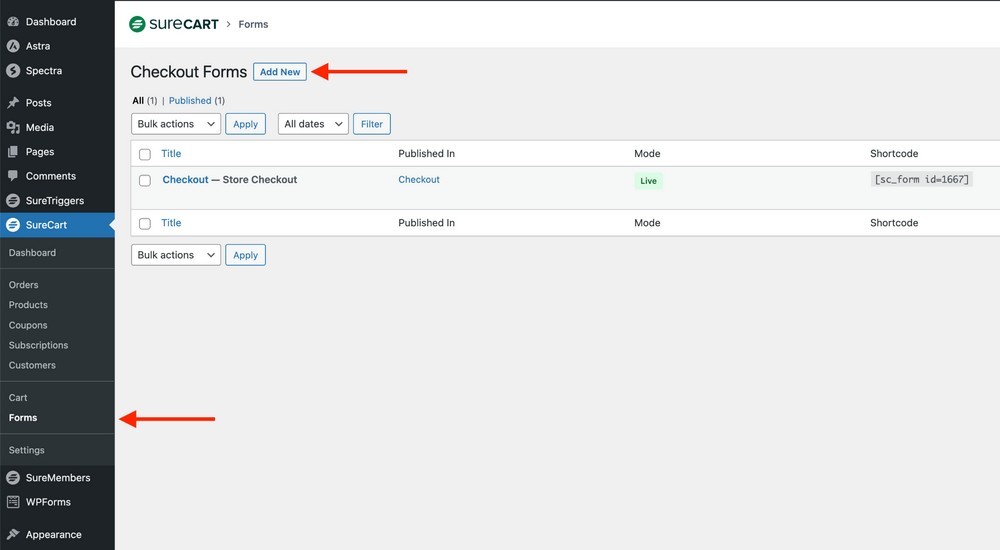
From the form editor, you can create a checkout form in the following steps:
- Add a form title
- Choose a design from pre-made form templates
- Add products to the form
- Format it if required
Let’s create one so you can see how it works.
Add a form title of your choice. We recommend using the same title as your product name unless it’s a common form for multiple products.
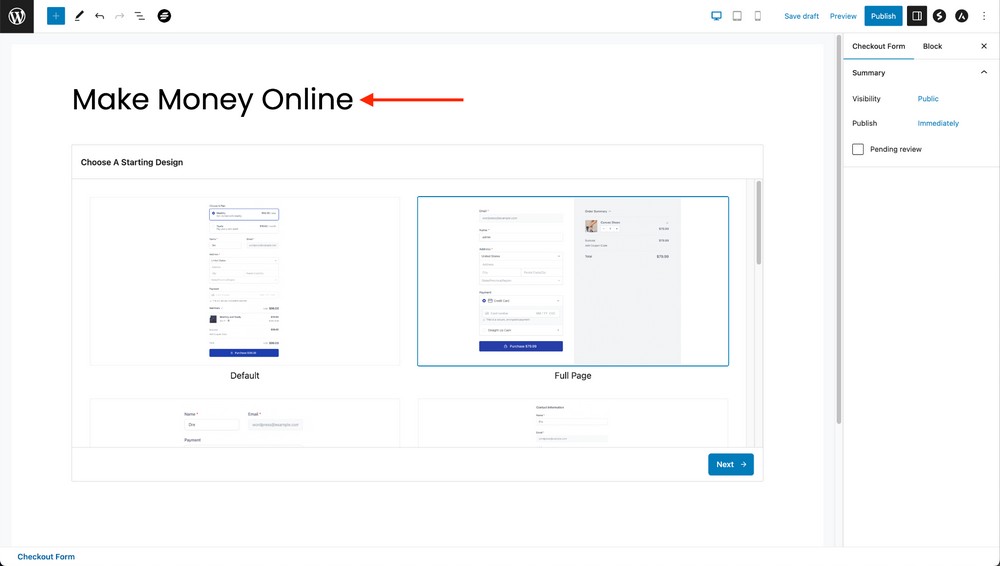
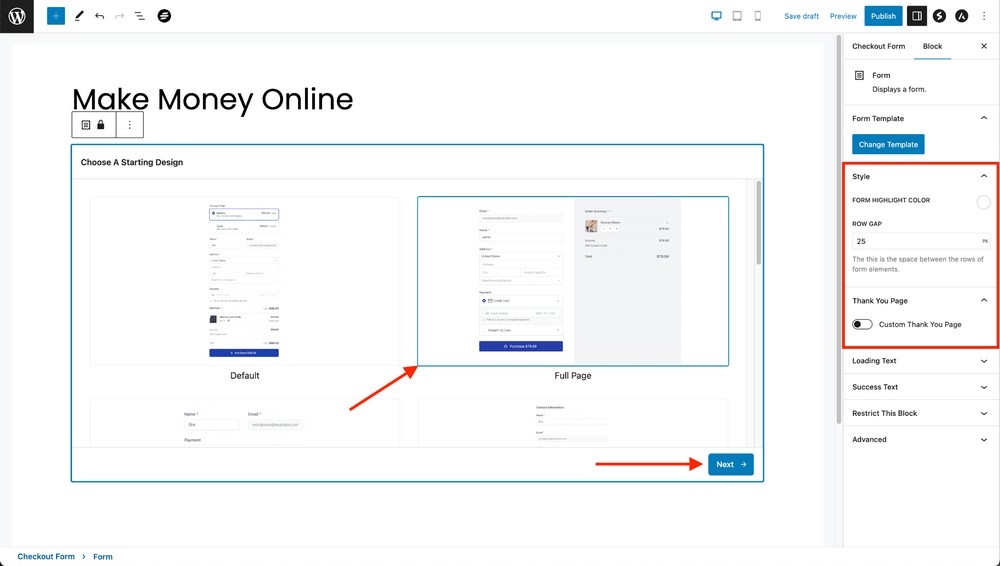
Select a form template and press the Next button.
PRO TIP:
It’s better to go with more extended plans at discounted rates to keep the hosting cost predictable for a longer time.
Add products to your form on the following screen.
Press the Add Product button and select the desired product from the list.
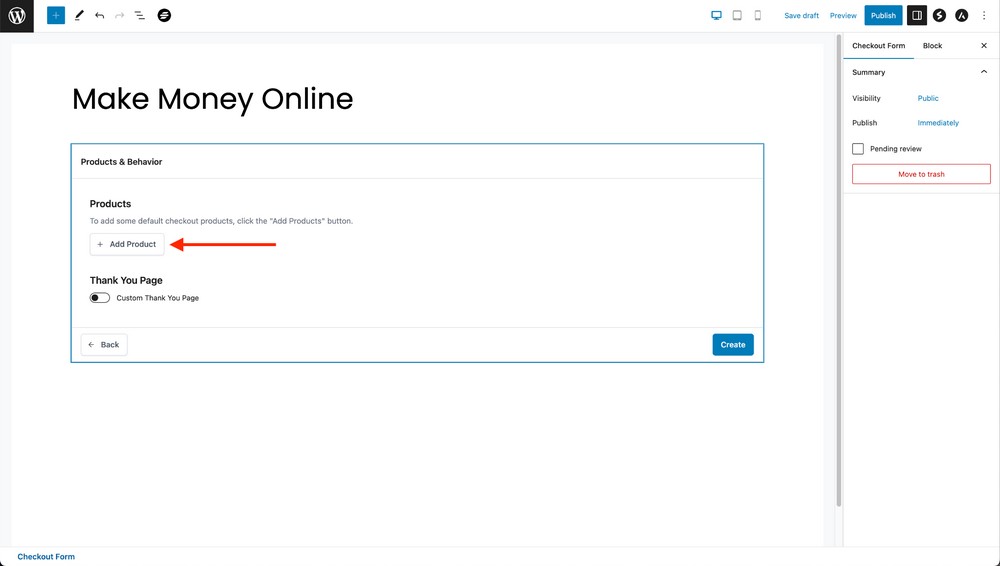
Select a product from the list to associate with this form. You can attach multiple products to a single form if you want.
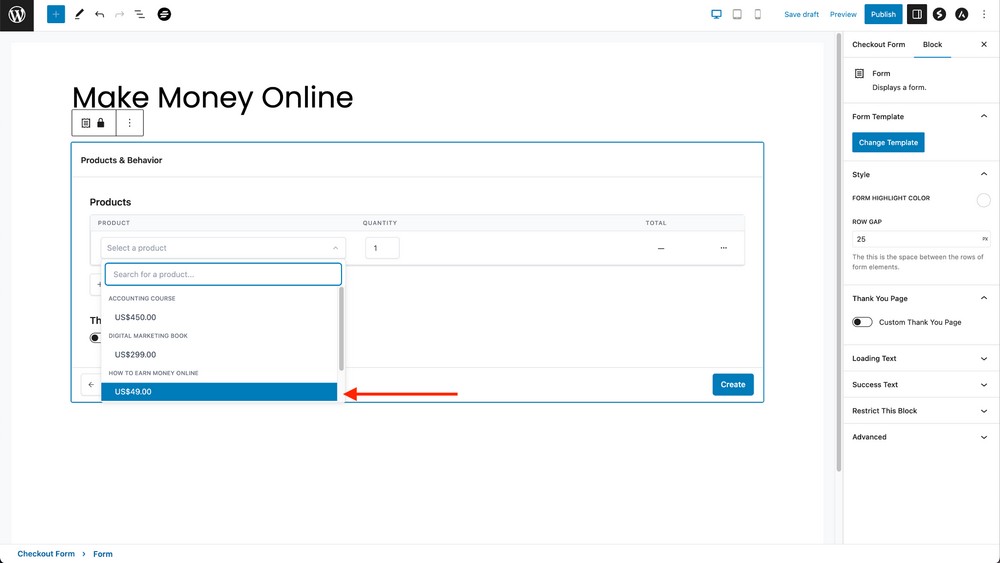
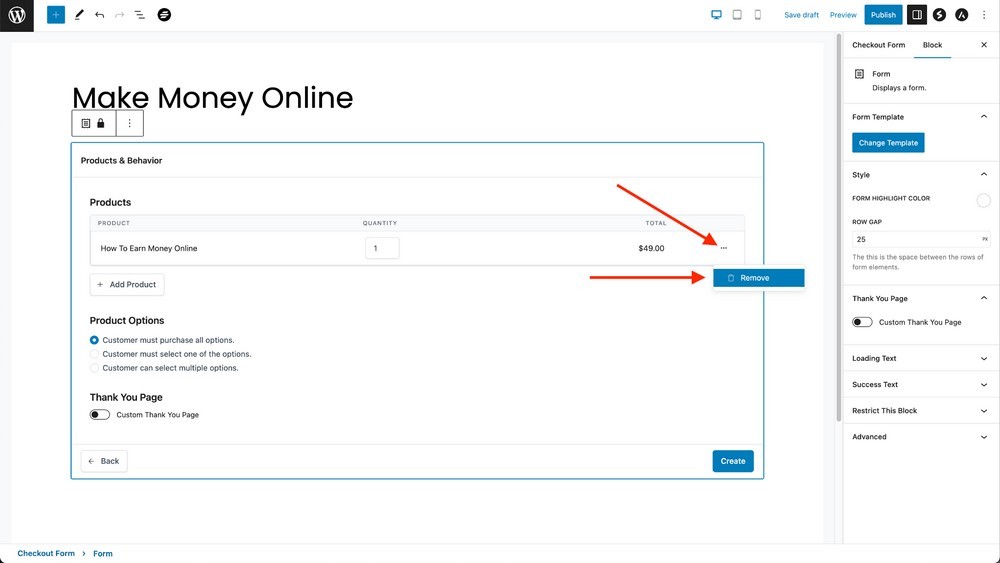
If you want to remove a product and select another one, you can do it from here.
Press the three small dots to show the Remove button. Pressing it will remove the product you just added.
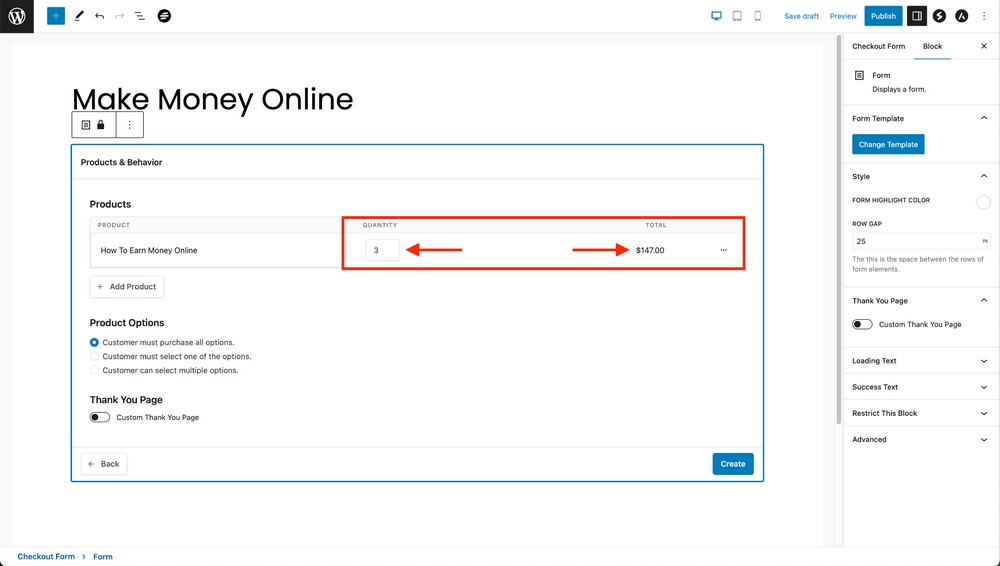
You can also change the quantity of products sold in a bundle. You can change the number to whatever you want.
Once you are done, press the Create button.
NOTE:
We knowingly skipped two options: Product Options and Thank You Page.
We will return to them later in the Advanced Forms section.
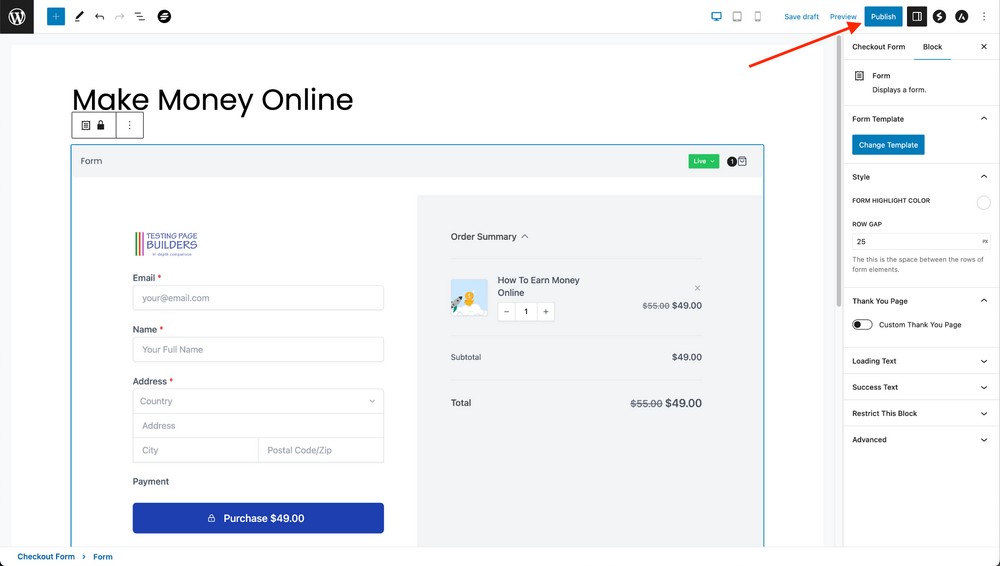
On the next screen, you will see our checkout form ready to be published. Press the Publish button in the top right corner to publish the form.
➡️ Add the checkout form
We’ve created a checkout form and attached a product to it. Now we want to present it to our audience so they can interact with it during the purchase process.
For this purpose, we need to embed this form on a web page. Let’s create a page and embed this form as our final step.
Go to Pages > Add New to open the WordPress page editor.
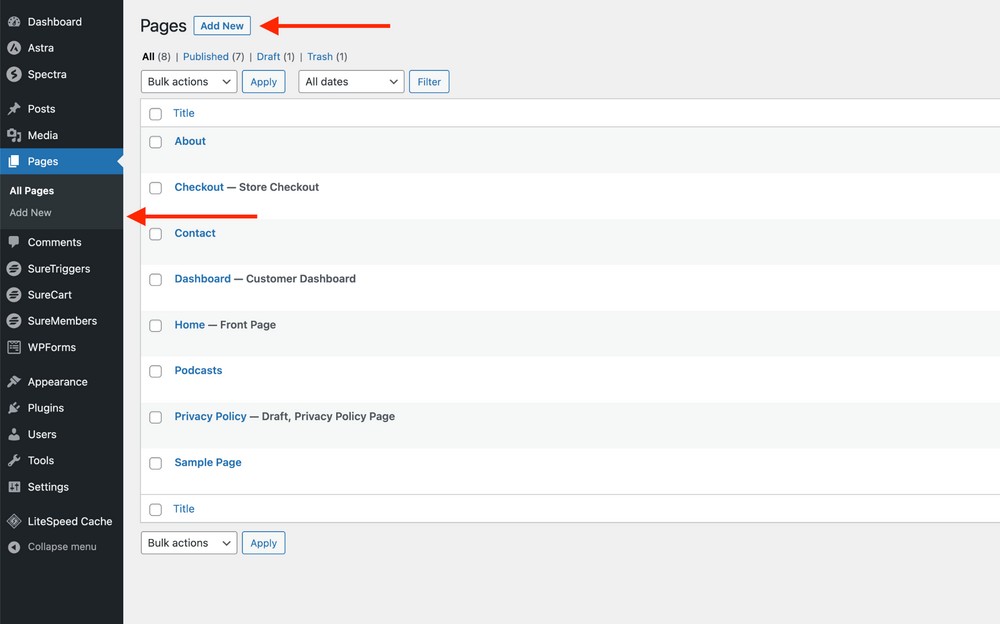
Choose a page title. Ideally, it should be similar to the checkout form you want to embed.
In this case we will select the title Make Money Online.
It’s good practice and keeps things organized at the same time.
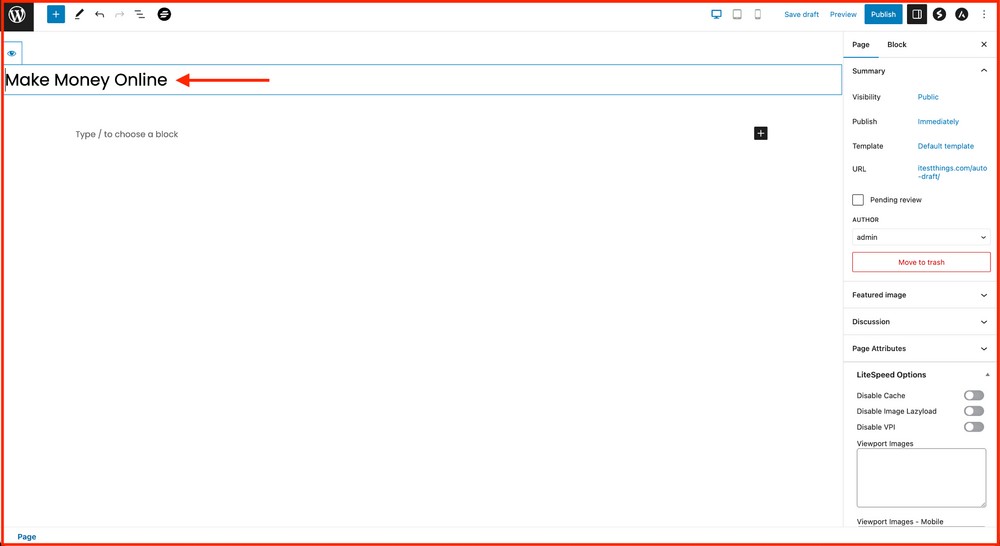
Next, follow these steps:
- Select a block under the page title
- Press the blue + button at the top. We call it the block inserter key
- Search for the checkout form block
- Click on it to add it to the page
- Select the Select Form button to choose the desired form from the list
- After you have selected the form, press the Choose button
- Press the Publish button to publish the page with the embedded form
➡️ Create a checkout form directly from page
It is possible to create checkout forms directly from your web pages with SureCart.
Go to Pages > Add New or open an existing page. Once you’re inside the page editor follow these steps:
- Search for the checkout form block and press the New Form button
- Choose a form title and press the Next button
- Choose the desired form template to suit your needs and press the Next button
- Add the product from the list and press the Create button
- Press the Publish button and press the Save button when it asks
➡️ Add a thank you page
One way to show your gratitude after a customer purchases a product is to thank them. That’s where a thank you page comes in useful.
Let’s create one and attach it to our checkout form.
Create a page with the title “Thank You”.
We will use a short text and an image to thank our users for this test website. You can use anything that suits your business.
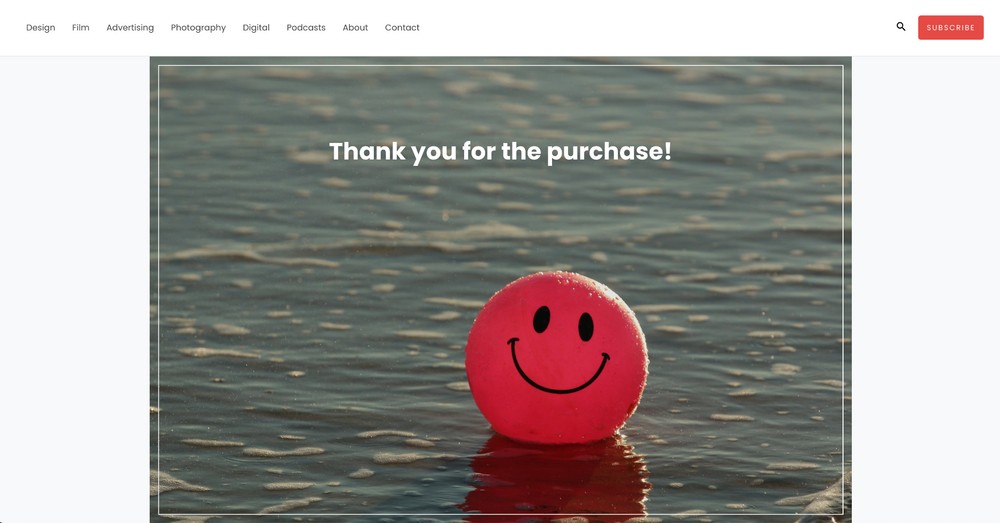
We want this page to appear when someone purchases an item so we need to attach it to a checkout form.
Open an existing checkout form or checkout page and click at the top of the form.
The right sidebar will show the related settings. A Thank You Page option is one of them.
In our case, we opened the Make Money Online checkout page and clicked on the top bar of the form.
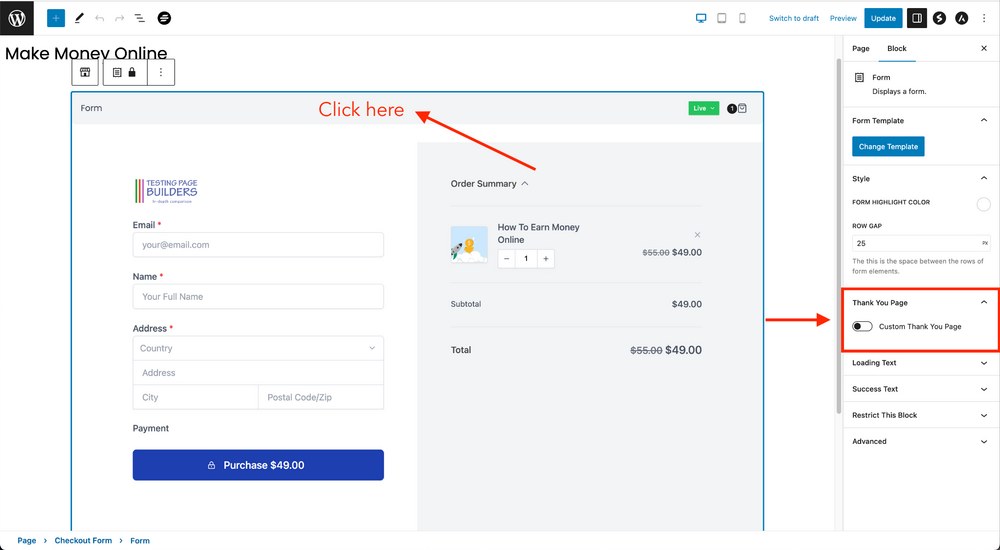
Next, enable the Custom Thank You Page option to reveal a list of available pages underneath.
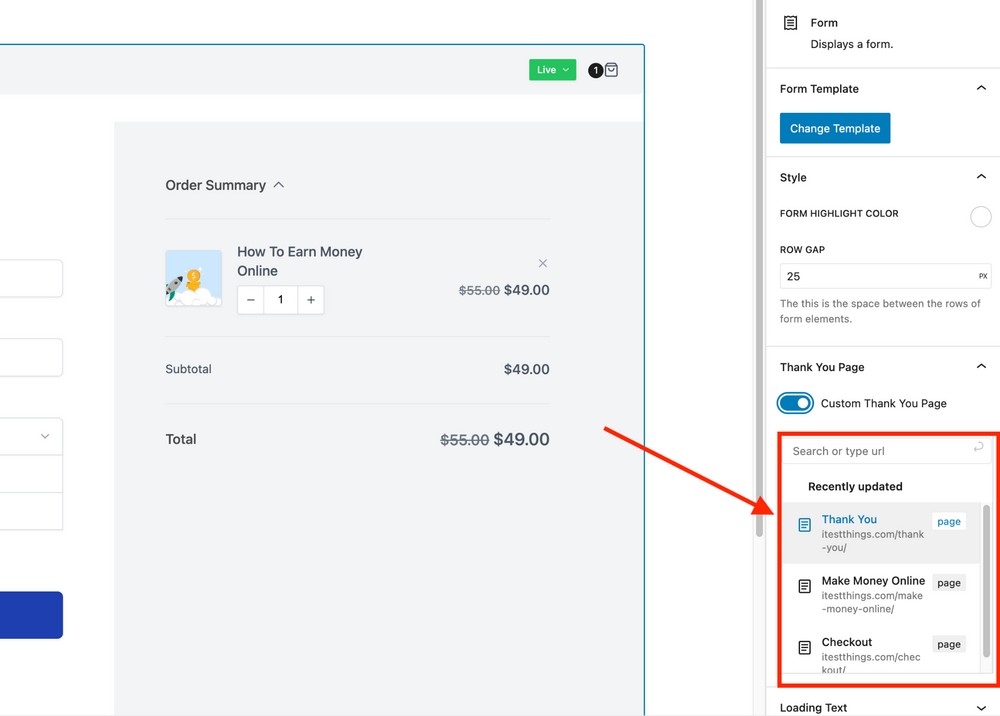
Select the thank you page we created earlier and press the Update button in the top right corner to save changes.
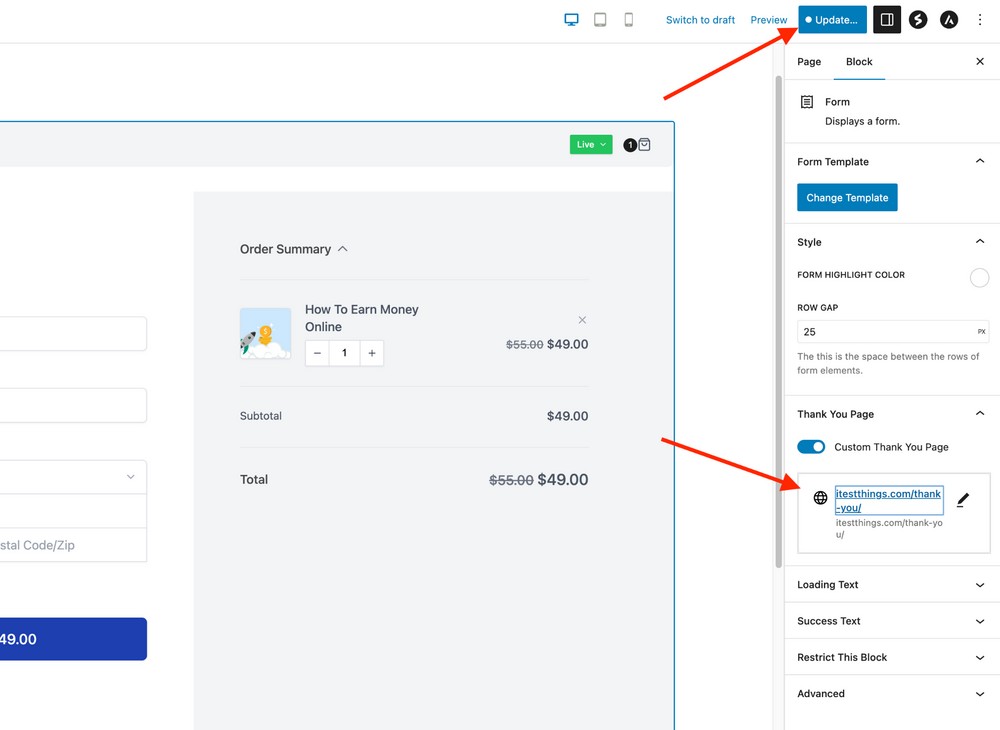
Let’s check out the thank you page in real time.
➡️ Activate test mode
We want to know if our checkout form works the way we want before inviting customers.
We also need to enable test mode so we can use test credit card numbers and see the results.
This is another awesome feature SureCart offers. It allows you to test any transaction prior to going live.
Open the checkout page in edit mode from Pages > All Pages > Make Money Online.
The status dropdown field is visible on the top bar of the form. Our existing form has the status Live and shows in green.
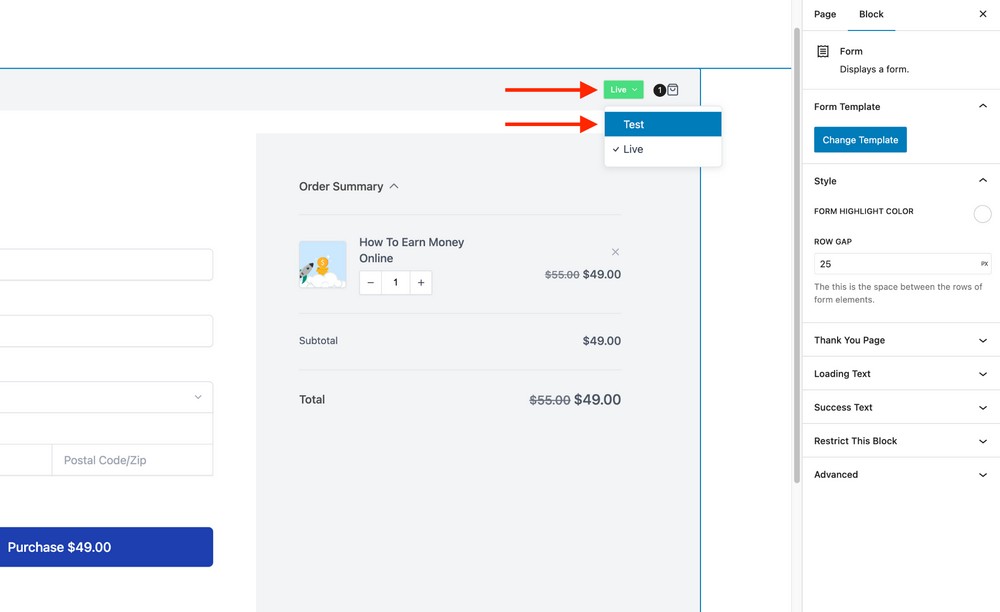
Click on the status field and select Test.
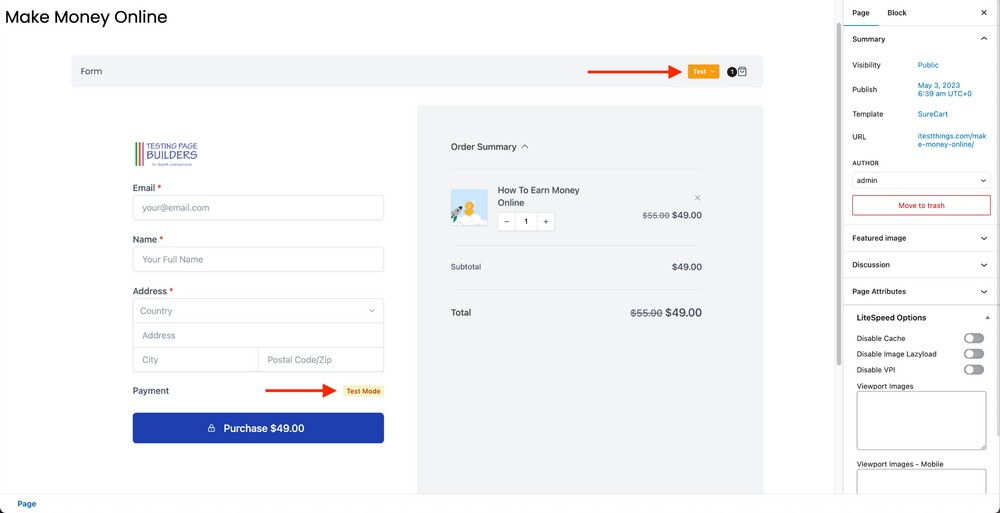
Press the Update button in the top right corner to save changes. This will enable test mode for this form.
You can also notice the Test Mode status appearing above the Purchase button.
➡️ Access the customer dashboard with a button
If you sell a downloadable product such as an ebook, video or image, you may want to give your customers a more personalized dashboard.
You can use the customer dashboard for several purposes such as:
- Allow customers to download the product
- Let them set/change the password
- Access the invoice or look at the purchase history
- Or, anything you want
Typically, SureCart creates a default customer dashboard page with every installation.
Whenever a customer purchases a downloadable item, they are automatically redirected to their customer dashboard.
If you want to alter the sequence and add a custom thank you page, here’s how:
Create a page from Pages > Add New.
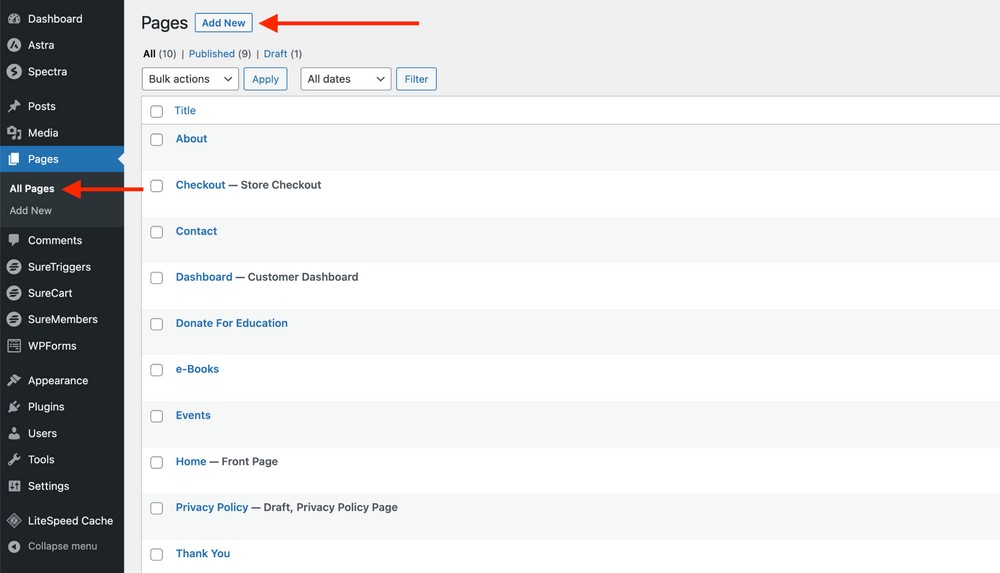
We want to create an order confirmation page with a call to action. So name the page accordingly.
We will use the title “Digital Marketing Book Order Confirmation” and add the following elements:
- An order successful message
- A thank you message
- An image or video, if required
- A button that should take the user to the customer dashboard
Let’s add these elements.
Let’s press the Toggle block inserter button and add the Spectra Image block to the block editor.
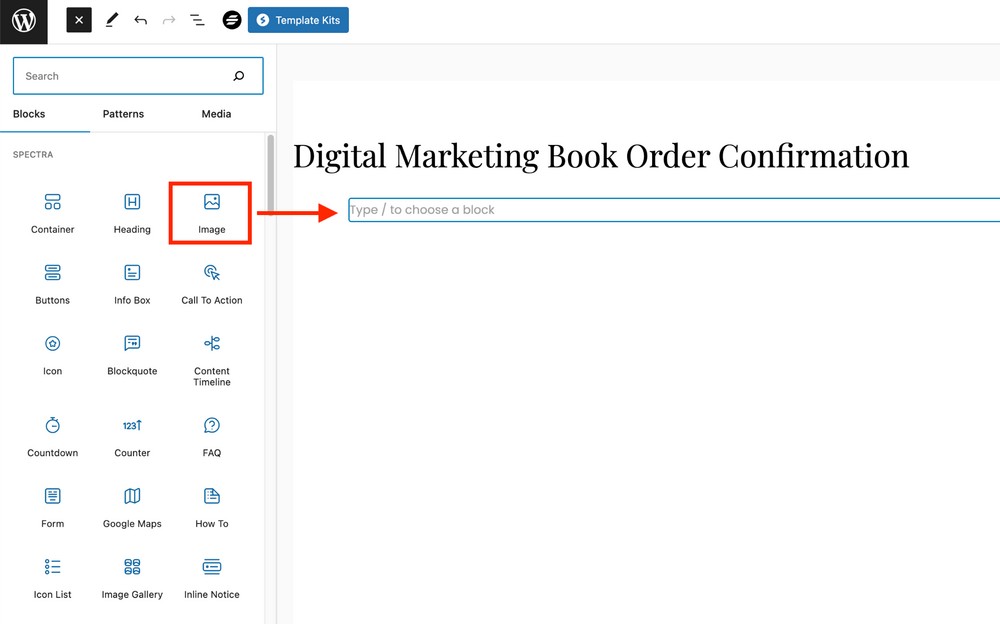
Now we need to upload an image for our page.
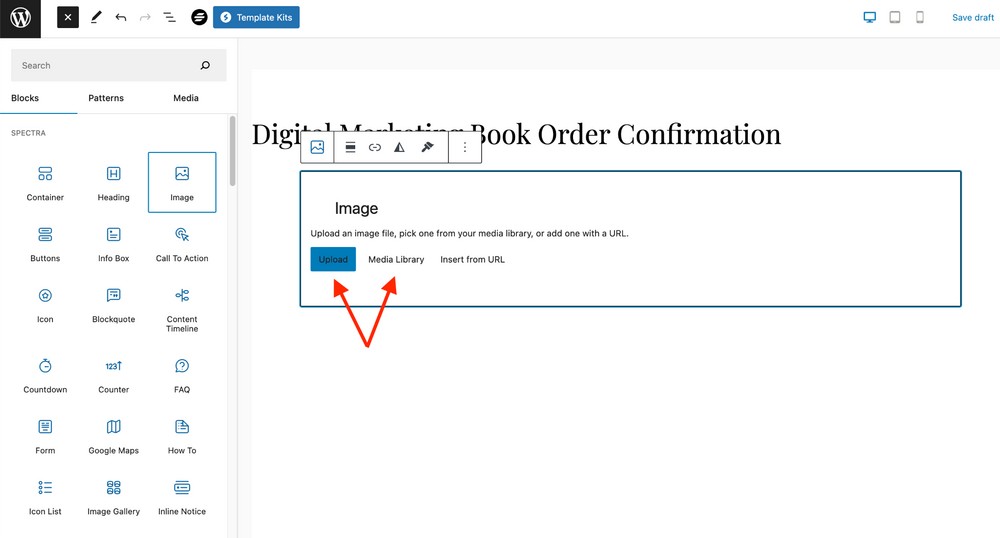
After importing the image, we will click on it to show related settings in the right sidebar.
These are Spectra page builder specific settings.
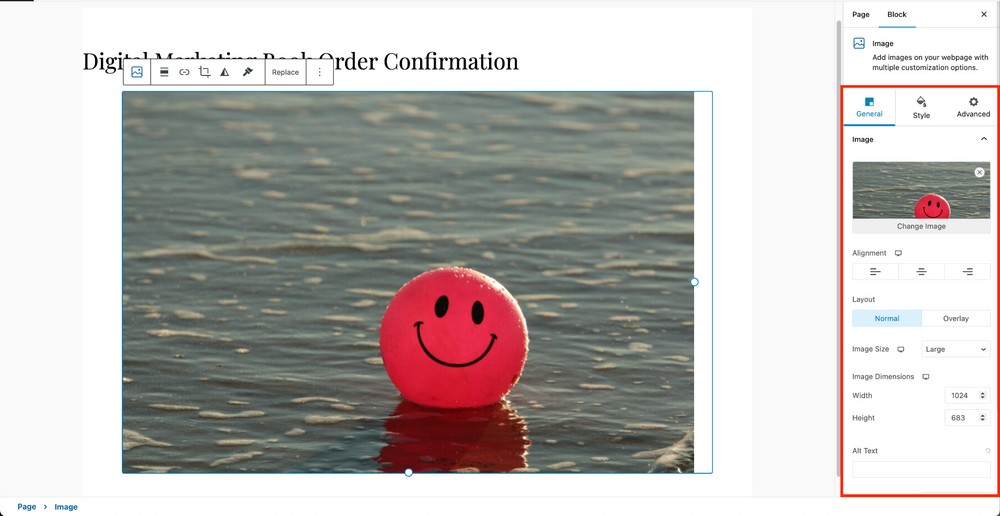
The Spectra page builder is very user-friendly and provides a WordPress-like experience.
Coming back to our page, we will now use the sidebar options to customize our page. Later, we will link it to our default checkout form so it loads automatically after a successful purchase.
PRO TIP:
If you want to hide the page title, click the eye-shaped icon above the title.
Create an advanced checkout form
SureCart offers a number of advanced features that enable you to sell products and services in a more professional manner.
For instance, you can offer a graphic design course with a one-time payment, an installment plan and subscriptions, if you wish.
Let’s show you how.
To add a new product to SureCart, go to SureCart > Products and click the Add New button. Add the essential details about the course.
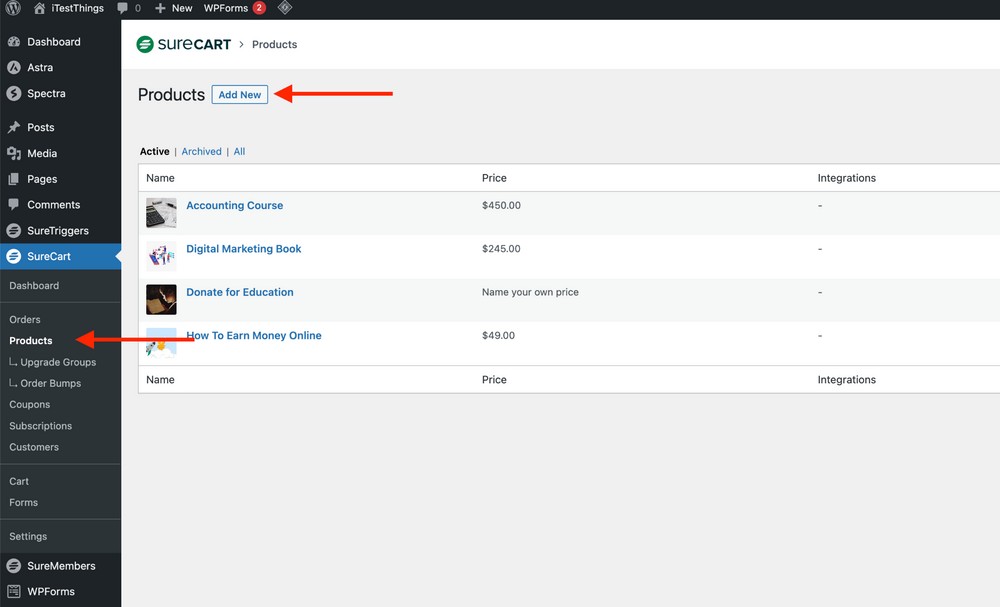
Name the product and press the Create button when the option appears.
Make sure to add the product description, images and downloadable files to the product detail page.
Next, set a one-time price for this product.
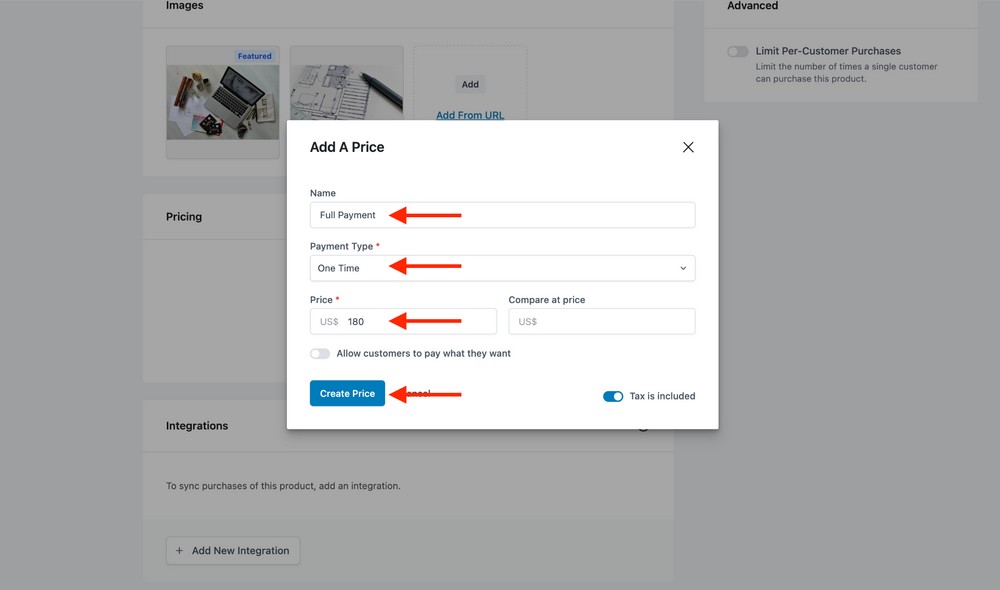
It’s now time to add a monthly price plan to this product.
Press the + Add Another Price button, name the price plan and select Installment from the Payment Type drop down list.
Choose an installment price that you like and choose the number of payments you want users to make.
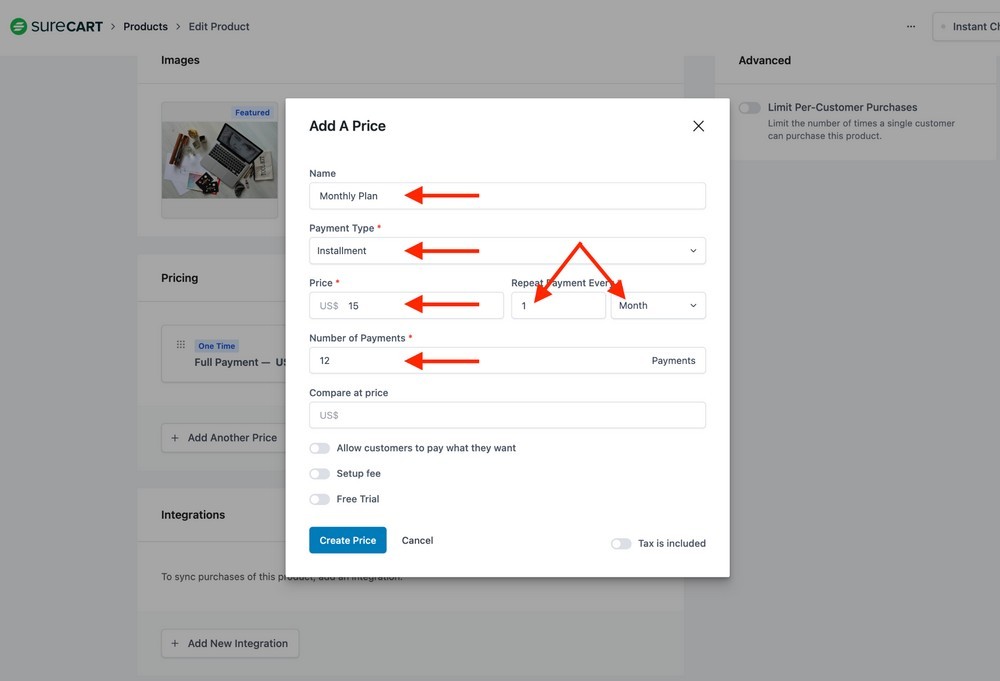
Press the Create Price button at the end.
Depending on what you’re selling, you may also be able to attach a subscription plan to it.
Select Subscription from the Payment Type field and then set the price according to your needs in the price field.
You can also charge users a setup fee if you like.
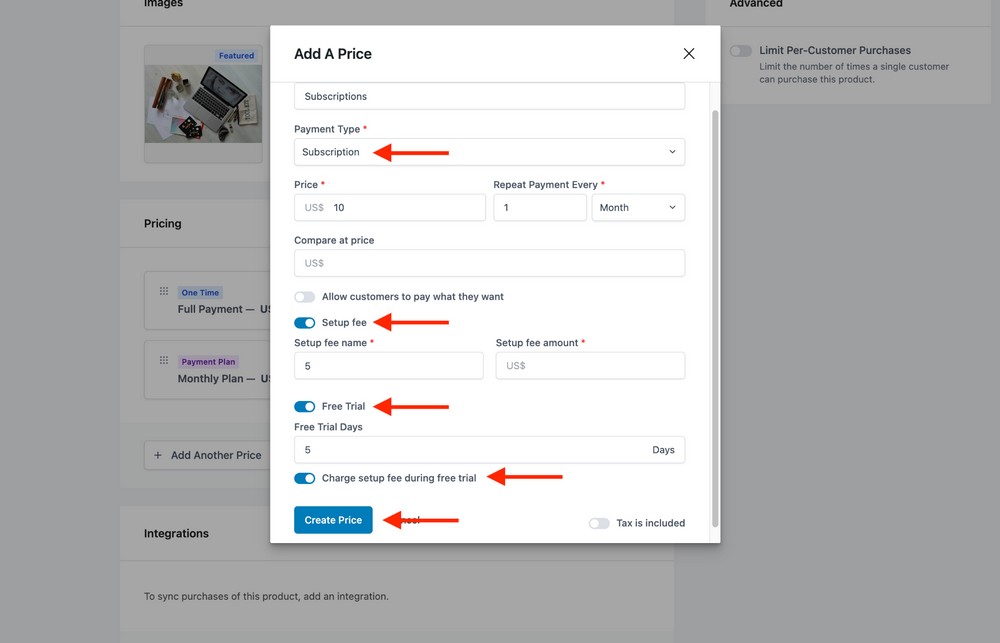
If this is the case, enable the Setup fee option, name it something relevant and set a price for it.
You can give your customers a free trial by enabling the option below and choosing a number of days which the trial should last.
If you want users to pay a setup fee during the trial period, enable the Charge setup fee during free trial option.
Press the Create Price button to save changes and close the window.
Now we’ve set up the product, let’s add this to our checkout form. We will use an existing form this time.
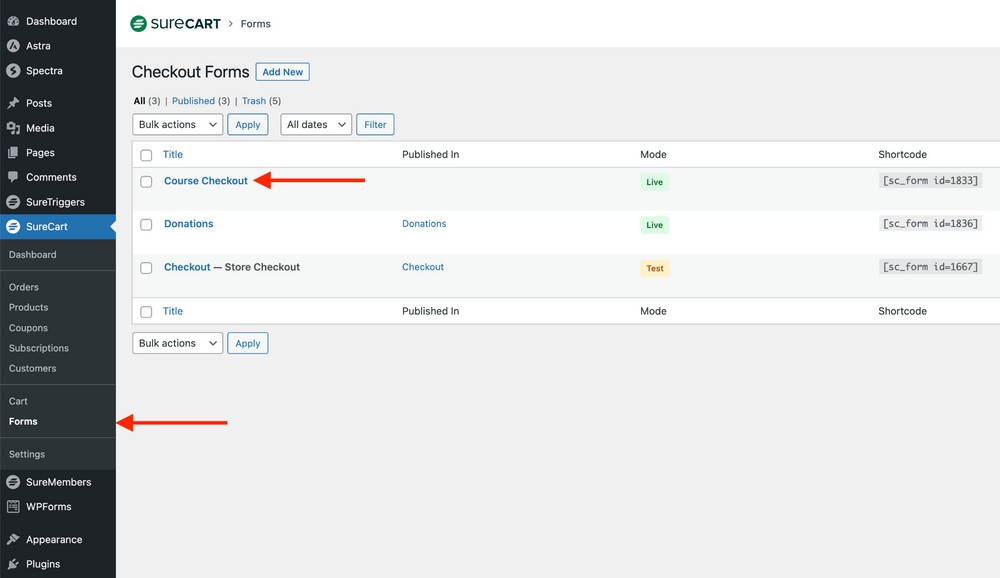
Here are the steps to follow:
Change the form title to anything you want
Click on the form’s top bar to see the Change Template button in the right side bar.
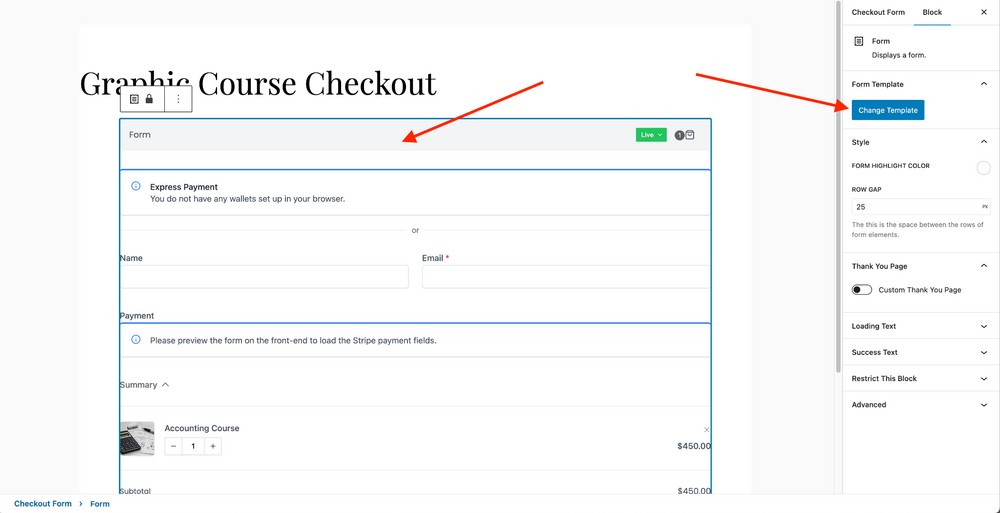
Press this button to select from the available checkout form templates.
We will select the Full Page template and press the Next button. You can choose the one you like.
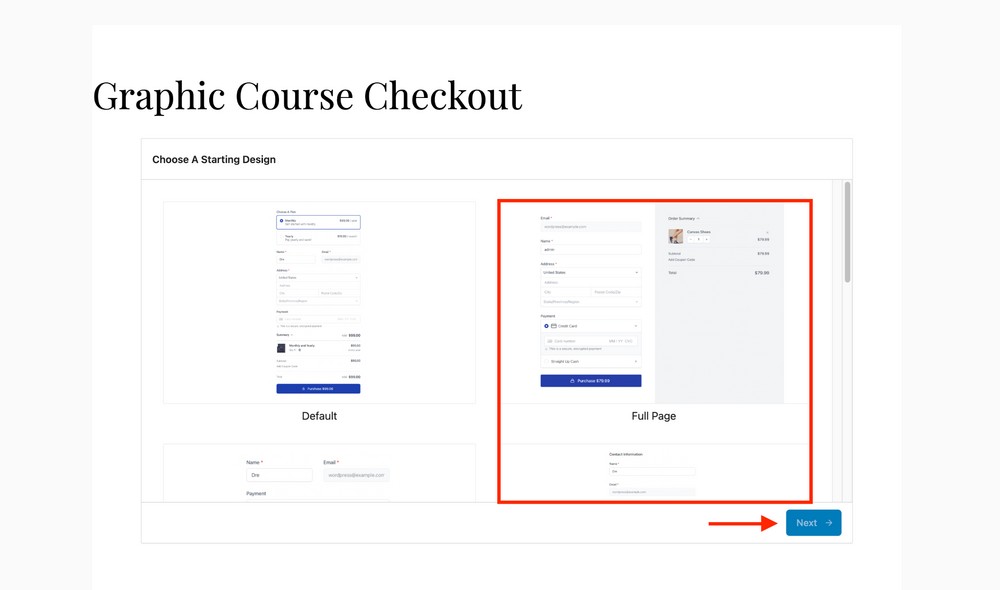
To add a product to this checkout form, we need to press the + Add Product button to see a list of available products.
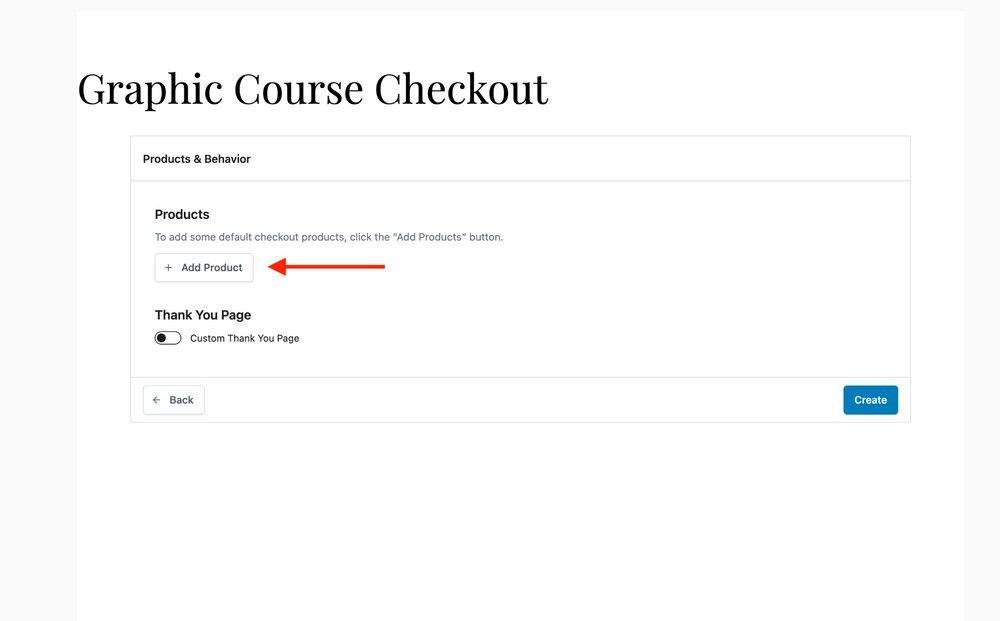
Now, select the price plan we just created. Choose the one-time payment plan under the graphic design course product.
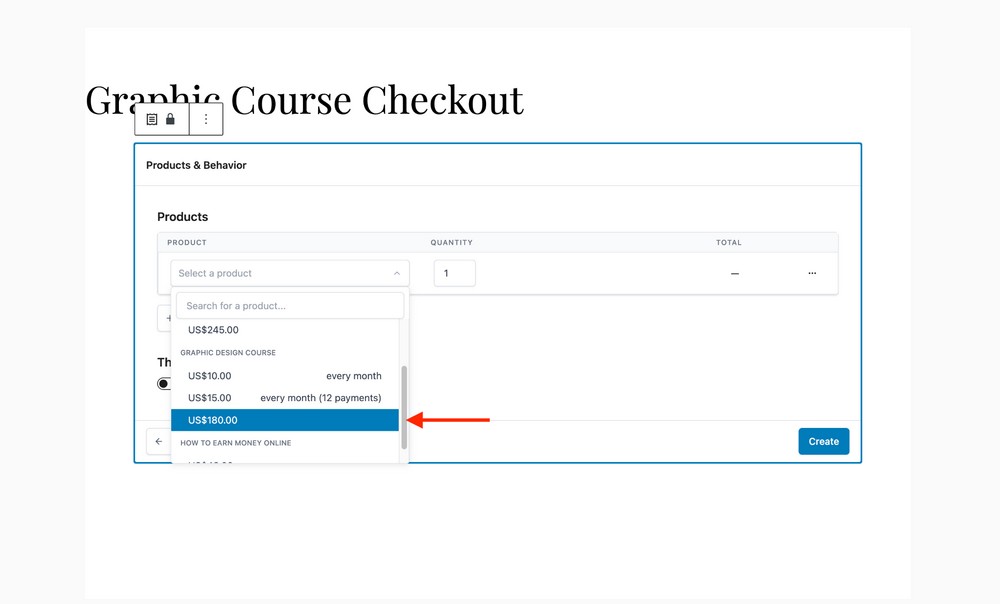
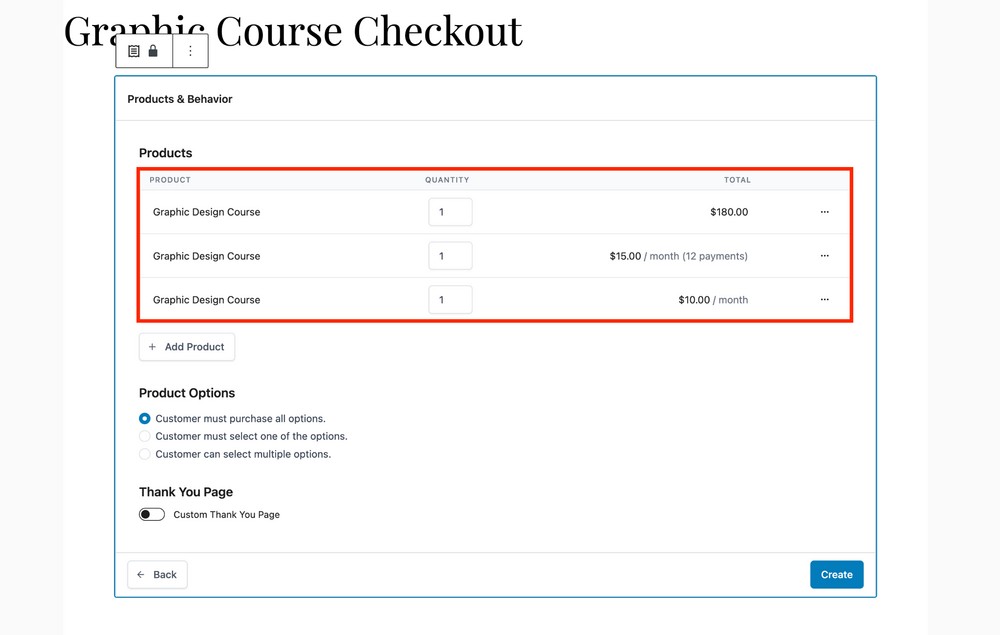
Repeat the process and add installments and subscriptions as required.
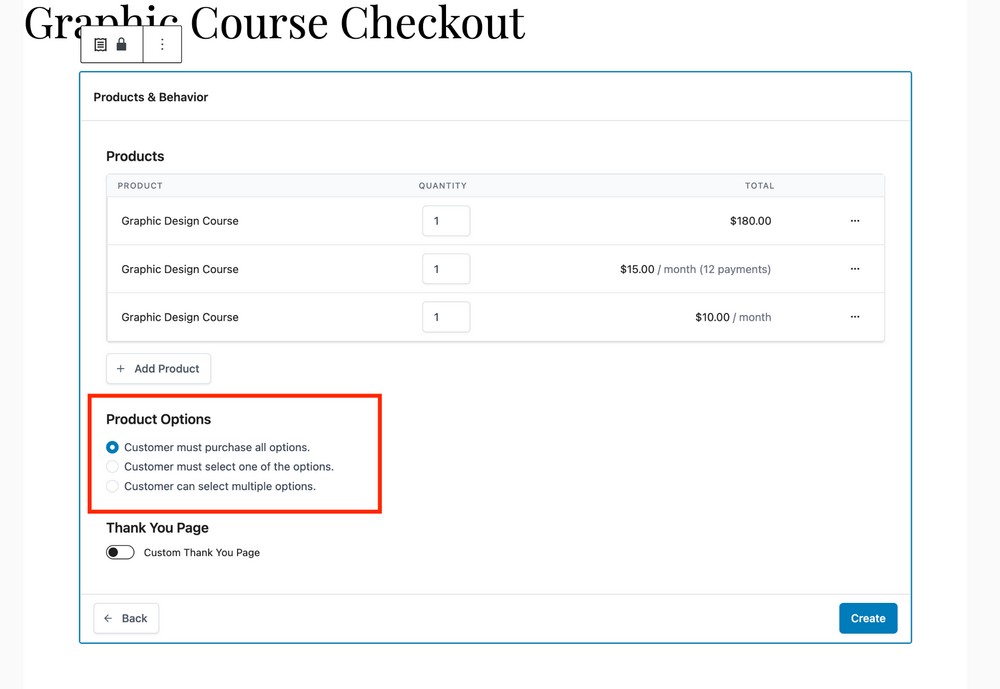
Let’s give users the option to either select a set price or something else
We can do this from Product Options.
In this case, we will choose the second option: “Customer must select one of the options”.
As the name suggests, customers can choose one of the price options during purchase.
Let’s enable the Thank You Page option and select a page from the list. We used the “Digital Marketing Book Order Confirmation” page earlier in this tutorial.
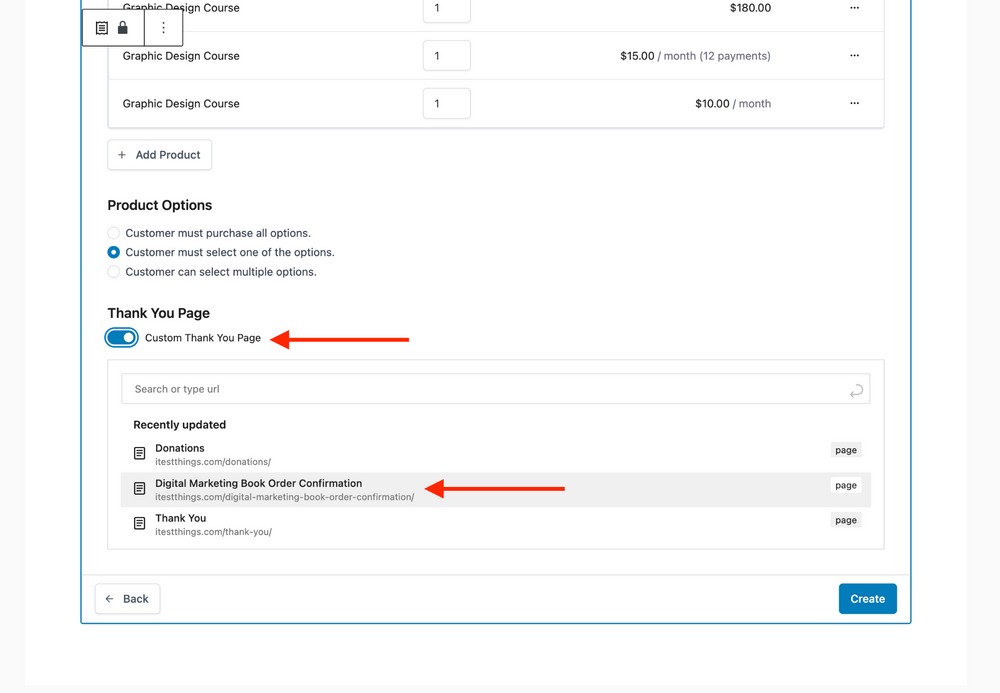
Let’s use this page and press the Create button to create the form.
Don’t close this form yet! You may want to change how it appears. 😀
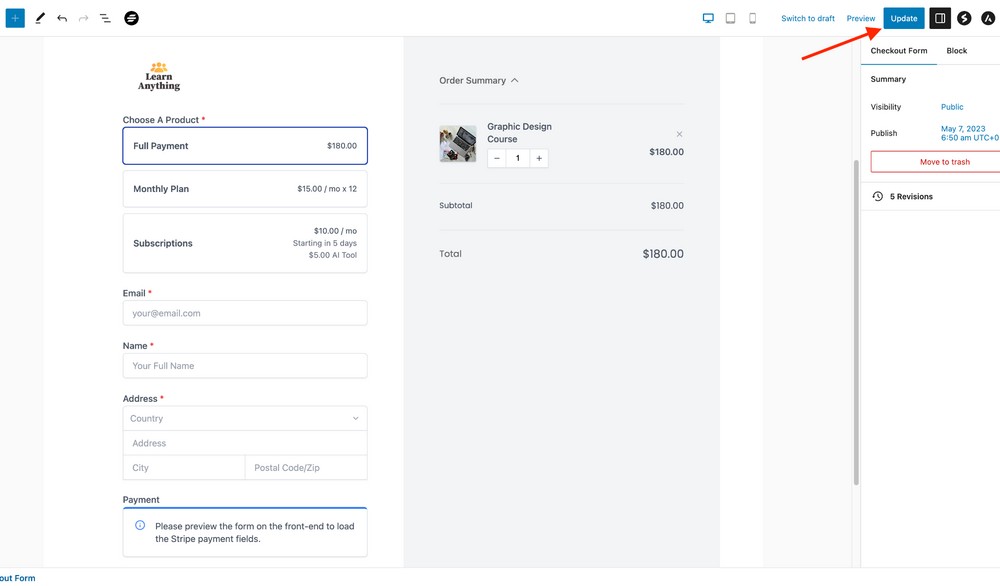
Customize a checkout form 🛠️
With SureCart you can customize your checkout form however you want. If you want a Shopify-style checkout form, here’s an in-depth tutorial for it.
Right now, our checkout form is a two column layout. Let’s alter a few things and see how the changes take effect.
How about making the following changes for now?
- Change the column order
- Remove the logo
- Remove unwanted form fields
- Change the column color
Right now we have the payment and address information form on the left and the shopping cart on the right.
We can change this order easily.
Document Overview is the button at the top left you need to press to open a sidebar. This shows all the elements of your checkout form.
You can click on the small arrows beside each parent element inside the live view panel to reveal child elements.
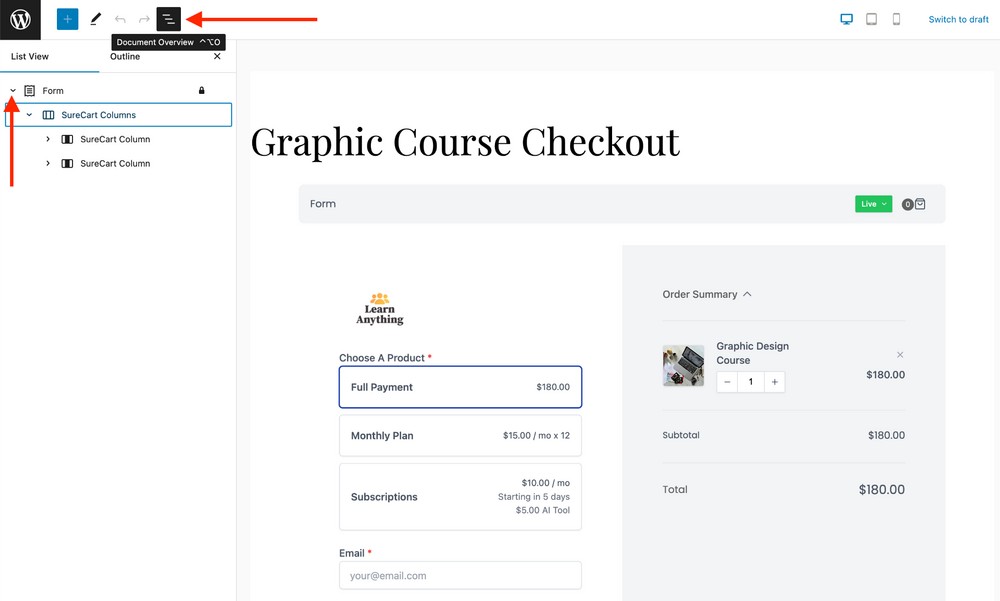
Since we have two columns in our form, we can select each by clicking on them.
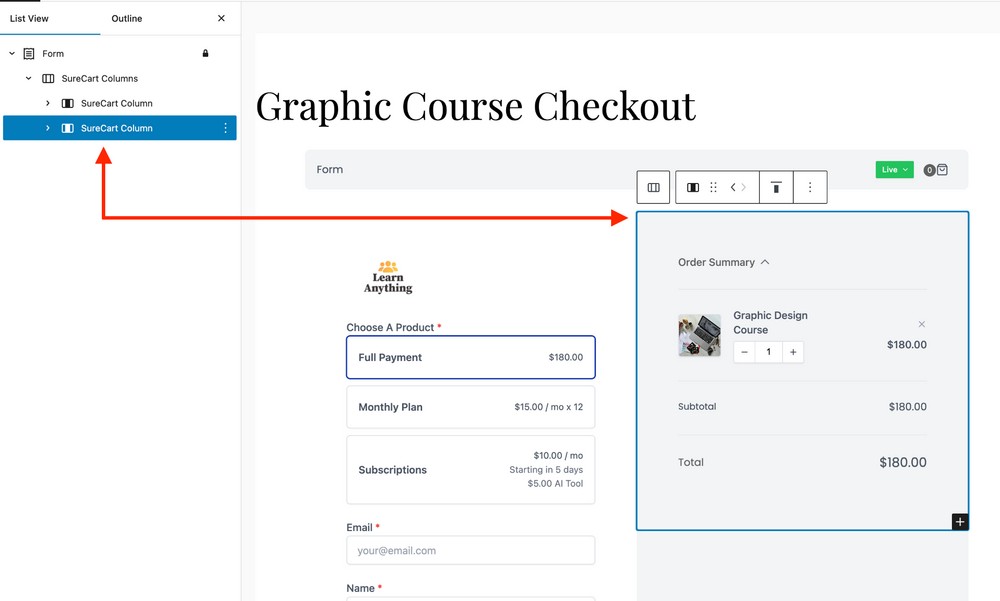
In the list view sidebar (left), drag the one at the bottom and drop it on top of the one you already have. It’s that simple.
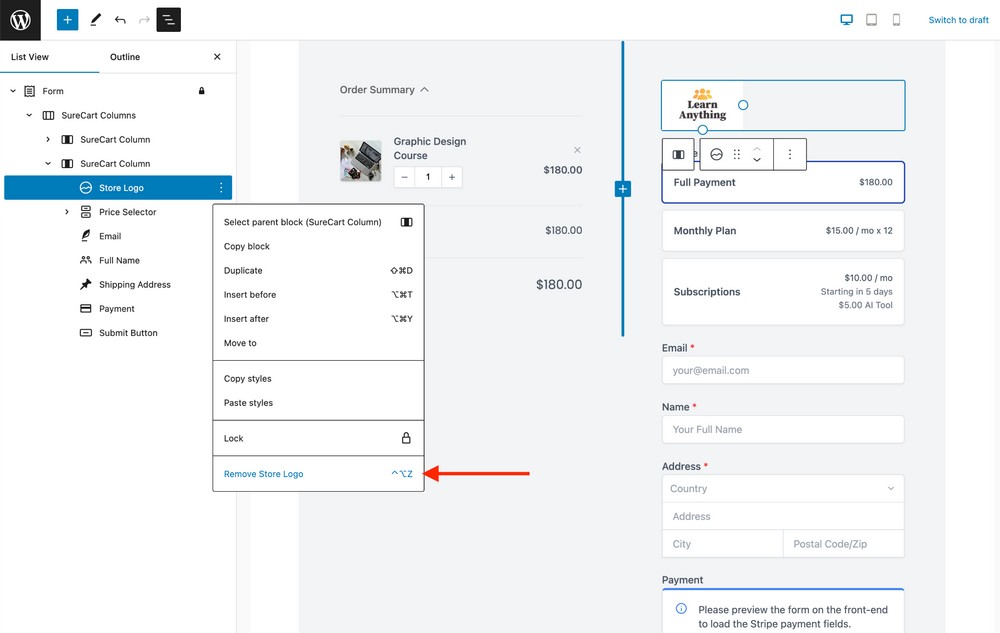
Next we want to remove the logo from the top of the right column.
You will need to expand the form elements until you see the Store Logo.
Press the three dots beside the button to reveal a menu.
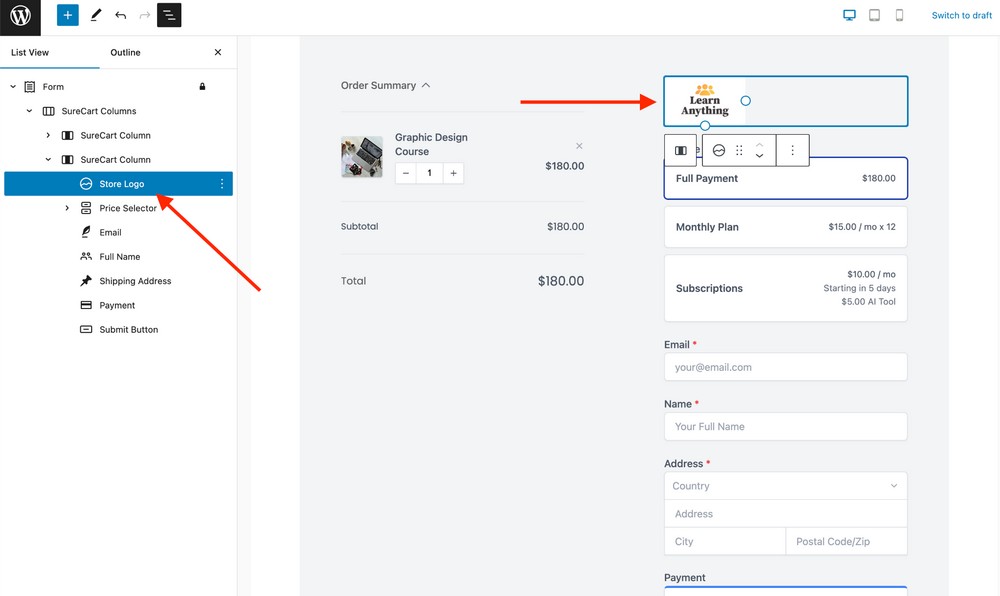
Scroll down to the bottom and click the Remove Store Logo option.
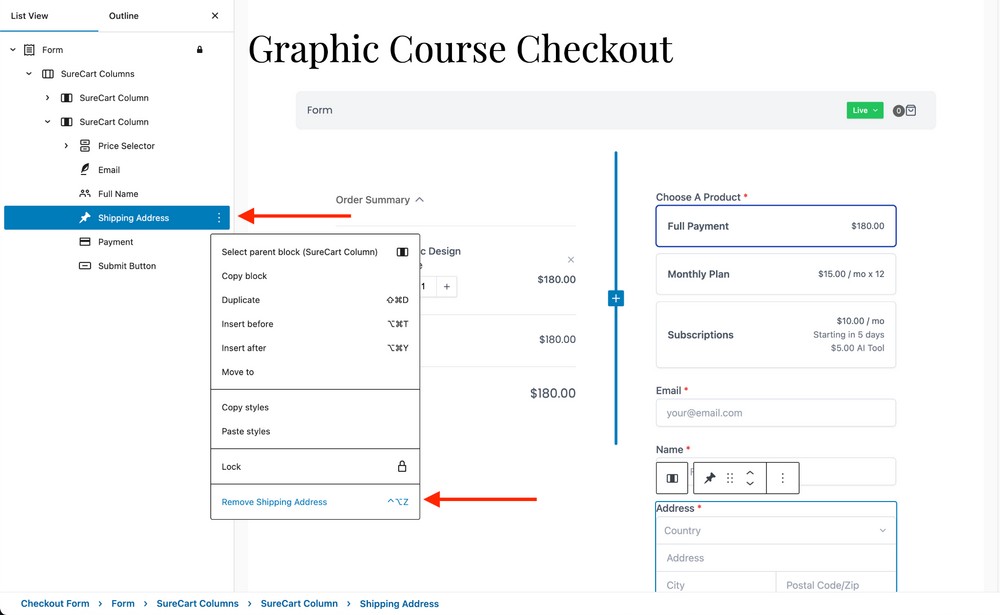
We’re selling a digital product so we don’t necessarily need a shipping address in order to make the sale.
Let’s remove it to simplify the form.
Select the second column in the list view and then scroll down to Shipping Address.
Press the three dots and click on the Remove Shipping Address option.
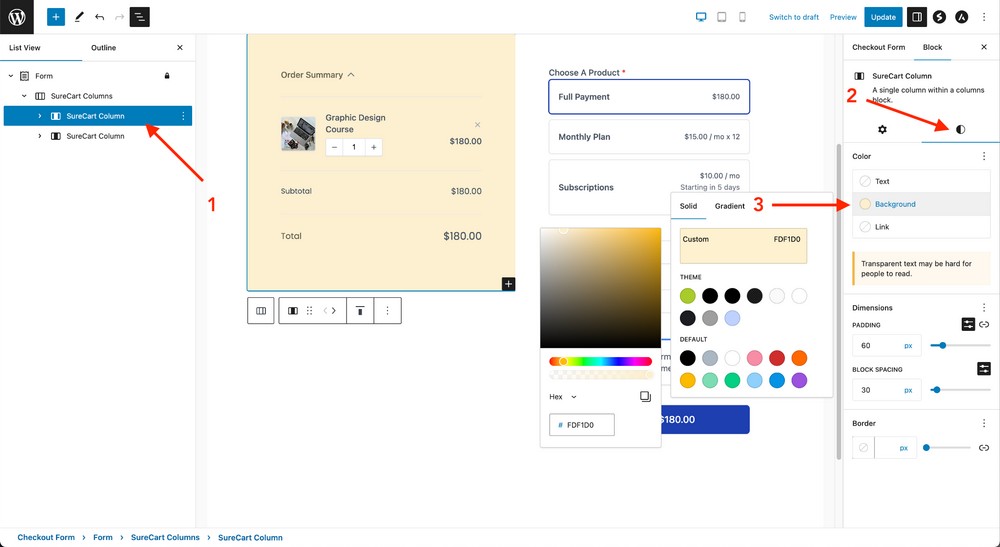
Next, change the background color of the left column.
Choose the desired column from the list view, click on the Styles tab in the right column and choose the color you want.
We need to open this form on a live site so let’s integrate it into a page.
We’ve covered this step earlier in detail so we will walk through it quickly.
Go to Pages > Add New and choose “Graphic Course Checkout” as the title.
Use the Checkout Form block to import the form. Press the Choose button to proceed.
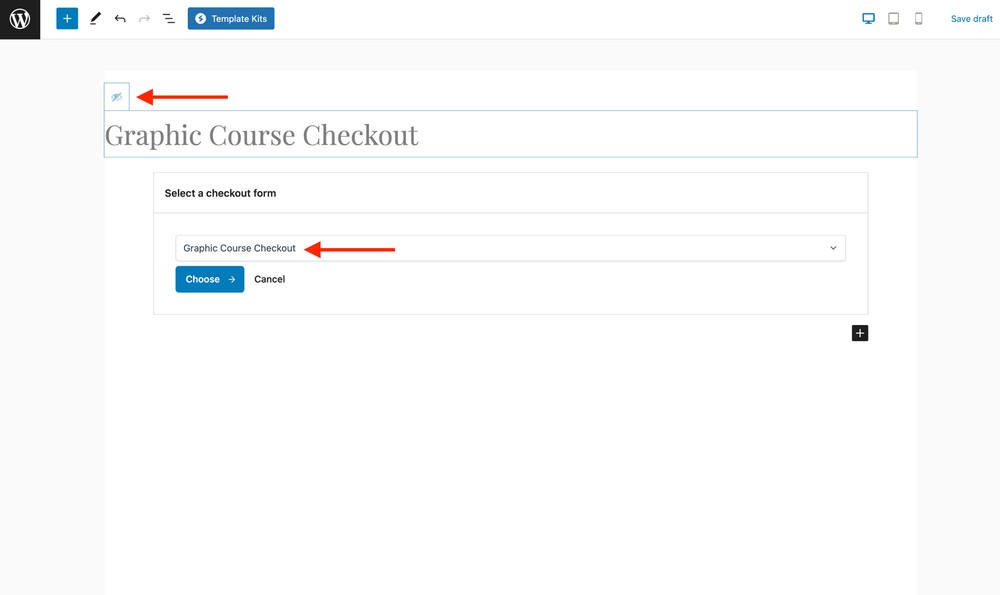
On the next screen, press the Publish button to complete the process.
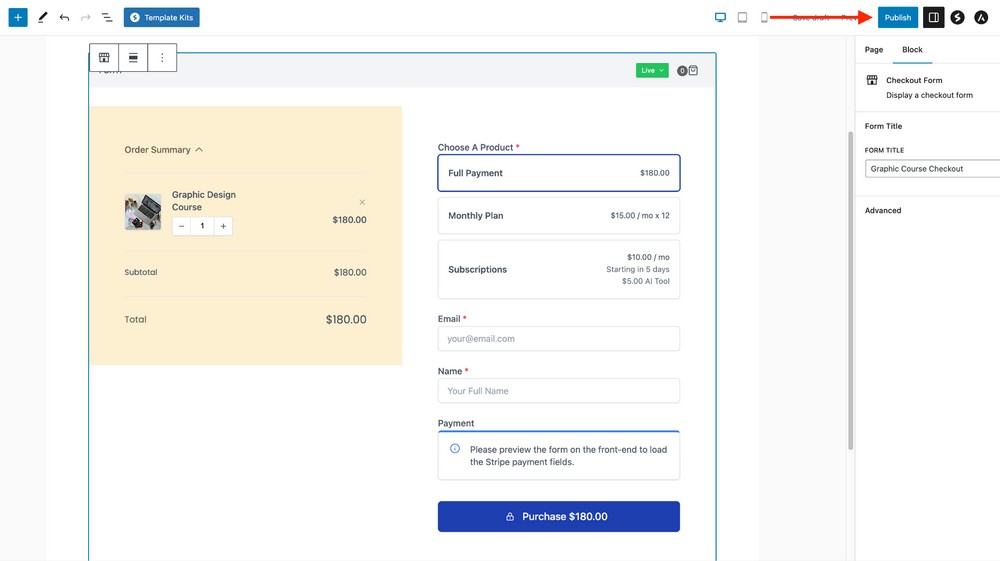
Now open the page on a live site to see the results.
Our checkout form looks nice but there are some distractions with the header and footer.
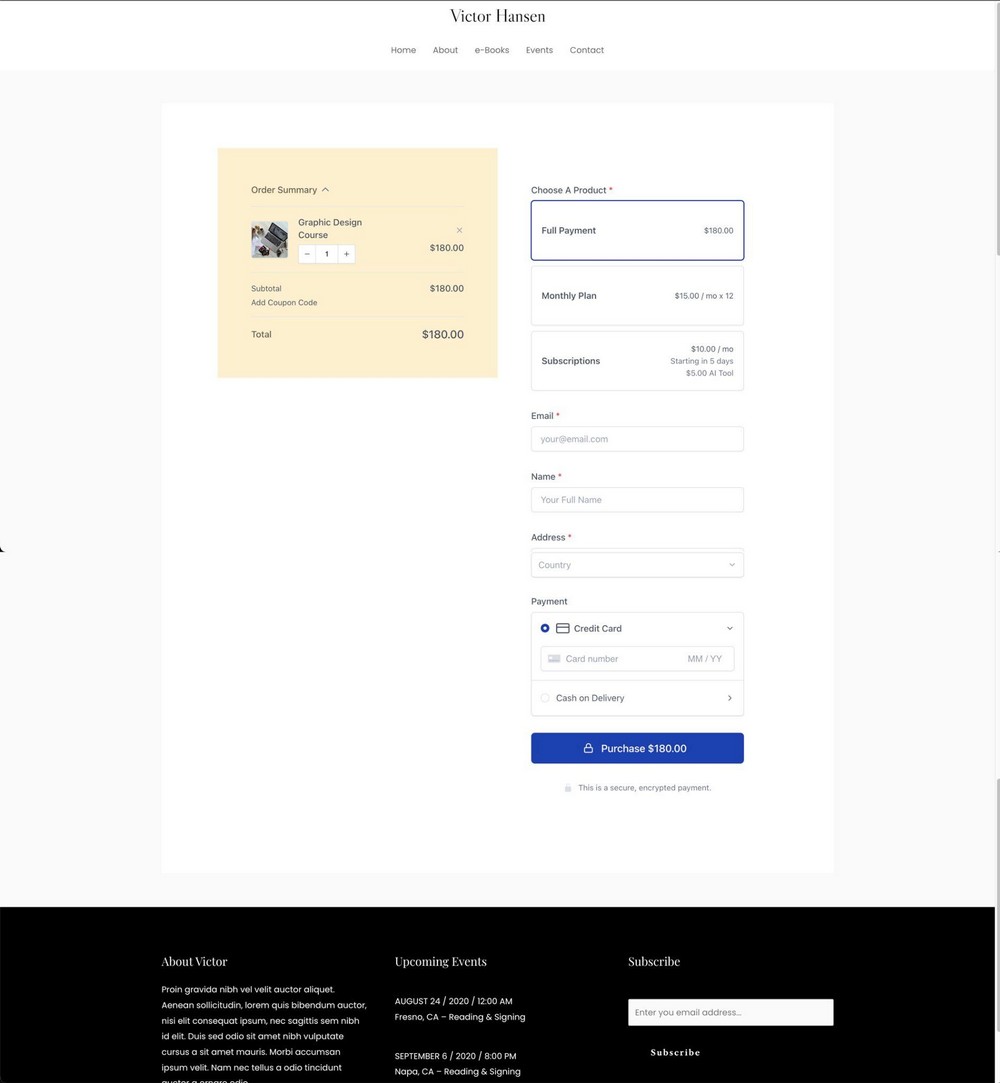
We should remove them to make the page more optimized.
Open this checkout page in edit mode and press the Astra icon in the top right corner.
This will reveal page-related settings in the right sidebar.
Scroll down to Disable Elements and enable the options Disable Header and Disable Footer.
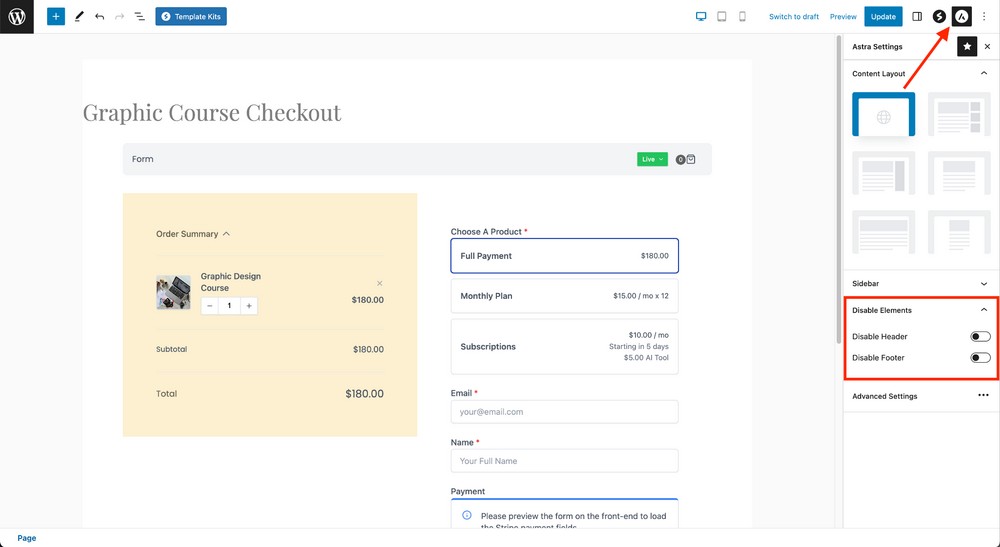
Press the Update button to save changes.
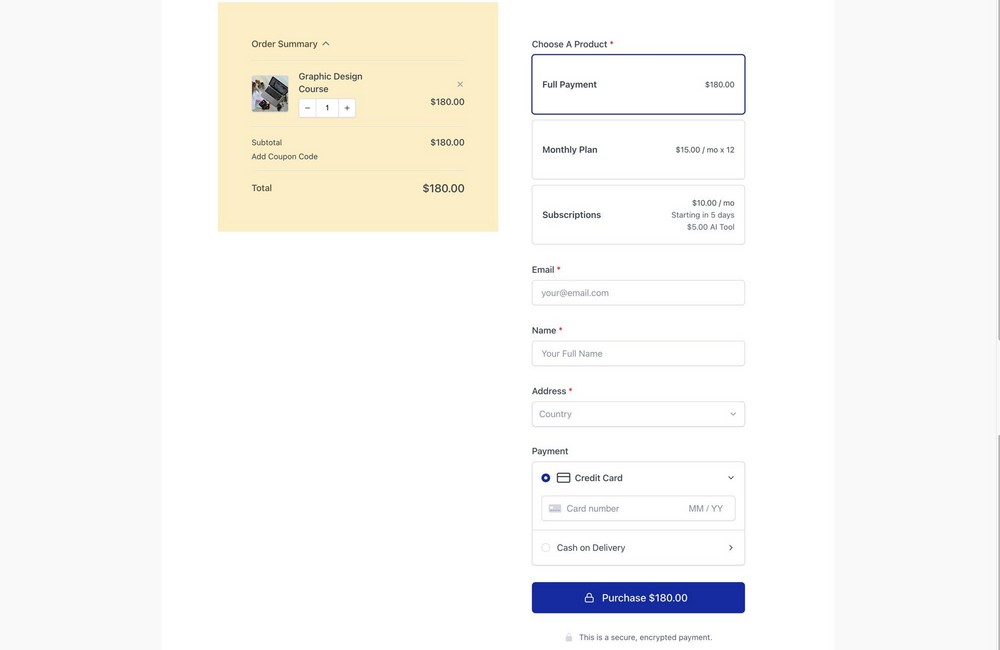
These are just a few of the things we did to show you how you can easily customize a checkout form to suit your needs.
For it to have a look you like, you can do a variety of things with the SureCart, Astra and Spectra combination.
If you aren’t on the Astra theme, you can use similar settings in your theme or page builder to disable the header and footer areas for your checkout page.
Accept donations
Here is what you need to do to start accepting donations through SureCart.
First we need to create a product. Go to SureCart > Products and press the Add New button.
In the next step, choose a suitable name for your product and press the Create button.
When the product detail page opens up, add an image and press the + Add A Price button to choose a product for donation.
Next, choose Payment Type as One Time, set the default price to $1 and enable the option Allow customers to pay what they want.
The last option is essential to correctly link this product to a donation form.
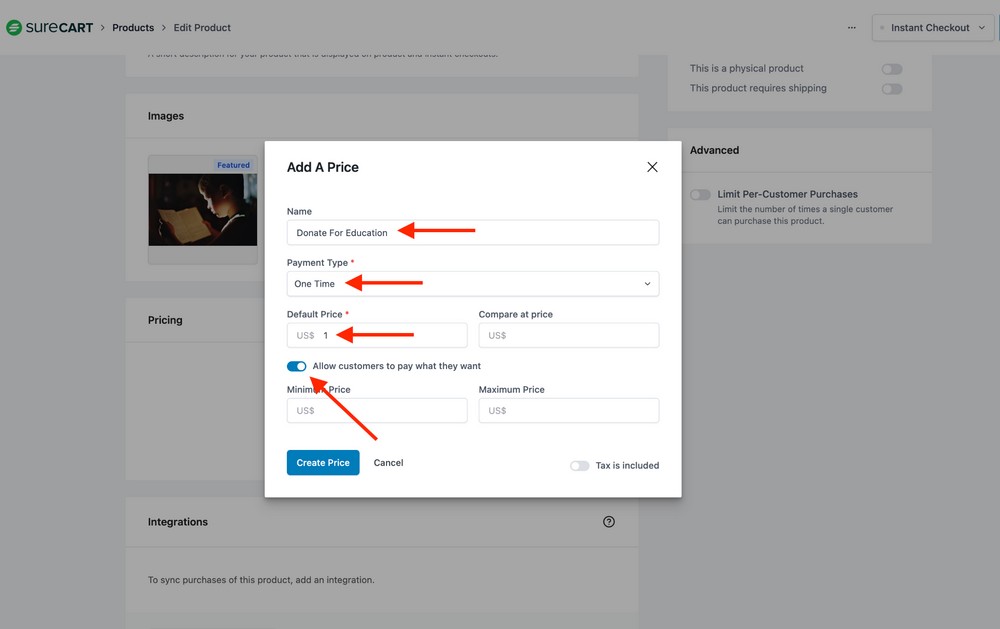
Press the Create Price button when you are done.
Press the Save Product button in the top right corner to save changes.
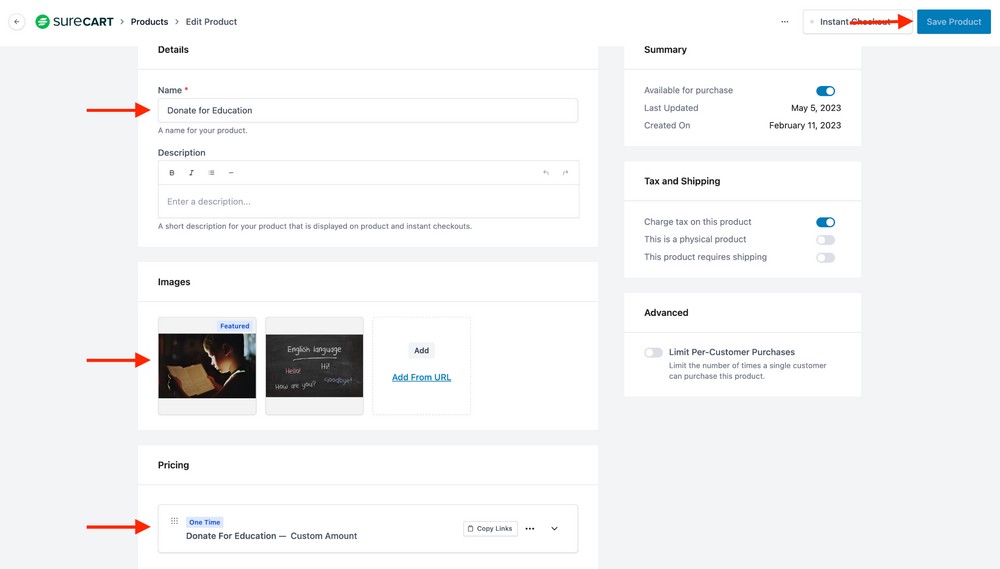
Now, we need to add this product to a checkout form. SureCart provides a dedicated checkout form for donations.
As we discussed previously, you can create checkout forms in multiple ways: From Pages or Forms.
Let’s create this form through pages.
Go to Pages > Add New to open the page editor. First thing we need to do is choose a title.
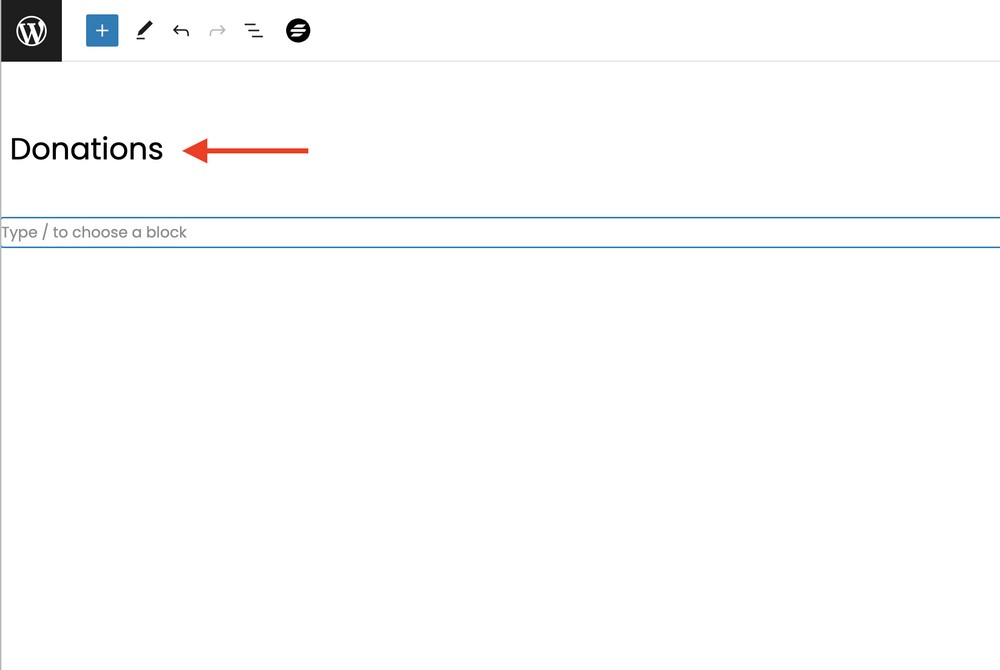
Type “/” in the block editor to choose the Checkout Form block from the block list.
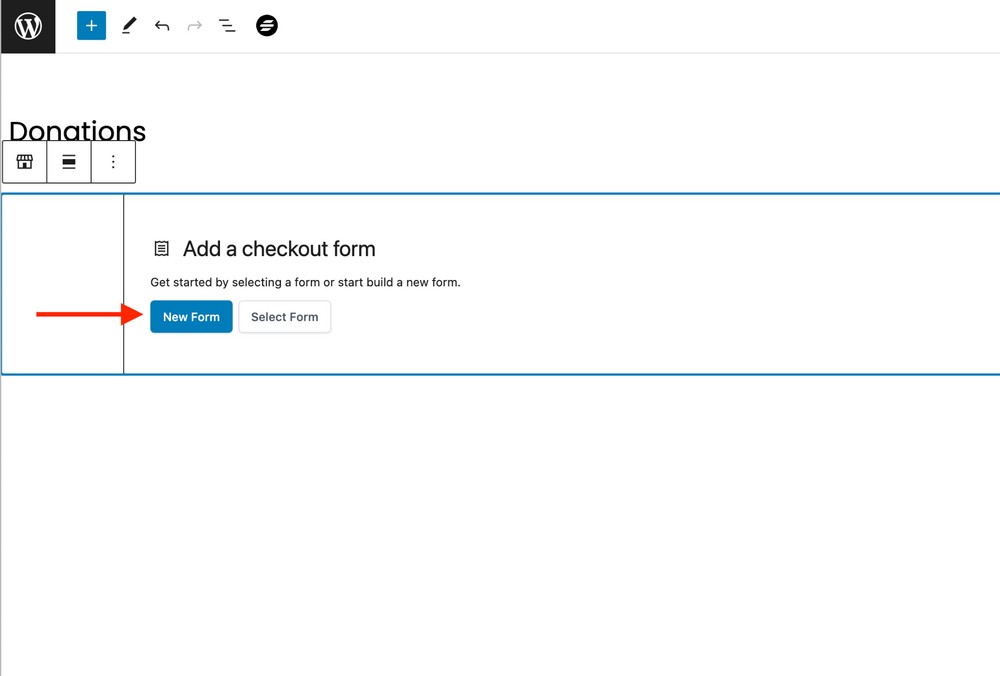
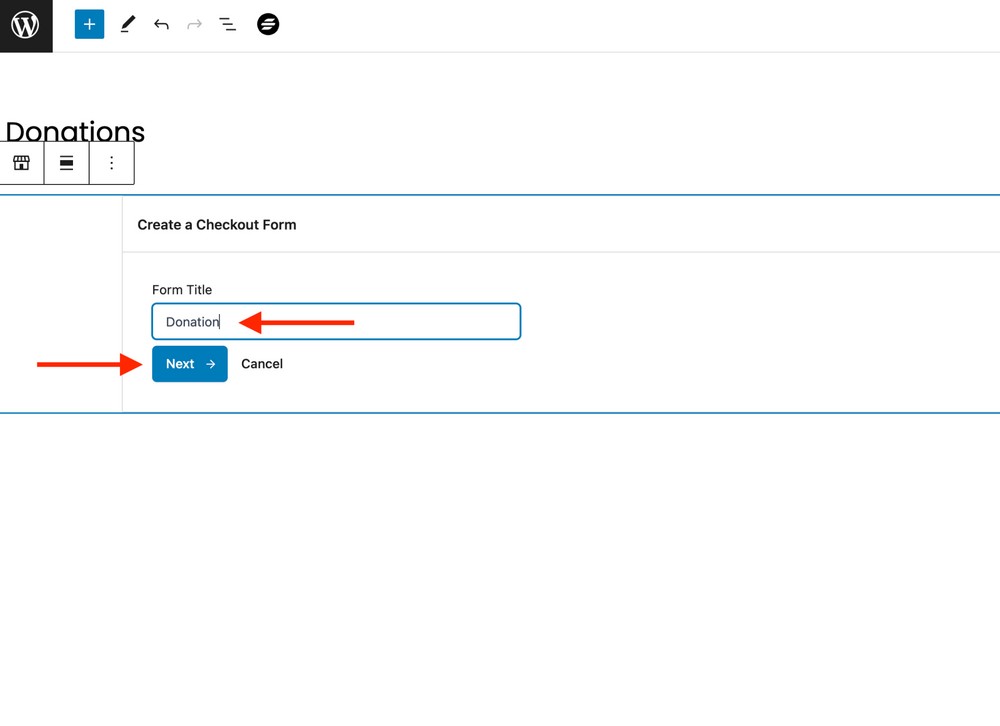
Press the New Form button and choose a form title on the following screen.
Since we want to create a donation form, we will name it accordingly. Press the Next button after selecting the title.
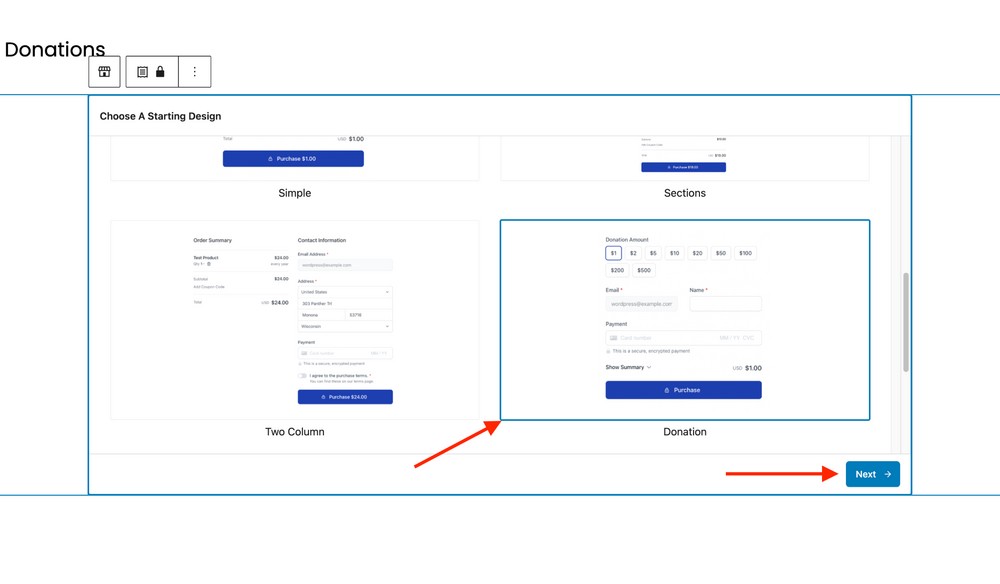
Find and select the predesigned Donation template and press the Next button.
On the following screen, choose the product from the list we created earlier.
Once you have selected the product, press the Create button to enter the last step.
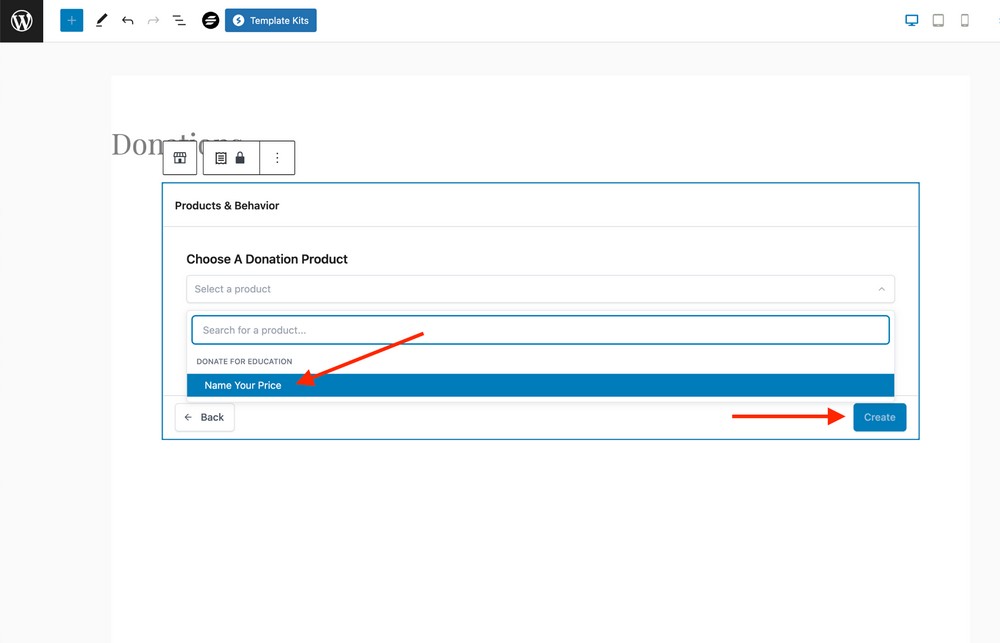
Press the Publish button to save changes and publish the donation checkout page.
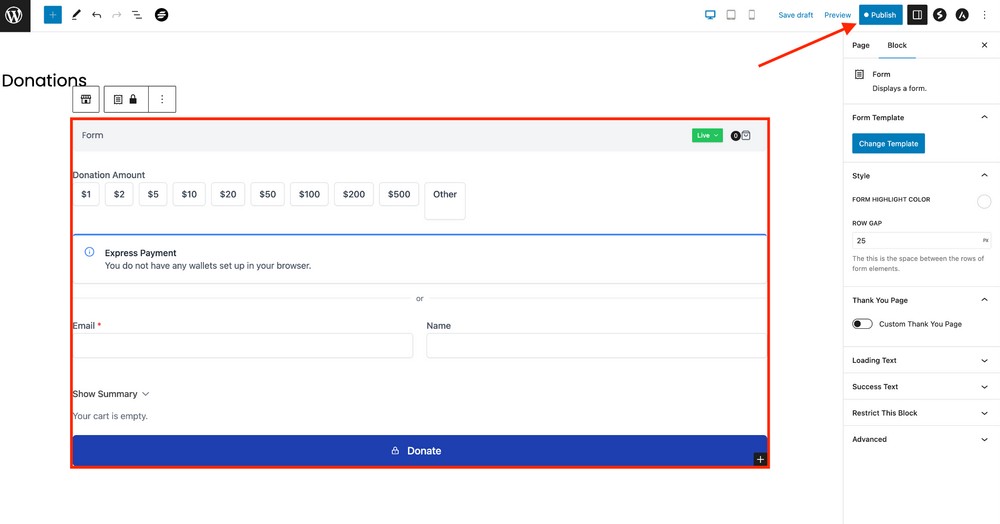
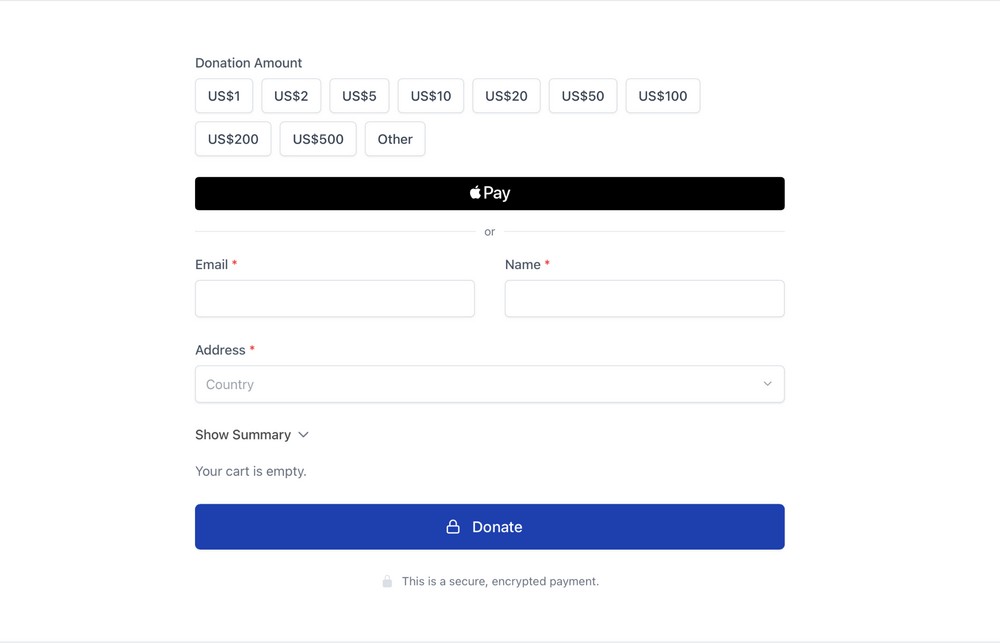
Here is how the donation page should appear on the live site.
Add a coupon
Coupons are an excellent way to keep your customers happy. With SureCart you can manage coupons easily and offer them however you want.
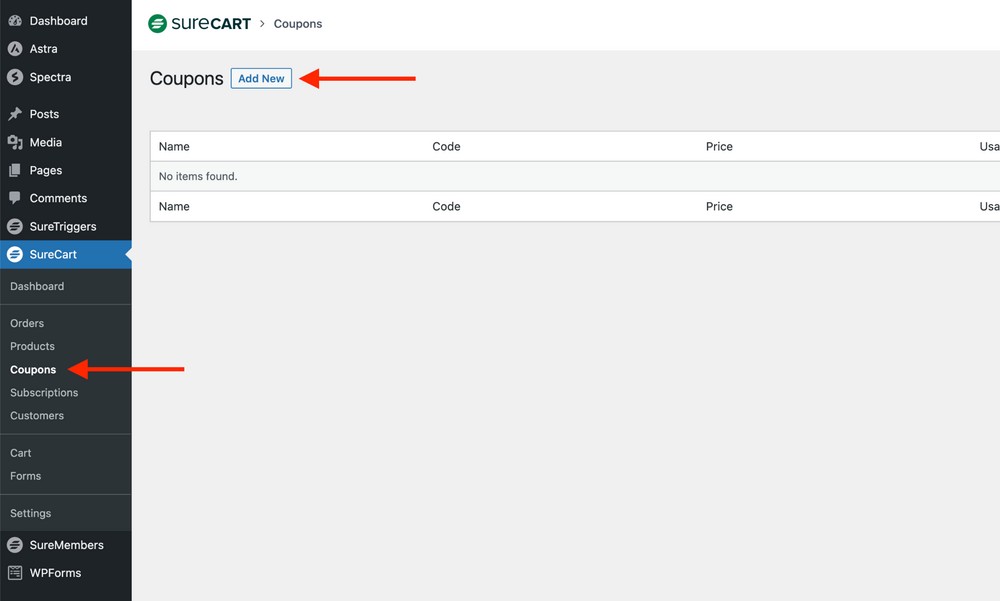
You can add a coupon from SureCart > Coupons.
Press the Add New button to open the coupon form.
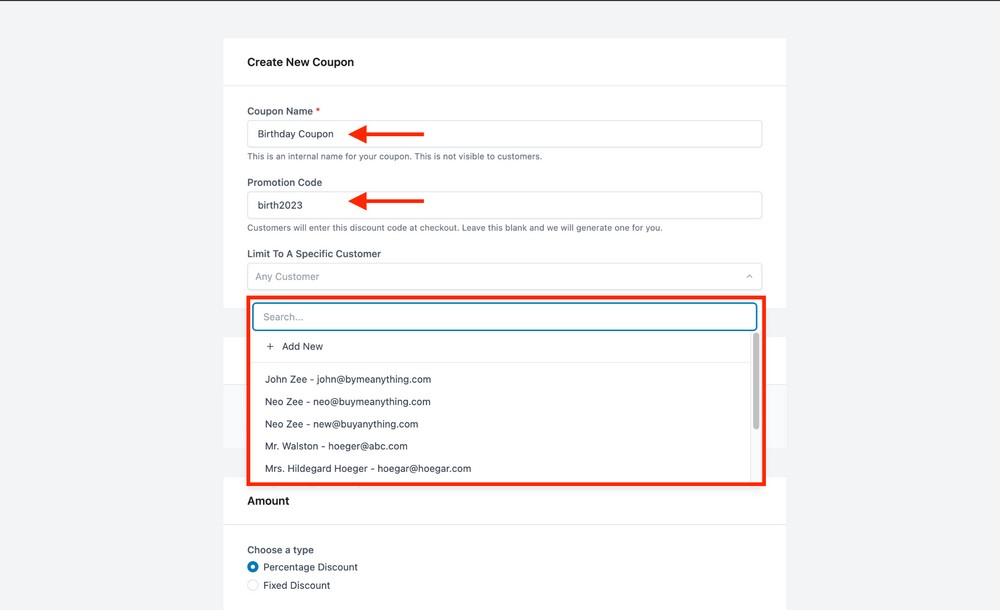
You can name the coupon anything relevant to the event you want it to be used for.
Next, choose a promotion code. We recommend keeping it simple to make it easy for users to type and remember.
You can offer this coupon to anyone or choose specific customers for the offer.
For this purpose, you can use the Limit To A Specific Customer option.
Next, use the Product Restriction option to restrict this coupon to specific products.
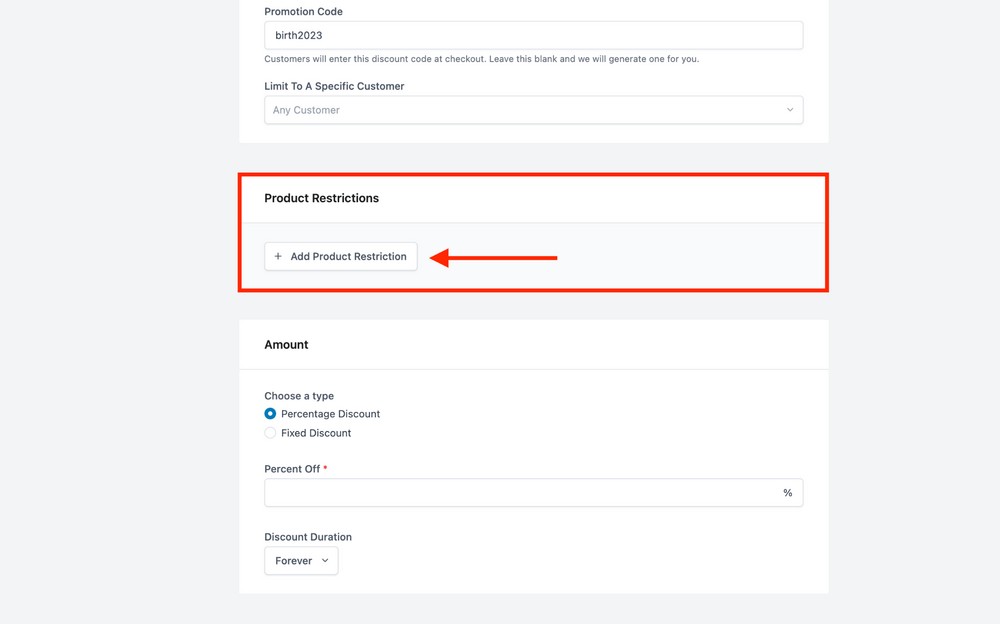
Press the + Add Product Restriction button to show a list of available products for this coupon.
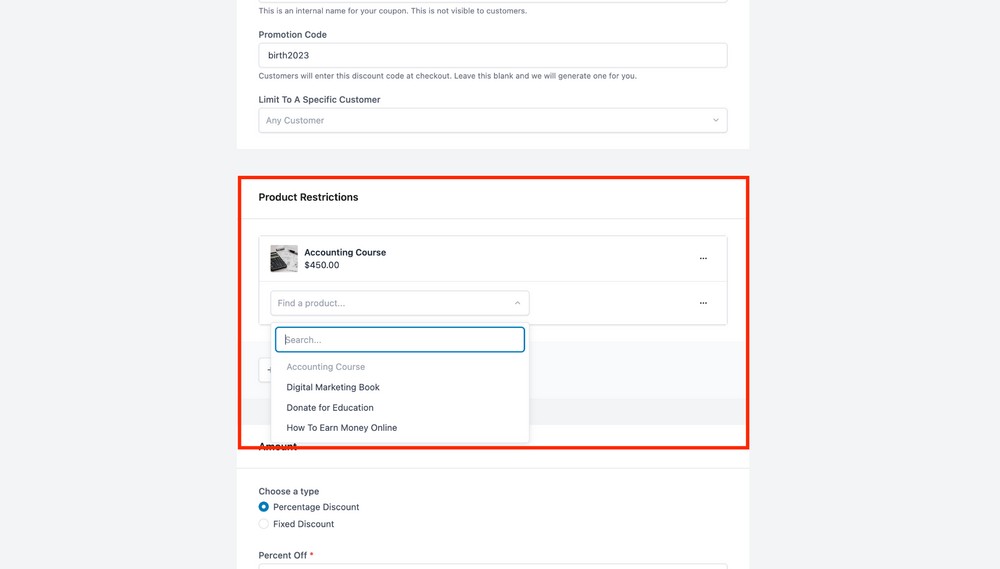
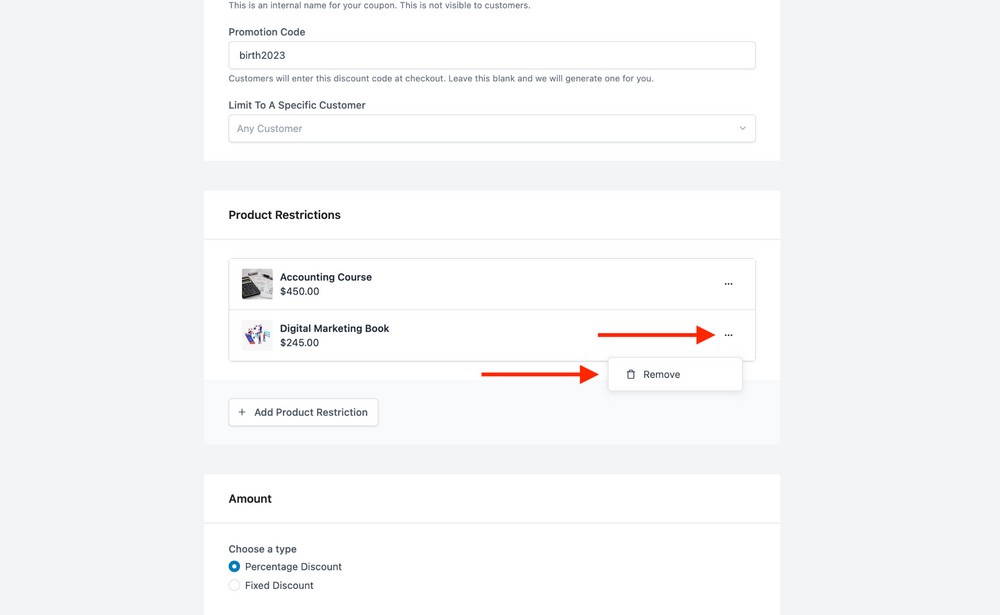
You can attach multiple products to a coupon.
Whenever you want to remove an assigned product, press three tiny dots inside the product widget to reveal the Remove button.
Press it and that’s it.
Next, you want to choose how your coupon benefits your customers.
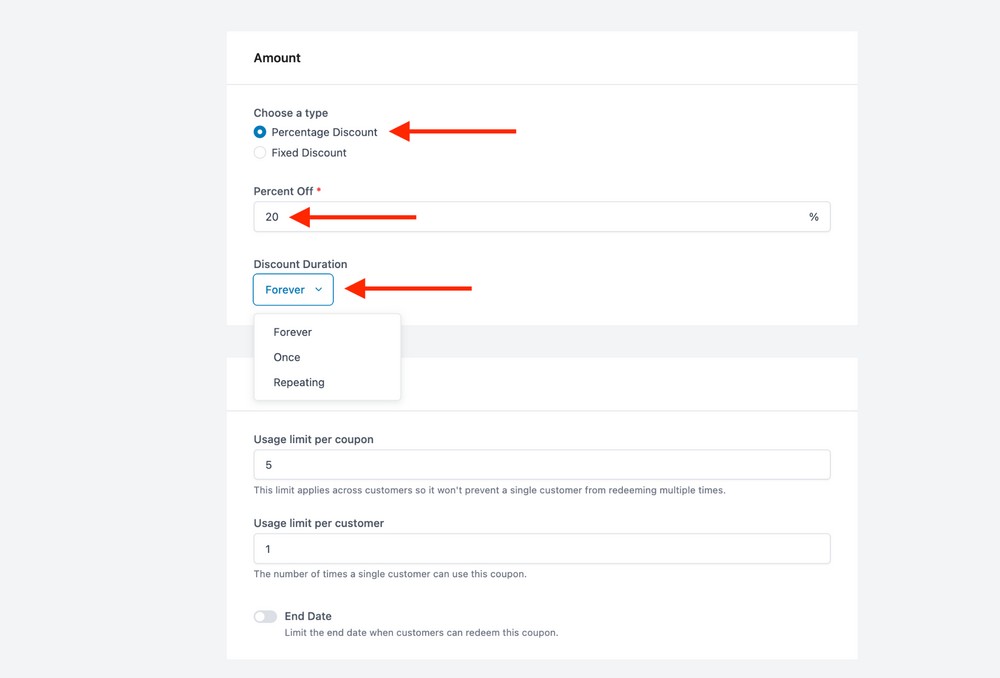
In the Amount widget, choose the type of discount from two options: Percentage Discount or Fixed Discount.
Just below, you can also choose from the list the duration this coupon is valid for: Forever, Once and Repeating.
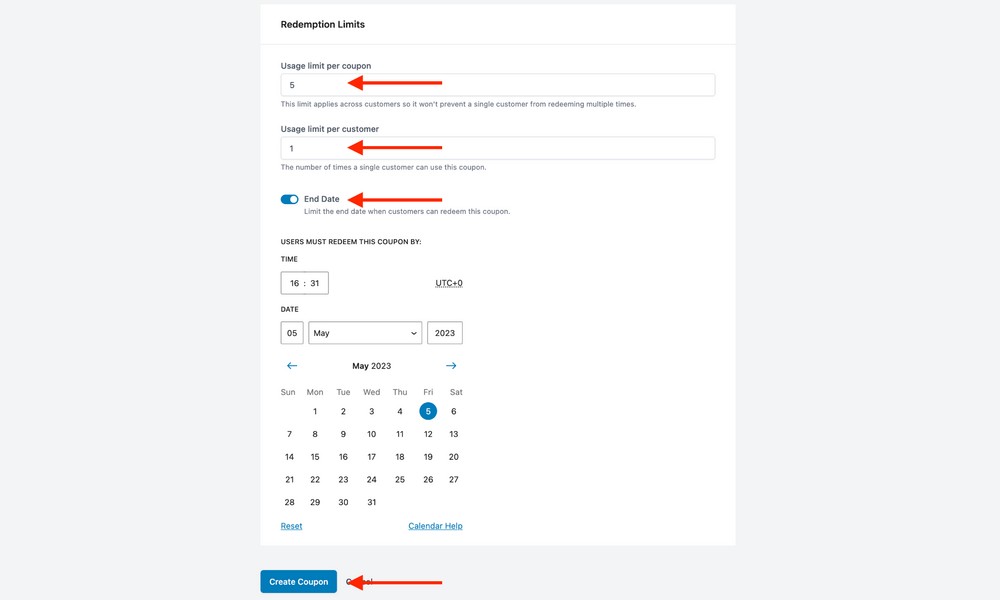
In the last step, determine the redemption limits for this coupon. You can set the usage limit per coupon, per customer and the end date here.
Press the Create button when you’ve completed everything.
Issue a refund or revoke access to a course
There are instances when refunds need to be issued or subscriptions revoked.
SureCart is designed to make things easy for store owners to issue refunds and revoke access.
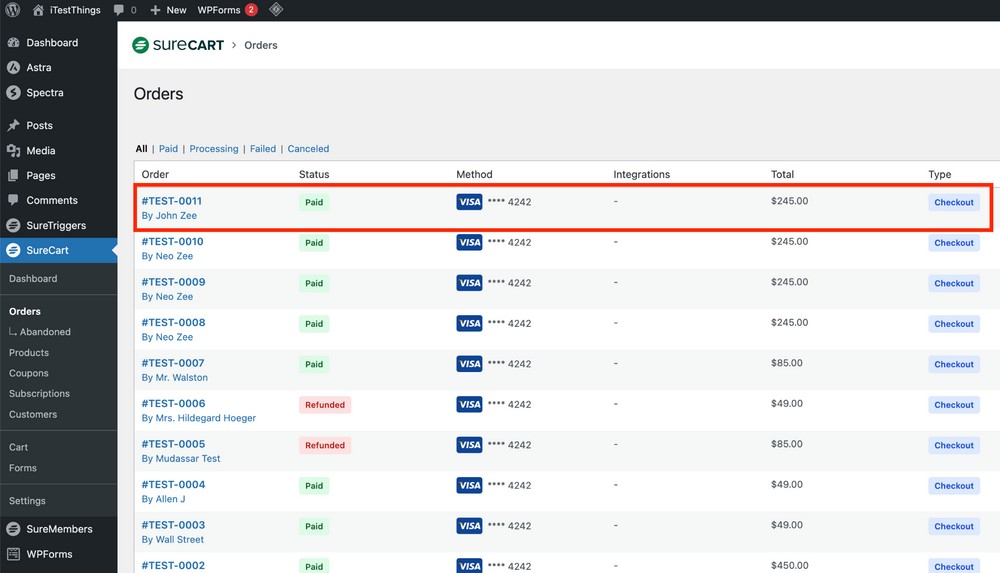
In WordPress admin, go to SureCart > Orders and click on the order you want to refund.
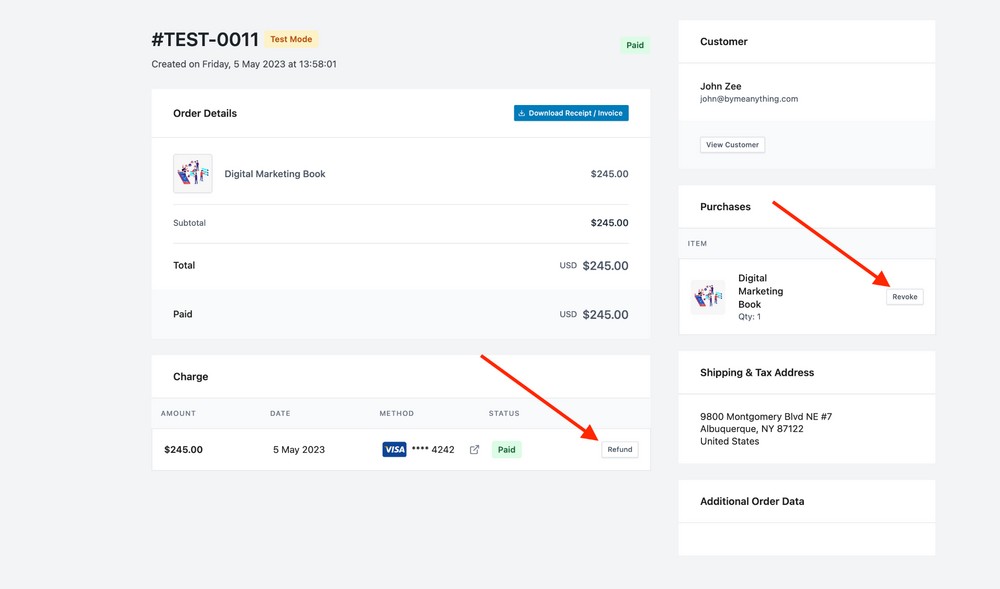
You will notice two buttons in the view order mode, Refund and Revoke.
Press the relevant button depending on your requirements.
When you press the Refund button, a window will pop up asking you how the refund should proceed.
You can change the amount you want to refund. It can be different from the total order amount.
From the list of possible refund reasons, select the one you want.
And lastly, you can choose the product from the list of items this customer purchased.
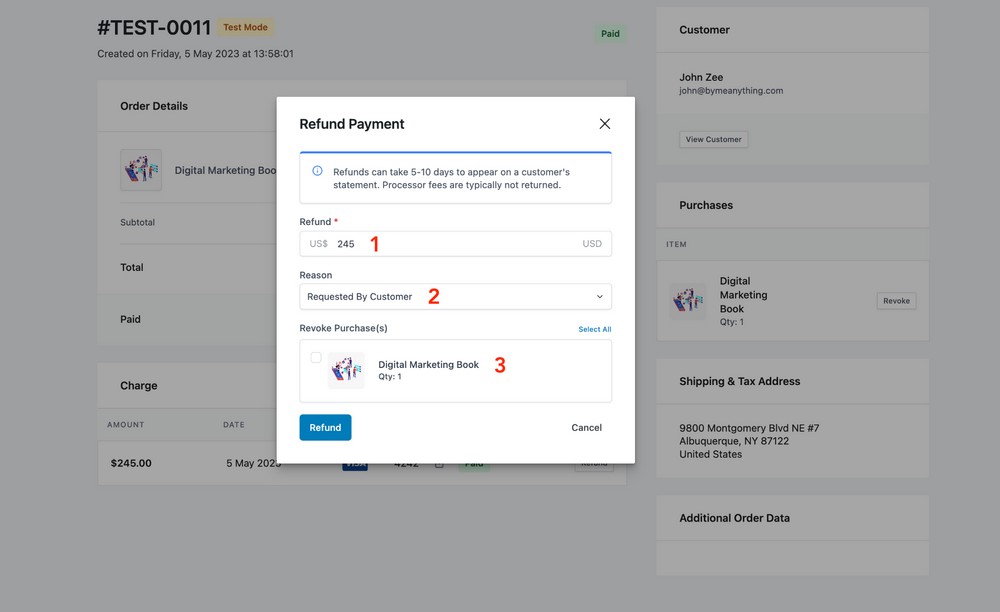
Press the Refund button once you finalize the details.
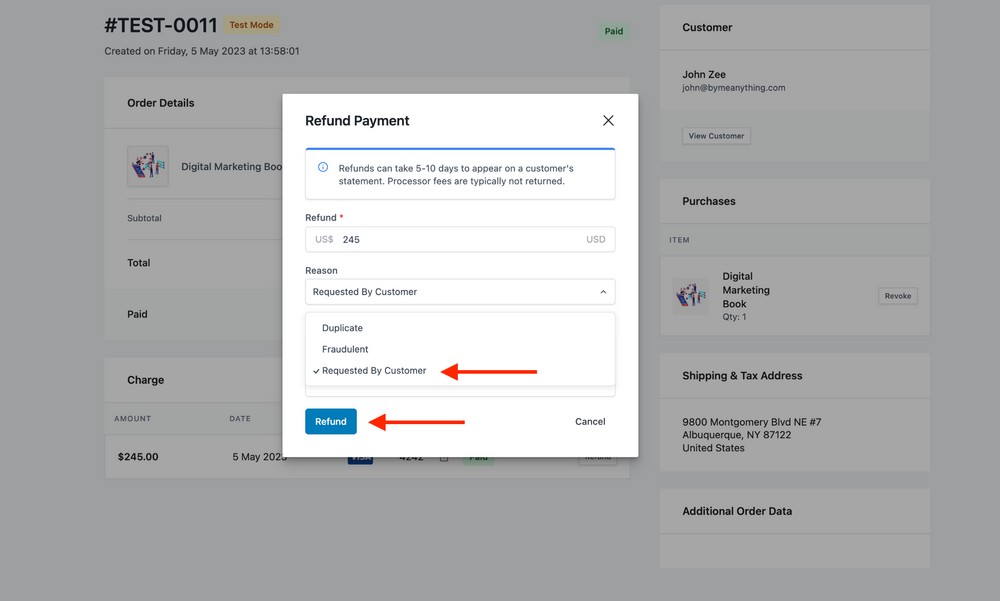
In some cases, a refund can be given while still allowing the customer to continue using the product.
If this is the case, skip revoking the order.
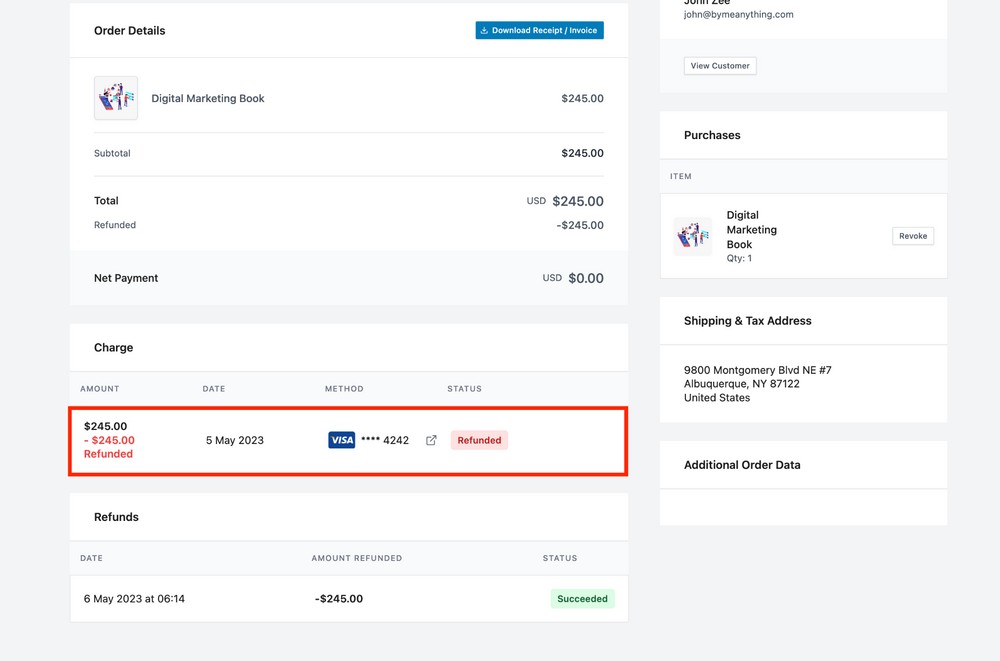
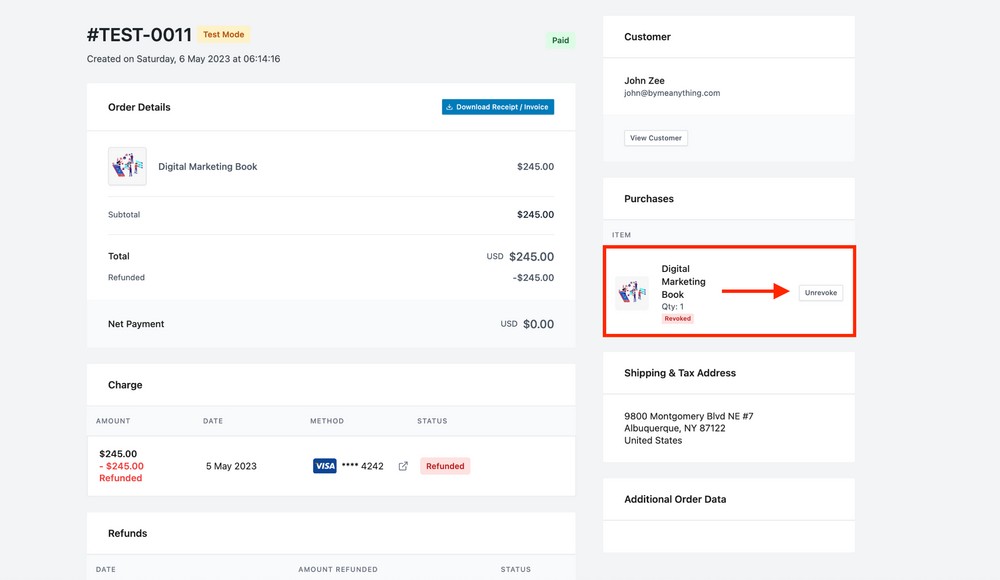
If you also want to end access to your product, press the Revoke button to do so.
Final thoughts
Choosing SureCart for your eCommerce project is a wise decision. It’s not merely a plugin for selling products, it’s a complete solution that helps you with everything.
You can sell any product, manage orders, follow up with customers through automatic emails, send them offers, recover abandoned carts, manage subscriptions, taxes, payment processing and much more.
All from a single interface.
It doesn’t end there. You can customize and automate anything you want.
In this comprehensive tutorial, you’ll learn everything you need to know about SureCart as a beginner. Even if you’re already using it, you will still find tons of helpful materials.
Have you built your online store with SureCart? Do you need us to help you with something? We are all ears!
Disclosure: This blog may contain affiliate links. If you make a purchase through one of these links, we may receive a small commission. Read disclosure. Rest assured that we only recommend products that we have personally used and believe will add value to our readers. Thanks for your support!
No place for size or color variations for physical products?
Hello Jeffrey, we have these coming up for Physical products soon! 🙂
Hello,
How to redirect users to the home page and not to the customer dashboard
Thanks
Hello Jean.
This is definitely something you can accomplish.
Set it up so that your thank you page will be redirected to your home page from the SureCart checkout form.
For more information you can follow this article – https://staging-storefront.surecart.com/docs/custom-thank-you-page/.
Best,